

Pas Apicella
Secure your application from Argo CD to Kubernetes
GitOps is a popular framework for managing and securing the application development pipeline. For many who have embarked on a GitOps journey, a common question is: “how can I secure my pipeline when everything is automated?”
The GitOps framework is a concept where any code commits or changes are done through Git, which then triggers an automated pipeline that builds and deploys applications on Kubernetes. Because there are few touch points for development and security teams in the pipeline, its security needs to be mandated to ensure the deployed applications have as few vulnerabilities as possible.
This blog covers how Snyk can provide application security in GitOps, focusing on a popular tool, Argo CD. In this scenario, Snyk runs an IaC scan to ensure the to-be-deployed application is safe before deployment, and stops the build if it is not. Snyk also can monitor the deployed applications across different namespaces in Kubernetes in an automated fashion.
https://snyk.io/blog/secure-apps-from-argocd-to-kubernetes/
Note for self: Snyk scan from ArgoCD
Demo
https://github.com/papicella/springbootemployee-api/tree/master/argocd
Demo Job on K8s to perform Snyk IaC Scan
apiVersion: batch/v1
kind: Job
metadata:
  name: snyk-iac-scan
  annotations:
    argocd.argoproj.io/hook: PreSync
spec:
  ttlSecondsAfterFinished: 600
  template:
    spec:
      containers:
        - name: snyk-cli
          image: snyk/snyk-cli:npm
          command: ["/bin/sh","-c"]
          args:
            - git clone https://github.com/papicella/springbootemployee-api.git;
              snyk auth $SNYK_TOKEN;
              snyk iac test springbootemployee-api/argocd/employee-K8s.yaml || true;
          env:
            - name: SNYK_TOKEN
              valueFrom:
                secretKeyRef:
                  name: snyk-token
                  key: token
      restartPolicy: Never
  backoffLimit: 0

Using Pulumi to automate the Snyk Kubernetes integration for containers
Better late than never finally got around to posting this today.
In this blog post, we will walk through the process of using Pulumi, a new open source tool that allows developers to build code in multiple languages like JavaScript, Typescript, Python, and Go to create all that is required to configure the Kubernetes integration in Snyk Container.
https://snyk.io/blog/automate-snyk-kubernetes-pulumi/
Find and fix vulnerabilities in your CI/CD pipeline with Snyk and Harness
Integrating the Snyk developer-focused security platform into Harness’ unified delivery pipeline workflow ensures security and compliance testing is part of every release. This allows you to prevent applications with vulnerable dependencies and code from making their way into production. With modern tooling like Snyk and Harness, you can find, fix, and remediate through a CI/CD pipeline and mitigate the risk to the business without affecting your ability to release software quickly.
Created a new Snyk Blog with the harness team as per the link below.
https://snyk.io/blog/find-fix-vulnerabilities-ci-cd-pipeline-snyk-harness/
Using harness CI to run a series of Snyk Tests
When DevOps emerged more than 10 years ago, the main focus was to bridge the gaps between Dev and Ops teams by introducing automation to the processes of building, testing and deployment of applications.
As development teams continue to deliver more rapidly and more frequently, security teams are finding it difficult to keep up and often end up being the bottleneck in the delivery pipeline. For this reason, bringing security early into the DevOps process from the outset – in other words, embracing a DevSecOps culture within a business – has become increasingly important.
Applications have changed as cloud-native technologies like Containers, Kubernetes, and the use of Infrastructure as Code technologies like Terraform, Cloudformation, ARM templates are now the norm. These elements are now built and customized by developers and live in their Source Code Management repositories.
In this demo below I show you how Harness CI along with Snyk can help setup a DevSecOps Pipeline well before we even think about deployment.
Note: We are using the public GitHub repo below
https://github.com/papicella/springbootemployee-api
1. First we need to identify our user token within Snyk. For enterprise customers you can setup service accounts and retrieve a token which we will require later. For non enterprise Snyk accounts you can just use the main User Token. Both methods of how to obtain this are defined below.
Service Accounts
https://docs.snyk.io/features/integrations/managing-integrations/service-accounts
For those without access to service accounts you can obtain your Snyk user Token as follows
https://docs.snyk.io/features/snyk-cli/install-the-snyk-cli/authenticate-the-cli-with-your-account
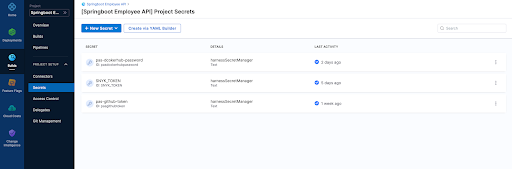
2. In harness let's define a few secrets one being our Snyk Token we retrieved in step 1, also my GitHub token
3. Our builds need to run somewhere in this example we are using a connector to our K8s cluster which is defined at the "Organization" level within Harness


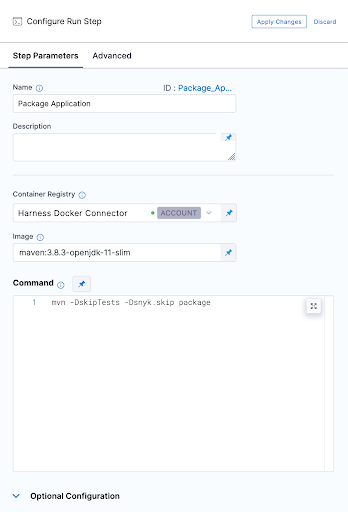
4. Our first execution step is simply going to package the application. Our Spring Boot application is using maven and has a single pom.xml file. Notice below that we have to use a Docker connector for a "Build-> Run" step , here I am using an account level Docker connector
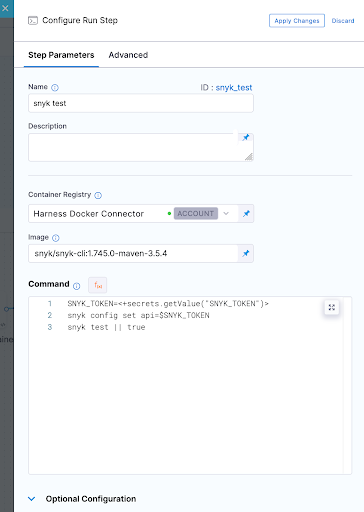
5. Now we can run our first Snyk Test. In this simple example we don't fail the build at all and ensure we pass a SUCCESS exit code for our Snyk Open Source test which will pick up the one and only pom.xml file in the repo. I am also using Snyk Docker image that includes the Snyk CLI and Maven to perform this test.
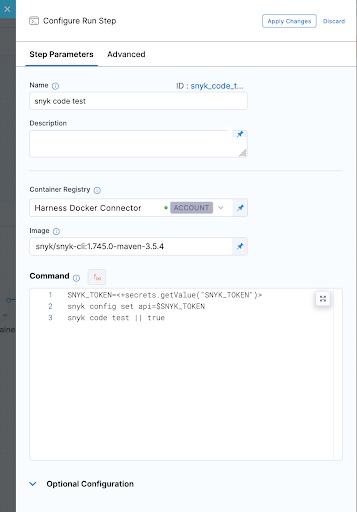
6. So jumping right ahead let's quickly take a look at our other 3 tests.
Snyk Code Test
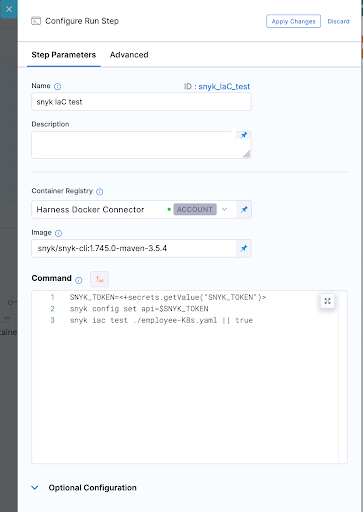
Snyk IaC test
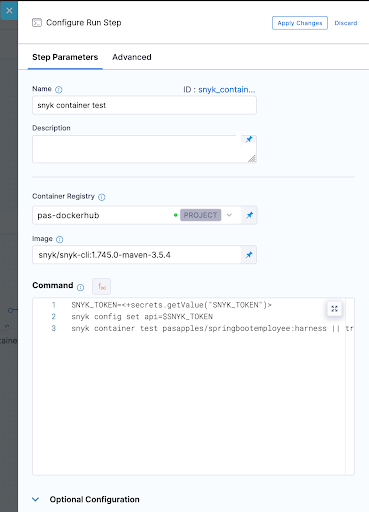
Snyk Container Test
In all these Snyk Tests we ensure nothing fails instead we just report on vulnerabilities. WE could also set our severity threshold as part of our tests as shown below.
--severity-threshold=medium
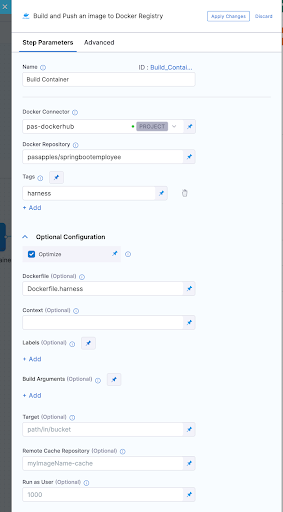
7. In order to run the container test we had to build our container image which was done using a "Build and push image to Dockerhub" step as shown below
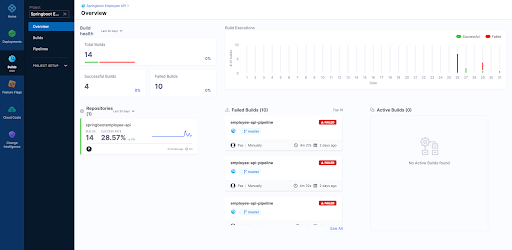
8. Now after running a few builds our Overview page on Harness UI nicely summarises what has passed versus what has failed for us.
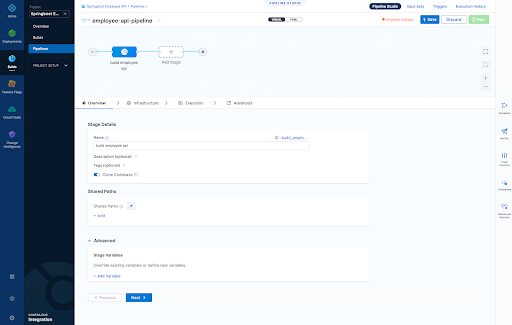
9. Finally we can view each build as follows

Overview Page
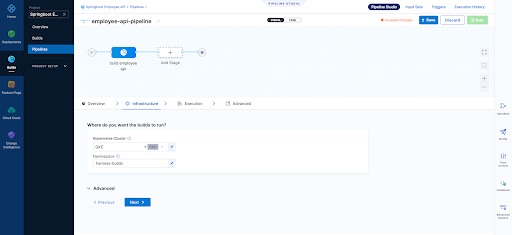
Infrastructure Page - Here we define where are harness delegate running in a K8s cluster which is just one of the options here when it comes to a worker node for the pipeline steps we run
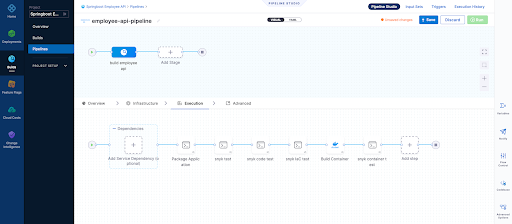
- Snyk Open Source Test
- Snyk Code Test
- Snyk IaC Test
- Snyk Container Test
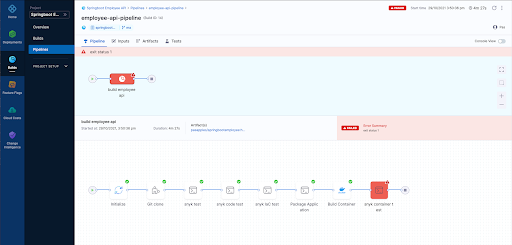
Pipeline Result Page
For those that wish to see the whole pipeline YAML here it is below:
pipeline: name: employee-api-pipeline identifier: employeeapipipeline projectIdentifier: Springboot_Employee_API orgIdentifier: default tags: {} properties: ci: codebase: connectorRef: pasgithub repoName: springbootemployee-api build: <+input> stages: - stage: name: build employee api identifier: build_employee_api description: "" type: CI spec: cloneCodebase: true infrastructure: type: KubernetesDirect spec: connectorRef: org.GKE namespace: harness-builds execution: steps: - step: type: Run name: Package Application identifier: Package_Application spec: connectorRef: account.harnessImage image: maven:3.8.3-openjdk-11-slim command: mvn -DskipTests -Dsnyk.skip package privileged: false - step: type: Run name: snyk test identifier: snyk_test spec: connectorRef: account.harnessImage image: snyk/snyk-cli:1.745.0-maven-3.5.4 command: |- SNYK_TOKEN=<+secrets.getValue("SNYK_TOKEN")> snyk config set api=$SNYK_TOKEN snyk test || true privileged: false failureStrategies: [] - step: type: Run name: snyk code test identifier: snyk_code_test spec: connectorRef: account.harnessImage image: snyk/snyk-cli:1.745.0-maven-3.5.4 command: |- SNYK_TOKEN=<+secrets.getValue("SNYK_TOKEN")> snyk config set api=$SNYK_TOKEN snyk code test || true privileged: false when: stageStatus: Success failureStrategies: [] - step: type: Run name: snyk IaC test identifier: snyk_IaC_test spec: connectorRef: account.harnessImage image: snyk/snyk-cli:1.745.0-maven-3.5.4 command: |- SNYK_TOKEN=<+secrets.getValue("SNYK_TOKEN")> snyk config set api=$SNYK_TOKEN snyk iac test ./employee-K8s.yaml || true privileged: false when: stageStatus: Success failureStrategies: [] - step: type: BuildAndPushDockerRegistry name: Build Container identifier: Build_Container spec: connectorRef: pasdockerhub repo: pasapples/springbootemployee tags: - harness dockerfile: Dockerfile.harness optimize: true - step: type: Run name: snyk container test identifier: snyk_container_test spec: connectorRef: pasdockerhub image: snyk/snyk-cli:1.745.0-maven-3.5.4 command: |- SNYK_TOKEN=<+secrets.getValue("SNYK_TOKEN")> snyk config set api=$SNYK_TOKEN snyk container test pasapples/springbootemployee:harness || true privileged: false resources: limits: memory: 2048Mi variables: []
Snyk
Harness
Using Buildkite to perform Snyk Open Source and Snyk Code (SAST) tests
Buildkite is a platform for running fast, secure, and scalable continuous integration pipelines on your own infrastructure. In the example below I will run my Buildkite pipeline on my Macbook to perform two Snyk Tests, one for Open-Source dependancies and the other a SAST test of the code itself.
Snyk is an open source security platform designed to help software-driven businesses enhance developer security.
You will need an account on Snyk and Buildkite to follow the steps below.
Steps1. First in Snyk let's create a Service Account which will be the Snyk token I will use to authenticate with. You can use the Snyk API Token but the service account is all you need to run "Snyk Tests" so makes sense to use that.

2. Next let's store that Service Account token somewhere where I can safely inject that into my pipeline at the appropriate step. In this example I am using "Google Secret Manager" but there are other choices of course.

Note: We will be using the secret NAME shortly "PAS_BUILDKITE_SA_SNYK_TOKEN"
3. You will need a Buildkite agent on your local Infrastructure in my case I using my Macbook so that's done as follows
https://buildkite.com/docs/agent/v3/macos
4. You're now ready to create a pipeline. A pipeline is a template of the steps you want to run. There are many types of steps, some run scripts, some define conditional logic, and others wait for user input. When you run a pipeline, a build is created. Each of the steps in the pipeline end up as jobs in the build, which then get distributed to available agents.
In the example below our pipeline is created from a GitHub repo and then select the default branch. At that point incoming webhooks are sent to Buildkite by source control providers (GitHub, GitLab, Bitbucket, etc.) to trigger builds, in this scenario we using GitHub

5. Let's go ahead and actually just edit the build steps using YAML. My final YAML is as follows and I explain below why it looks this way but in short I just want to run two snyk tests rather then actually deploy anything for this demo.
Few things to note here:
- I am using a GCP secret manager plugin to retrieve my Snyk SA token with a name as follows "PAS_BUILDKITE_SA_SNYK_TOKEN"
- I am using a Google Service Account JSON so I can authenticate with GCP and retrieve my secret "SNYK_SA_TOKEN_VAR", you will need to use a Service Account with privileges to at least READ from Google Secret Manager
- I am using some local non sensitive ENV variables which get used at the appropriate time
- I have three commands of which the first command sets my Snyk API token for the Snyk CLI
- I have not installed the Snyk CLI because it already exists on my Macbook
- I am only looking for my Snyk tests to fail if it finds any CRITICAL issues only
- I should be running a "mvn package" here but I can still execute a "snyk test" without it for demo purposes as we have a pom..xml
- I could also build a container in the pipeline from the source code and then run a "snyk container test" as well, in fact I could even run "snyk iac test" against any IaC files in the repo as well
- If a test fails we can easily run "snyk monitor" to load the results into the Snyk App but for this demo we don't do that
6. Now we can manually run a build or wait for triggering event on our repo, here is some screen shots of what it looks like including some failures where we find vulnerabilities in a separate node.js repo


It makes more sense to create a Buildkite plugin for Snyk rather than execute commands using a script and here is an example of one below. Having said that the commands you run to execute a "snyk test" are simple enough to include in the pipeline YML without the need for a plugin here especially if you have infrastructure already setup with the ability to run the "snyk cli". A plugin would be the right approach here though as per the example below.
https://github.com/seek-oss/snyk-buildkite-plugin

Hopefully you have seen how easy it is to continuously avoid known vulnerabilities in your dependencies and code, by integrating Snyk into your continuous integration pipeline with Buildkite.
More InformationUsing the Elastic Snyk module to visualize Snyk imported project data with Elastic Kibana
Snyk is an open source security platform designed to help software-driven businesses enhance developer security
- vulnerabilities fileset: Collects all found vulnerabilities for the related organizations and projects
- audit fileset: Collects audit logging from Snyk, this can be actions like users, permissions, groups, api access and more.
- Sets the default paths to the log files (but don’t worry, you can override the defaults)
- Makes sure each multiline log event gets sent as a single event
- Uses ingest node to parse and process the log lines, shaping the data into a structure suitable for visualizing in Kibana
Here is how to get started with this currently BETA module
Steps1. First you will need an account on Snyk App and have imported a few projects so you have some vulnerability data to get started with. Here is an example of some imported projects which already exist in my Snyk App Account.

2. You will need an Elastic Cluster best way to get one of those if you don't have one is to head to the Elastic Cloud Service for a free trial
3. Next we need to install Elastic Filebeat. The quick start guide here is the best way to do that
https://www.elastic.co/guide/en/beats/filebeat/current/filebeat-installation-configuration.html
Couple of things here
- You need to run this command to enable the snyk module as shown below. In this example the module is already enabled so the output would differ the first time you run this.
Module snyk is already enabled
- Make sure you have configured connectivity to your Elastic Cluster as per the doc above. The example below is for the Elastic Cloud Service itself.
cloud.auth: "filebeat_setup:YOUR_PASSWORD"
4. With Elastic Filebeat installed and configured now we can setup the Snyk module to do that we perform the following.
Edit "./modules.d/snyk.yml"
The following link shows how to configure the snyk.yml file and what settings are available
https://www.elastic.co/guide/en/beats/filebeat/current/filebeat-module-snyk.html
Example Config to get started with:


5. At this point we can start Elastic Filebeat as shown below.
6. If we head to Kibana and go into the "Discover" Page we will see data flowing into the cluster by setting "event.module = snyk" on the "filebeat-*" index pattern as shown below.

Or maybe we want to use Dev Tools itself


7. Finally a Dashboard of some graphs as we monitor the "Snyk Data" coming into the cluster

Next Steps?
Kibana gives you the freedom to select the way you give shape to your data. With its interactive visualizations, start with one question and see where it leads you!!!. If it was me I would go straight to Kibana Lens. Kibana Lens is an easy-to-use, intuitive UI that simplifies the process of data visualization through a drag-and-drop experience it allowed me to create the dashboard page above in under 3 minutes even without knowing where to start.
https://www.elastic.co/kibana/kibana-lens
Want all your vulnerability data form the Snyk Platform within your Elastic Stack the "Elastic Snyk Module" will do that for you in a few easy steps.
More InformationSnyk Container meets Cloud Native Buildpacks: Cloud Native Application Security the right way
Released my first Snyk Blog post on how Snyk Container along with Cloud Native Buildpacks can mitigate the security risks of containerized applications.
https://snyk.io/blog/snyk-container-cloud-native-buildpacks-cloud-native-application-security/

Taking Snyk Code for Test Drive
Snyk Code is our newest addition to the Snyk platform. Snyk Code uses a revolutionary approach designed to be developer-first. Conventional Static Application Security Testing (SAST) tools are limited by lengthy scans times and poor accuracy, returning too many false positives, and eroding developer trust. Snyk Code makes developer efforts efficient and actionable.
In this short blog post let's take it for a test drive on a large Java Project.
Steps1. You will need an account on Snyk App sign up for free at snyk.io
2. Once you have an account and are logged in go ahead and enable "Snyk Code" as follows

3. Clone the following GitHub repo as follows.
https://github.com/papicella/CWE-Juliet-TestSuite-Java
4. Authenticate with "Snyk CLI" as shown below
Note: The following link will get the CLI installed for you
https://support.snyk.io/hc/en-us/articles/360003812538-Install-the-Snyk-CLI
$ snyk auth
5. Let's check the number of lines of code we scanning as follows. Here we are making sure we only scan Java Source files as that's all that exists in this repo in any case. Snyk Code supports other programming languages as well like Python, JavaScript etc.
So we have close 2.5 million lines of code here of course that counts lines of empty space such as carriage returns BUT still that's lots of code to scan.
6. Run your "Snyk Code" Test as follows to see two things , how long the scan took and the number of results returned. From this we can see the scan and results took less then 2 minutes!
$ time snyk code test ./Java/src
....
The following post shows some comparison data against other SAST engines and code repositories.
https://snyk.io/blog/sast-tools-speed-comparison-snyk-code-sonarqube-lgtm/
More InformationSnyk provides native integration for Atlassian Bitbucket Cloud security - Here is how!!!
The Snyk security integration is free and easy to set up with just a few clicks inside the Bitbucket Cloud product. For the first time, developers can consume information that was previously only available inside Snyk now within Bitbucket Cloud. Snyk enables developers to see new vulnerabilities as they emerge and implement fixes early and quickly in the process.
In this post we show how easily you can integrate Snyk into Bitbucket Cloud
Steps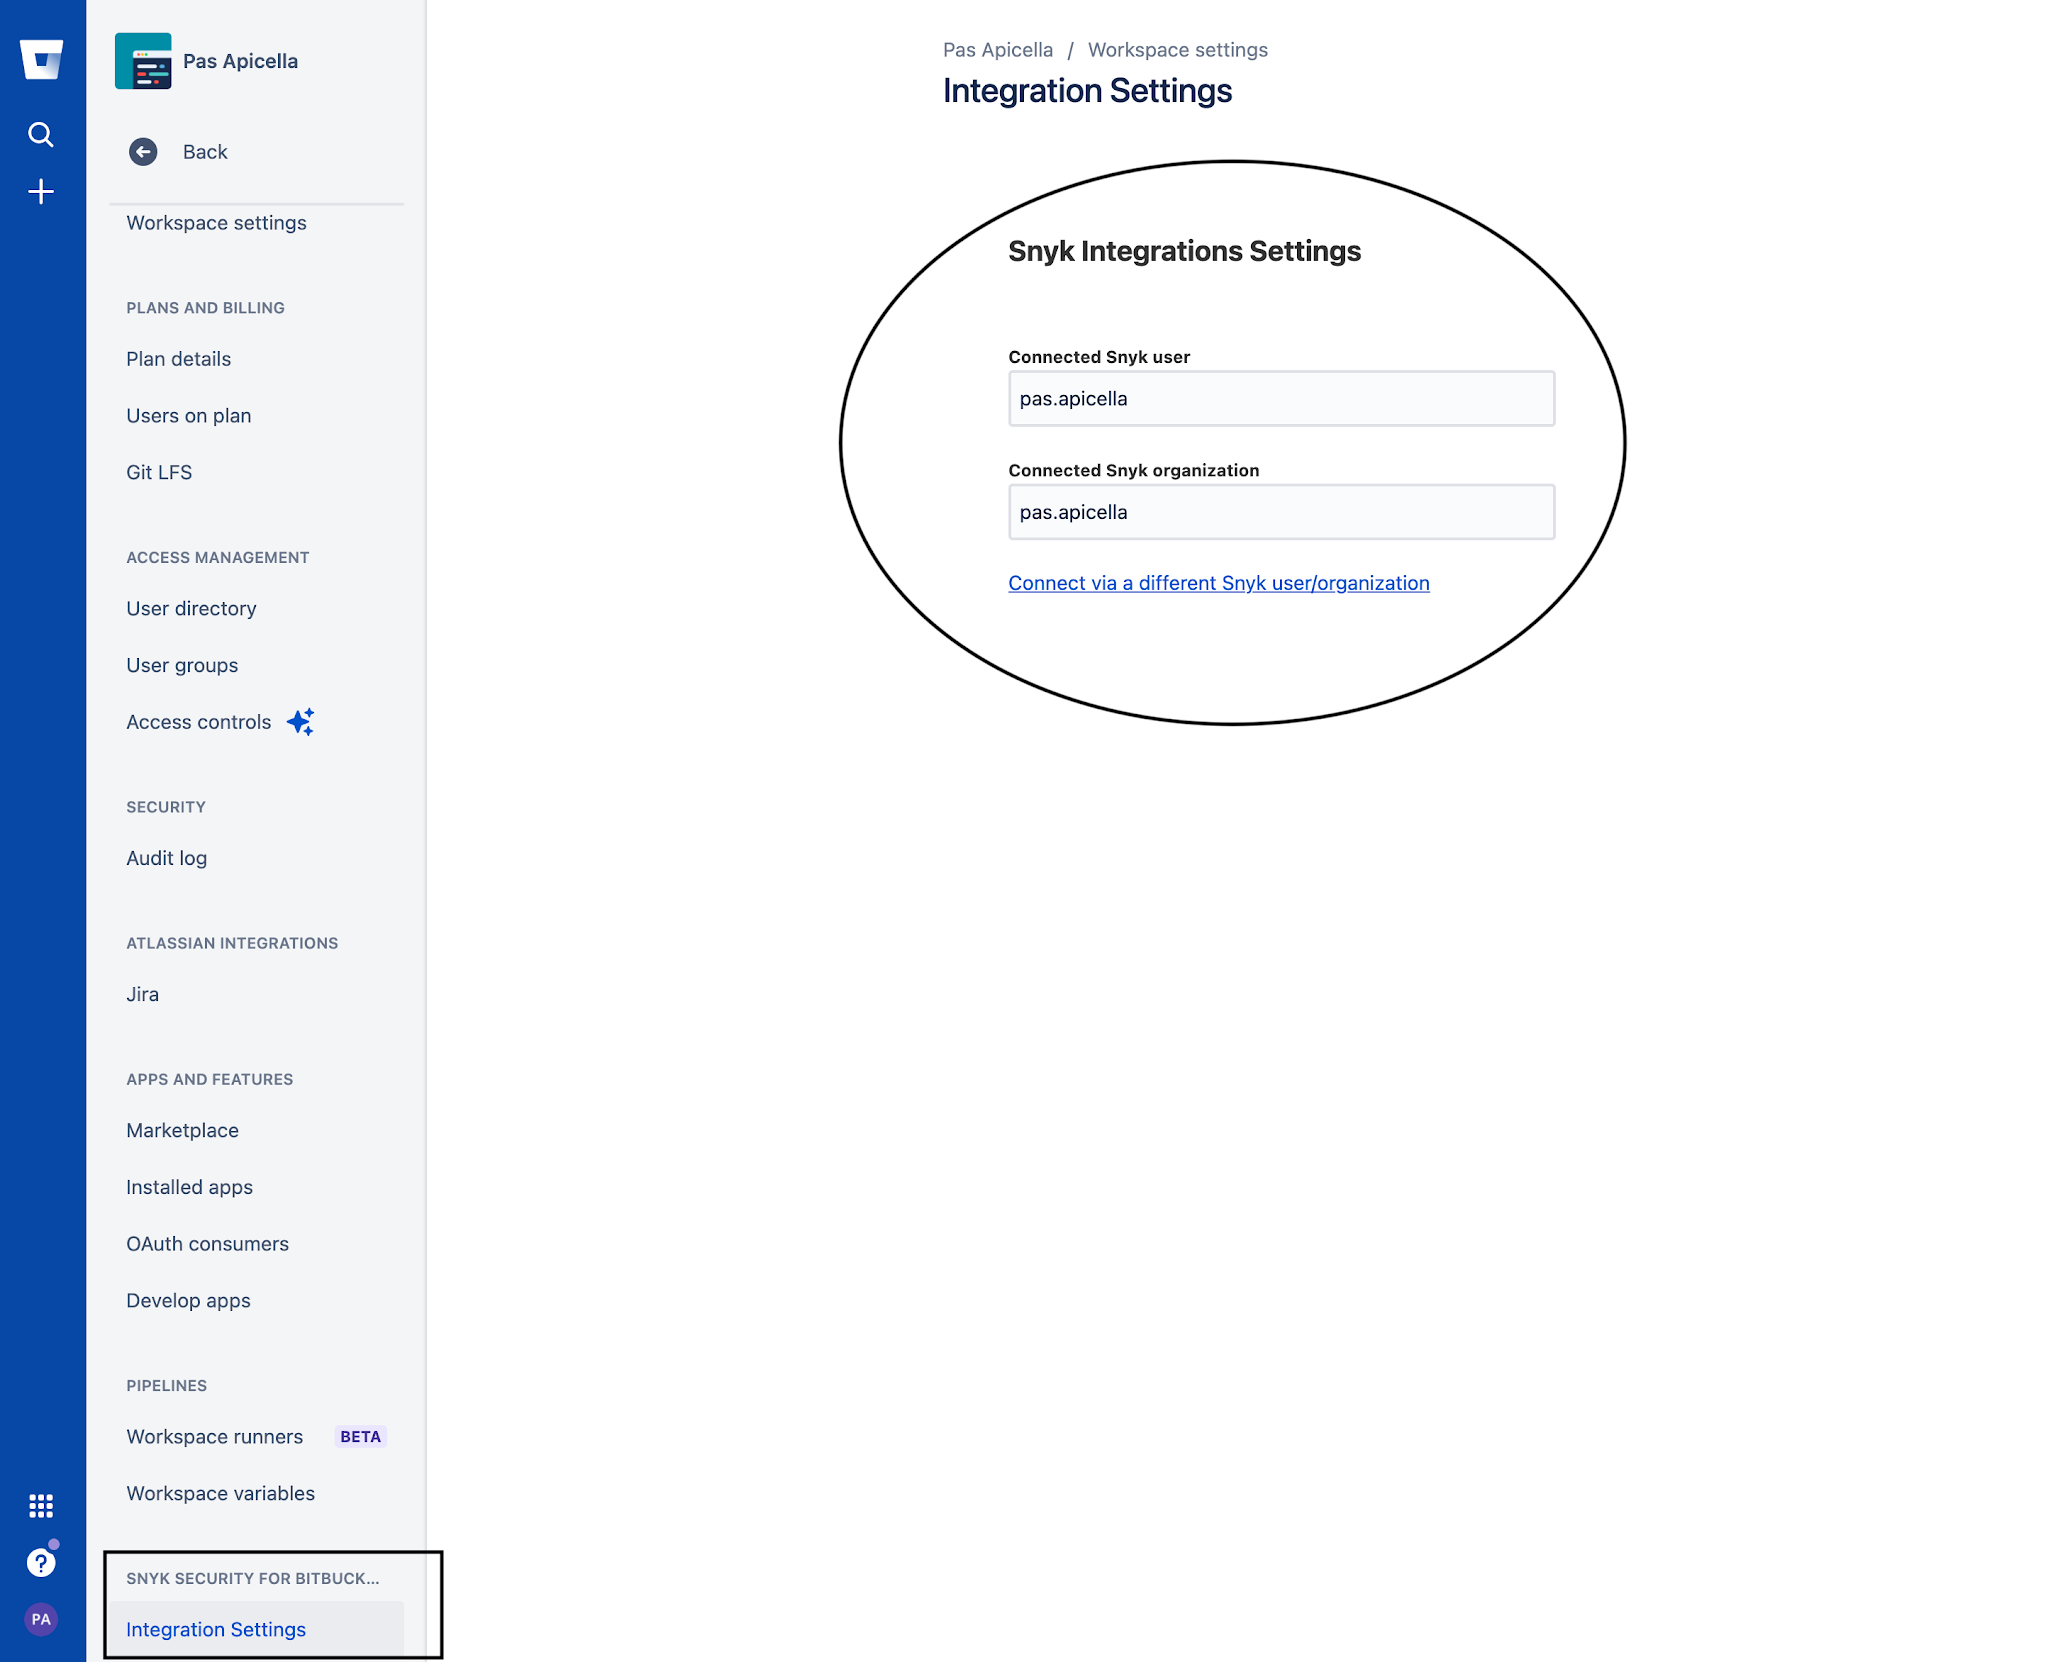


https://snyk.io/blog/snyk-native-integration-atlassian-bitbucket-cloud-security/?utm_campaign=PR-LH-Bitbucket-2021&utm_medium=Social&utm_source=Linkedin-Organic
Snyk Import Project API using Azure Repos
In this example below we show how you could import a Azure Repo directly from the Snyk API. The Snyk API is available to customers on paid plans and allows you to programatically integrate with Snyk.
API url
The base URL for all API endpoints is https://snyk.io/api/v1/
Authorization
To use this API, you must get your token from Snyk. It can be seen on https://snyk.io/account/ after you register with Snyk and login.
The token should be supplied in an Authorization header with the token, preceded by token:
Authorization: token API_KEY
StepsNote: You would have configured an Azure Repos Integration as shown below prior to running these steps


1. Authenticate with the CLI using your Snyk Token as follows
$ snyk auth TOKEN
Your account has been authenticated. Snyk is now ready to be used.
2. Log into your Azure DevOps account and verify which Project Repo you wish to import as per the image below

3. With your project selected you will need the following details to perform the Snyk API import request
owner: Name of your project

name: Name of your Repository

branch: Branch name you wish to import

4. Finally we will need our Organisation ID and Azure Repos ID which we retrieve from the Snyk UI as follows
organization ID
Setting > General -> Organization ID
Azure Repos ID
Setting > Integrations -> Azure Repos -> Edit Settings -> Scroll to bottom of page

Take of note of both ID's we will need them in the steps below
5. Now we are ready to import our Azure Repo using a command as follows. We are using a "curl" command to issue a POST request and this command is for a Mac OSX or linux system so it would need tweaking if running on Windows for example
Command
6. Set the ENV variables for ORG_ID and AZURE_REPO_ID as follows
export AZURE_REPO_ID=FROM_STEP-4
7. Run command
Finally switch back to the Snyk UI and verify you have imported the Azure repo as shown below

Basic Pipeline using Snyk Container, OCI Images, Azure DevOps all part of Cloud Native Application Security
Snyk Container will find vulnerabilities in containers and Kubernetes workloads throughout the SDLC by scanning any compliant OCI image which includes those created by Cloud Native Buildpacks or other build tools that create OCI images.
So what could an Azure DevOps Pipeline look like that incorporates the following using Snyk?
Running a Snyk Scan against the project repository


More Information
So, for Container and Kubernetes security, designed to help developers find and fix vulnerabilities in cloud native applications, click the links below to learn more and get started today.
Installing Snyk Controller into a k3d kubernetes cluster to enable runtime container scanning with the Snyk Platform
Snyk integrates with Kubernetes, enabling you to import and test your running workloads and identify vulnerabilities in their associated images and configurations that might make those workloads less secure. Once imported, Snyk continues to monitor those workloads, identifying additional security issues as new images are deployed and the workload configuration changes
In the example below we show you how easy it is to integrate the Snyk Platform with any K8s distribution in this case k3d running on my laptop.
Steps1. Install k3d using the instructions from the link below.
2. Create a cluster as shown below.
3. View the Kubernetes nodes.
4. Run the following command in order to add the Snyk Charts repository to Helm.
"snyk-charts" already exists with the same configuration, skipping
5. Once the repository is added, create a unique namespace for the Snyk controller:
$ kubectl create namespace snyk-monitor
6. Now, log in to your Snyk account and navigate to Integrations. Search for and click Kubernetes. Click Connect from the page that loads, copy the Integration ID. The Snyk Integration ID is a UUID, similar to this format: abcd1234-abcd-1234-abcd-1234abcd1234. Save it for use from your Kubernetes environment in the next step
Instructions link : https://support.snyk.io/hc/en-us/articles/360006368657-Viewing-your-Kubernetes-integration-settings
7. Snyk monitor runs by using your Snyk Integration ID, and using a dockercfg file. If you are not using any private registries which we are not in this demo, create a Kubernetes secret called snyk-monitor containing the Snyk Integration ID from the previous step and run the following command:
--from-literal=dockercfg.json={} \
--from-literal=integrationId=INTEGRATION_TOKEN_FROM_STEP_6
8. Install the Snyk Helm chart as follows:
--namespace snyk-monitor \
--set clusterName="k3d Dev cluster"
Release "snyk-monitor" does not exist. Installing it now.
NAME: snyk-monitor
LAST DEPLOYED: Wed Jun 2 17:47:13 2021
NAMESPACE: snyk-monitor
STATUS: deployed
REVISION: 1
TEST SUITE: None
9. Verify the Snyk Controller is running using either
NAME READY STATUS RESTARTS AGE
snyk-monitor-64c94685b-fwpvx 1/1 Running 3 21h
pod/springboot-app created
11. Head back to the Snyk Dashboard and click on your Kubernetes Integration Tile and you should see a list of applicable workloads to monitor in our case we just have the single app called "springboot-app".

12. Add the selected workload and your done!!!

More Information
https://support.snyk.io/hc/en-us/articles/360003916138-Kubernetes-integration-overview
Cloud Native Buildpacks meets Snyk Container
Cloud Native Buildpacks transform your application source code into images that can run on any cloud and avoid ever having a write Dockerfile again after all why would you even care about a Dockerfile?
So in today's post we are going to take a look at how Snyk App with Snyk Container can scan those Cloud Native Buildpack OCI images for you.
Snyk Container equips developers to quickly fix container issues. Use the following to find out more about Snyk Container - https://snyk.io/product/container-vulnerability-management/
You may not always have access to the original source code that runs in your containers, but vulnerabilities in your code dependencies are still important. Snyk can detect and monitor open source dependencies for popular languages as part of the container scan which is important because Cloud Native Buildpacks are building container images from source code using popular programming languages.
Demo1. First let's clone spring petclinic app and create our artifact for deployment.
$ cd spring-petclinic
0.18.1+git-b5c1a96.build-2373
At this point we are ready to go so let's create 3 OCI images and push them to 3 separate regitries as follows
- Dockerhub
- Amazon Elastic Container Registry (ECR)
- Google Cloud Registry (GCR)
8. Lets do a scan from the CLI by first authenticating with Snyk App as follows which will direct you to a browser to authenticate once done return to the prompt.
$ snyk auth
9. Now you can run a snyk container test to any of the 3 registries we used as follows.
$ snyk container test us.gcr.io/snyk-cx-se-demo/petclinic-google:latest
$ snyk container test 300326902600.dkr.ecr.us-east-1.amazonaws.com/petclinic:latest
$ snyk container test pasapples/petclinic:latest
Demo Output
...
Description: Information Exposure
Info: https://snyk.io/vuln/SNYK-UBUNTU1804-GCC8-572149
Introduced through: gcc-8/libstdc++6@8.4.0-1ubuntu1~18.04, apt/libapt-pkg5.0@1.6.13, apt@1.6.13, meta-common-packages@meta
From: gcc-8/libstdc++6@8.4.0-1ubuntu1~18.04
From: apt/libapt-pkg5.0@1.6.13 > gcc-8/libstdc++6@8.4.0-1ubuntu1~18.04
From: apt@1.6.13 > gcc-8/libstdc++6@8.4.0-1ubuntu1~18.04
and 2 more...
Organization: pas.apicella-41p
Package manager: deb
Project name: docker-image|us.gcr.io/snyk-cx-se-demo/petclinic-google
Docker image: us.gcr.io/snyk-cx-se-demo/petclinic-google:latest
Platform: linux/amd64
Licenses: enabled
Tested 97 dependencies for known issues, found 25 issues.
10. Back to Snyk App we can import all 3 OCI images from all 3 registries once we configure each integration for the registries as shown below


11. And take a look at where the vulnerabilities exist within those open source dependencies used in our petclinic source code as well as base image layer vulnerabilities


Give Snyk App a go yourself and start scanning those OCI container images built using Cloud Native Buildpacks now!!!More Information
Elastic Cloud with Observability 7.11 Using Rancher k3d for K8s
Started working locally with rancher's k3d to spin up K8s clusters so I thought why not use Elastic Cloud with Elastic Observability to monitor this local K8s cluster and even run container workloads that use Elastic APM to monitor the application through tracing.
- Monitors all layers of your technology stack, including:
- The host systems where Kubernetes is running.
- Kubernetes core components, nodes, pods, and containers running within the cluster.
- All of the applications and services running in Kubernetes containers.
- Automatically detects and monitors services as they appear dynamically.
- Provides a way to correlate related data so that you can group and explore related metrics, logs, and other observability data.
Some basic steps to get this running as per below. This was tested with Elastic Stack 7.11 using the Elastic Cloud Service
Pre Steps1. I have my Elastic stack running using Elastic Cloud as per the screen shot below

2. I have k3d installed on my Mac as follows
k3d version v4.0.0
k3s version latest (default)
3. You will need the kubectl CLI as well
Steps1. First let's start a K8s cluster as follows. I have created a 5 node K8s cluster with 1 master node but you can reduce the number of worker nodes if you don't have the memory to support this
$ k3d cluster create elastic-k3d --servers 1 --agents 5
2. Start your k3d cluster as follows if not already started
INFO[0000] Starting cluster 'elastic-k3d'
INFO[0000] Starting Node 'k3d-elastic-k3d-agent-4'
INFO[0000] Starting Node 'k3d-elastic-k3d-agent-3'
INFO[0000] Starting Node 'k3d-elastic-k3d-agent-2'
INFO[0001] Starting Node 'k3d-elastic-k3d-agent-1'
INFO[0001] Starting Node 'k3d-elastic-k3d-agent-0'
INFO[0001] Starting Node 'k3d-elastic-k3d-server-0'
INFO[0002] Starting Node 'k3d-elastic-k3d-serverlb'
3. Let's list out our nodes just to verify what you created
NAME STATUS ROLES AGE VERSION
k3d-elastic-k3d-server-0 Ready control-plane,master 34h v1.20.2+k3s1
k3d-elastic-k3d-agent-4 Ready <none> 34h v1.20.2+k3s1
k3d-elastic-k3d-agent-1 Ready <none> 34h v1.20.2+k3s1
k3d-elastic-k3d-agent-3 Ready <none> 34h v1.20.2+k3s1
k3d-elastic-k3d-agent-2 Ready <none> 34h v1.20.2+k3s1
k3d-elastic-k3d-agent-0 Ready <none> 34h v1.20.2+k3s1
Now it's time to "Monitor Kubernetes: Observe the health and performance of your Kubernetes deployments" To do that we could just follow this tutorial as shown below
https://www.elastic.co/guide/en/observability/7.11/monitor-kubernetes.html
4. When installing filebeat and metricbeat make sure you add your Elastic Cloud credentials which can be obtained from the Elastic Cloud deployments page and would have also been provided as a XLS file to download once you create your deployment
cloud.auth: elastic:{PASSWORD}
metricbeat-kubernetes.yaml (Notice how I have added a kubernetes_metadata processor)
processors:
- add_host_metadata:
- add_kubernetes_metadata:
cloud.id: pas-K8s:{PASSWORD}
cloud.auth: elastic:{PASSWORD}
5. Once installed filebeat and metricbeat PODS should be running as per the output below
NAME READY STATUS RESTARTS AGE
metricbeat-pbfvs 1/1 Running 2 32h
metricbeat-v5n8l 1/1 Running 2 32h
metricbeat-cdfz9 1/1 Running 2 32h
metricbeat-z85g8 1/1 Running 2 32h
metricbeat-4fxhh 1/1 Running 2 32h
6. At this point it's worth heading to Kibana Obserability page and from there you will see we have logs and metrics from our local k3d K8s cluster as shown below

7. Now click on Metrics view and you can clearly see each of your k3d K8s nodes and by clicking on any node you get a very convenient view of metrics, process, metadata and more all from a single page. This was one of the new Elastic 7.11 features for Observability

8. Finally to deploy a application to this K8s cluster and have Elastic APM instrument it's activity you can either use the example in the tutorial link provided above OR just follow this very simple example to get this done
https://github.com/papicella/elastic-customer-api-rest

Elastic APM with Java Applications on Kubernetes
This GitHub demo is a Spring Boot application which accesses relational database with Spring Data JPA through a hypermedia-based RESTful front end. You can use the repo instructions to deploy to K8s and inject automatically an Elastic Agent for APM Monitoring with Elastic Observability.
There is no code changes required simply use an Init Container on K8s to instrument your application on Elastic APM server as shown by this GitHub repo below.
https://github.com/papicella/elastic-customer-api-rest

Try it out on your Kubernetes cluster using Elastic Cloud using our free 14 day trial


Loading Australian Football League (AFL) Data into the Elastic Stack with some cool visulaizations
I decided to load some AFL data into the Elastic Stack and do some basic visualisations. I loaded data for all home and away plus finals games since 2017 so four seasons in total. Follow below if you want to do the same.
StepsNote: We already have Elasticsearch cluster running for this demo
$ curl -u "elastic:welcome1" localhost:9200
{
  "name" : "node1",
  "cluster_name" : "apples-cluster",
  "cluster_uuid" : "hJrp2eJaRGCfBt7Zg_-EJQ",
  "version" : {
    "number" : "7.10.0",
    "build_flavor" : "default",
    "build_type" : "tar",
    "build_hash" : "51e9d6f22758d0374a0f3f5c6e8f3a7997850f96",
    "build_date" : "2020-11-09T21:30:33.964949Z",
    "build_snapshot" : false,
    "lucene_version" : "8.7.0",
    "minimum_wire_compatibility_version" : "6.8.0",
    "minimum_index_compatibility_version" : "6.0.0-beta1"
  },
  "tagline" : "You Know, for Search"
}
First I need the data loaded into the Elastic Stack I did that using Squiggle API which you would do as follows
1. I use HTTPie rather then curl.
http "https://api.squiggle.com.au/?q=games;complete=100" > games-2017-2020.json
2. Now this data itself needs to be altered slightly so I can BULK load it into Elasticsearch cluster and I do that as follows. I use JQ to do this.
cat games-2017-2020.json | jq -c '.games[] | {"index": {"_id": .id}}, .' > converted-games-2017-2020.json
Snippet I what the JSON file now looks like
{"index":{"_id":1}}
{"round":1,"hgoals":14,"roundname":"Round 1","hteamid":3,"hscore":89,"winner":"Richmond","ateam":"Richmond","hbehinds":5,"venue":"M.C.G.","year":2017,"complete":100,"id":1,"localtime":"2017-03-23 19:20:00","agoals":20,"date":"2017-03-23 19:20:00","hteam":"Carlton","updated":"2017-04-15 15:59:16","tz":"+11:00","ascore":132,"ateamid":14,"winnerteamid":14,"is_grand_final":0,"abehinds":12,"is_final":0}
{"index":{"_id":2}}
{"date":"2017-03-24 19:50:00","agoals":15,"ateamid":18,"winnerteamid":18,"hteam":"Collingwood","updated":"2017-04-15 15:59:16","tz":"+11:00","ascore":100,"is_grand_final":0,"abehinds":10,"is_final":0,"round":1,"hgoals":12,"hscore":86,"winner":"Western Bulldogs","ateam":"Western Bulldogs","roundname":"Round 1","hteamid":4,"hbehinds":14,"venue":"M.C.G.","year":2017,"complete":100,"id":2,"localtime":"2017-03-24 19:50:00"}
{"index":{"_id":3}}
{"hscore":82,"ateam":"Port Adelaide","winner":"Port Adelaide","roundname":"Round 1","hteamid":16,"round":1,"hgoals":12,"complete":100,"id":3,"localtime":"2017-03-25 16:35:00","venue":"S.C.G.","hbehinds":10,"year":2017,"ateamid":13,"winnerteamid":13,"updated":"2017-04-15 15:59:16","hteam":"Sydney","tz":"+11:00","ascore":110,"date":"2017-03-25 16:35:00","agoals":17,"is_final":0,"is_grand_final":0,"abehinds":8}
3. Using DevTools with Kibana we can run a query as follows
Question: Get each teams winning games for the season 2020 before finals - Final Ladder
Query:
GET afl_games/_search
{
  "size": 0,
  "query": {
      "bool": {
        "must": [
          {
            "match": {
              "year": 2020
            }
          },
          {
            "match": {
              "is_final": 0
            }
          }
        ]
      }
    },
    "aggs": {
      "group_by_winner": {
        "terms": {
          "field": "winner.keyword",
          "size": 20
        }
      }
    }
}
Results:
Results
{
  "took" : 2,
  "timed_out" : false,
  "_shards" : {
    "total" : 1,
    "successful" : 1,
    "skipped" : 0,
    "failed" : 0
  },
  "hits" : {
    "total" : {
      "value" : 153,
      "relation" : "eq"
    },
    "max_score" : null,
    "hits" : [ ]
  },
  "aggregations" : {
    "group_by_winner" : {
      "doc_count_error_upper_bound" : 0,
      "sum_other_doc_count" : 0,
      "buckets" : [
        {
          "key" : "Brisbane Lions",
          "doc_count" : 14
        },
        {
          "key" : "Port Adelaide",
          "doc_count" : 14
        },
        {
          "key" : "Geelong",
          "doc_count" : 12
        },
        {
          "key" : "Richmond",
          "doc_count" : 12
        },
        {
          "key" : "West Coast",
          "doc_count" : 12
        },
        {
          "key" : "St Kilda",
          "doc_count" : 10
        },
        {
          "key" : "Western Bulldogs",
          "doc_count" : 10
        },
        {
          "key" : "Collingwood",
          "doc_count" : 9
        },
        {
          "key" : "Melbourne",
          "doc_count" : 9
        },
        {
          "key" : "Greater Western Sydney",
          "doc_count" : 8
        },
        {
          "key" : "Carlton",
          "doc_count" : 7
        },
        {
          "key" : "Fremantle",
          "doc_count" : 7
        },
        {
          "key" : "Essendon",
          "doc_count" : 6
        },
        {
          "key" : "Gold Coast",
          "doc_count" : 5
        },
        {
          "key" : "Hawthorn",
          "doc_count" : 5
        },
        {
          "key" : "Sydney",
          "doc_count" : 5
        },
        {
          "key" : "Adelaide",
          "doc_count" : 3
        },
        {
          "key" : "North Melbourne",
          "doc_count" : 3
        }
      ]
    }
  }
}
4. Finally using Kibana Lens to easily visualize this data using a Kibana Dasboard

Of course you could do much more plus load more data from Squiggle and with the power of Kibana feel free to create your own visualizations.
More InformationSquiggle API
Getting Started with the Elastic Stack
https://www.elastic.co/guide/en/elasticsearch/reference/current/getting-started.html
VMware Solutions Hub - Elastic Cloud on Kubernetes - the official Elasticsearch Operator from the creators
Proud to have worked on this with the VMware Tanzu team and Elastic team to add this to VMware Solution Hub page clearly highlighting what the Elastic Stack on Kubernetes really means.
Do you need to run your Elastic Stack on a certified Kubernetes distribution, bolstered by the global Kubernetes community allowing you to focus on delivering innovative applications powered by Elastic?
If so click below to get started:
https://tanzu.vmware.com/solutions-hub/data-management/elastic
More Information
https://tanzu.vmware.com/solutions-hub/data-management/elastic
How to Become a Kubernetes Admin from the Comfort of Your vSphere
My Talk at VMworld 2020 with Olive power can be found here.
Talk Details
In this session, we will walk through the integration of VMware vSphere and Kubernetes, and how this union of technologies can fundamentally change how virtual infrastructure and operational engineers view the management of Kubernetes platforms. We will demonstrate the capability of vSphere to host Kubernetes clusters internally, allocate capacity to those clusters, and monitor them side by side with virtual machines (VMs). We will talk about how extended vSphere functionality eases the transition of enterprises to running yet another platform (Kubernetes) by treating all managed endpoints—be they VMs, Kubernetes clusters or pods—as one platform. We want to demonstrate that platforms for running modern applications can be facilitated through the intuitive interface of vSphere and its ecosystem of automation tooling
https://www.vmworld.com/en/video-library/search.html#text=%22KUB2038%22&year=2020
java-cfenv : A library for accessing Cloud Foundry Services on the new Tanzu Application Service for Kubernetes
The Spring Cloud Connectors library has been with us since the launch event of Cloud Foundry itself back in 2011. This library would create the required Spring Beans from bound VCAP_SERVICE ENV variable from a pushed Cloud Foundry Application such as connecting to databases for example. The java buildpack then replaces these bean definitions you had in your application with those created by the connector library through a feature called ‘auto-reconfiguration’
Auto-reconfiguration is great for getting started. However, it is not so great when you want more control, for example changing the size of the connection pool associated with a DataSource.
With the up coming Tanzu Application Service for Kubernetes the original Cloud Foundry buildpacks are now replaced with the new Tanzu Buildpacks which are based on the Cloud Native Buildpacks CNCF Sandbox project. As a result of this auto-reconfiguration is no longer included in java cloud native buildpacks which means auto-configuration for the backing services is no longer available.
So is their another option for this? The answer is "Java CFEnv". This provide a simple API for retrieving credentials from the JSON strings contained inside the VCAP_SERVICES environment variable.
https://github.com/pivotal-cf/java-cfenv

So if you after exactly how it worked previously all you need to do is add this maven dependancy to your project as shown below.
        <dependency>
            <groupId>io.pivotal.cfenv</groupId>
            <artifactId>java-cfenv-boot</artifactId>
        </dependency>
Of course this new library is much more flexible then this and by using the class CfEnv as the entry point to the API for accessing Cloud Foundry environment variables your free to use the Spring Expression Language to invoke methods on the bean of type CfEnv to set properties for example plus more.
For more information read the full blog post as per below
Finally this Spring Boot application is an example of using this new library with an application deployed to the new Tanzu Application Service for Kubernetes.
https://github.com/papicella/spring-book-service

More Information
1. Introducing java-cfenv: A new library for accessing Cloud Foundry Services
2. Java CFEnv GitHub Repo
https://github.com/pivotal-cf/java-cfenv#pushing-your-application-to-cloud-foundry