

Yann Neuhaus

OTDS – Installation of Replicas fail if the OT Admin password is too long?
For simplicity, in this blog, I will refer to the first OTDS instance as the “Primary” (the synchronization master host, installed with ISREPLICA_TOPOLOGY=0=FALSE) and any additional instances as “Replicas” (installed with ISREPLICA_TOPOLOGY=1=TRUE). Over the past few years, I have installed and worked on around 20–30 different OTDS environments, some with a single instance and others with multiple instances (HA). Overall, it is not a bad piece of software, even though it could use improvements in certain areas (e.g.: c.f. this blog). However, it was only after I started installing a few Replicas on recent OTDS versions (using a database backend instead of OpenDJ) that I encountered a rather unusual issue.
1. OTDS Replica installation failureSingle-instance installations using the silent properties file were always successful, and most multi-instance installations worked as well. However, I encountered a very specific issue twice: the Primary instance would install successfully, but the Replica installation would fail with an error stating “parameter JDBC_CONNECTION_STRING not defined“. Since everything runs in automated environments (Kubernetes or Ansible), I knew it was not a human error. When comparing the silent properties files, everything looked correct. The file used on the Primary was exactly the same as the one used on the Replica, except for “ISREPLICA_TOPOLOGY=0” and “ENCRYPTION_KEY=” on the Primary versus “ISREPLICA_TOPOLOGY=1” and “ENCRYPTION_KEY=XXXXXXX” on the Replica.
This is the expected configuration. A Replica needs to take the value of “directory.bootstrap.CryptSecret” from the “otds.properties” file of the Primary and use that value for “ENCRYPTION_KEY“. Therefore, when you install the Primary instance, the value remains empty because nothing is installed yet. During the Replica installation, the automation retrieves this value and populates the parameter accordingly. But then why would the Primary installation succeed while the Replica fails when using the exact same silent properties file? Quite strange, right? First of all, I tried running the installer manually (outside of Kubernetes or Ansible) to see whether additional details would appear in the console:
[tomcat@otds-1 workspace_otds]$ /app/scripts/workspace_otds/otds/setup -qbi -rf /app/scripts/workspace_otds/otds/silent.properties

OpenText Directory Services 24.4.0

Error, parameter JDBC_CONNECTION_STRING not defined.
[tomcat@otds-1 workspace_otds]$
The generated log file was not really helpful either:
[tomcat@otds-1 workspace_otds]$ cat otds.log
...
2025-08-08  6:38:40 chmod ran successfully on /etc/opentext/unixsetup
2025-08-08  6:38:40 Setting environment variable "ACTION" to "-1" : Success
2025-08-08  6:38:40 Setting environment variable "UPGRADE" to "0" : Success
2025-08-08  6:38:40 Setting environment variable "PATCH" to "0" : Success
2025-08-08  6:38:40 Setting environment variable "INSTALLED" to "0" : Success
2025-08-08  6:38:40 Setting environment variable "INSTALLEDVERSION" to "0.0.0" : Success
2025-08-08  6:38:40 Setting environment variable "PRODUCTINSTANCE" to "1" : Success
2025-08-08  6:38:40 Setting environment variable "PRODUCTVERSION" to "24.4.0.4503" : Success
2025-08-08  6:38:40 Setting environment variable "PRODUCTNAME" to "OpenText Directory Services" : Success
2025-08-08  6:38:40 Setting environment variable "PRODUCTID" to "OTDS" : Success
2025-08-08  6:38:40 Setting environment variable "PATCHVERSION" to "0" : Success
2025-08-08  6:38:40 Setting environment variable "ROOTUSER" to "0" : Success
2025-08-08  6:38:40 Setting environment variable "Main_INSTALLED" to "-1" : Success
2025-08-08  6:38:40 Setting environment variable "INST_GROUP" to "tomcat" : Success
2025-08-08  6:38:40 Setting environment variable "INST_USER" to "tomcat" : Success
2025-08-08  6:38:40 Setting environment variable "INSTALL_DIR" to "/app/tomcat/app_data/otds" : Success
2025-08-08  6:38:40 Setting environment variable "TOMCAT_DIR" to "/app/tomcat" : Success
2025-08-08  6:38:40 Setting environment variable "PRIMARY_FQDN" to "otds-1.otds.otdsdev.svc.cluster.local" : Success
2025-08-08  6:38:40 Setting environment variable "ISREPLICA_TOPOLOGY" to "1" : Success
2025-08-08  6:38:40 Setting environment variable "IMPORT_DATA" to "0" : Success
2025-08-08  6:38:40 Setting environment variable "OTDS_PASS" to "*****" : Success
2025-08-08  6:38:40 Setting environment variable "ENCRYPTION_KEY" to "mqLgucZ8UIUnNcLwjwmhNw==" : Success
2025-08-08  6:38:40 Setting environment variable "MIGRATION_OPENDJ_URL" to "" : Success
2025-08-08  6:38:40 Setting environment variable "MIGRATION_OPENDJ_PASSWORD" to "*****" : Success
2025-08-08  6:38:40 Setting environment variable "JDBC_CONNECTION_STRING" to "" : Success
2025-08-08  6:38:40 Setting environment variable "JDBC_USERNAME" to "" : Success
2025-08-08  6:38:40 Setting environment variable "JDBC_PASSWORD" to "*****" : Success
2025-08-08  6:38:40 Setting environment variable "ACTION" to "3" : Success
2025-08-08  6:38:40 Setting environment variable "Main_ACTION" to "3" : Success
2025-08-08  6:38:40 Adding Pre-req "TOMCAT7_HIGHER"
...
2025-08-08  6:38:40 Action #1 ended: OK
2025-08-08  6:38:40 Setting environment variable "PRIMARY_FQDN" to "otds-1.otds.otdsdev.svc.cluster.local" : Success
2025-08-08  6:38:40 Setting environment variable "ISREPLICA_TOPOLOGY" to "1" : Success
2025-08-08  6:38:40 Skipping IMPORT_DATA parameter (condition is false)
2025-08-08  6:38:40 Skipping OTDS_PASS parameter (condition is false)
2025-08-08  6:38:40 Setting environment variable "ENCRYPTION_KEY" to "mqLgucZ8UIUnNcLwjwmhNw==" : Success
2025-08-08  6:38:40 Skipping MIGRATION_OPENDJ_URL parameter (condition is false)
2025-08-08  6:38:40 Skipping MIGRATION_OPENDJ_PASSWORD parameter (condition is false)
2025-08-08  6:38:40 Error, parameter JDBC_CONNECTION_STRING not defined.
2025-08-08  6:38:40 Setup Ended: 1
2025-08-08  6:38:40 ============= Verbose logging Ended =============
[tomcat@otds-1 workspace_otds]$
For reference, here is the content of the “silent.properties” file that this Replica installation uses:
[tomcat@otds-1 workspace_otds]$ cat otds/silent.properties
[Setup]
Id=OTDS
Version=24.4.0.4503
Patch=0
Basedir=/app/scripts/workspace_otds/otds
Configfile=/app/scripts/workspace_otds/otds/setup.xml
Action=Install
Log=/app/scripts/workspace_otds/otds/otds.log
Instance=1
Feature=All

[Property]
INST_GROUP=tomcat
INST_USER=tomcat
INSTALL_DIR=/app/tomcat/app_data/otds
TOMCAT_DIR=/app/tomcat
PRIMARY_FQDN=otds-1.otds.otdsdev.svc.cluster.local
ISREPLICA_TOPOLOGY=1
IMPORT_DATA=0
OTDS_PASS=m1z6GX+HEX81DRpC
ENCRYPTION_KEY=mqLgucZ8UIUnNcLwjwmhNw==
MIGRATION_OPENDJ_URL=
MIGRATION_OPENDJ_PASSWORD=
JDBC_CONNECTION_STRING=jdbc:oracle:thin:@(DESCRIPTION=(ADDRESS_LIST=(ADDRESS=(PROTOCOL=TCP)(HOST=db_host.domain.com)(PORT=1521)))(CONNECT_DATA=(SERVICE_NAME=db_svc.domain.com)))
JDBC_USERNAME=OTDS
JDBC_PASSWORD=Shu#Asd#Tgb;6799
[tomcat@otds-1 workspace_otds]$
(These are the real passwords from that environment. I have changed them since then, obviously, but I included them so you can understand the details below. The encryption key is altered, though – the system originally took the real one from the “Primary” instance.)
3. Status of the installer created/managed filesAfter the failure, I checked the parameter file that the OTDS installer populates during installation, but it was mostly empty and not yet filled:
[tomcat@otds-1 workspace_otds]$ cat /etc/opentext/unixsetup/OTDS_parameters_1.txt

#GROUP name that should be used to change file group ownership (group of USER)
INST_GROUP=tomcat

#USER name that should be used to change file ownership (user running processes)
INST_USER=tomcat

#Specify the installation directory for OpenText Directory Services
INSTALL_DIR=/usr/local/OTDS

#Specify the directory, where (64-bit) Apache Tomcat 10 or higher is installed
TOMCAT_DIR=/app/tomcat

#This hostname is used by other instances to connect to the synchronization master host.
PRIMARY_FQDN=

#Is this server a supplementary instance to an existing environment?
ISREPLICA_TOPOLOGY=0

#Specify OpenDJ connection for import.
IMPORT_DATA=0

#Specify the data encryption key from an existing instance.
ENCRYPTION_KEY=

#OpenDJ LDAP URL (example: ldap://localhost:1389)
MIGRATION_OPENDJ_URL=

#Specify JDBC connection String (example: jdbc:postgresql://localhost:5432/postgres). NOTE: Enter these values carefully since they cannot be validated here. Refer to the OTDS installation and administration guide for JDBC URL samples for supported databases.
JDBC_CONNECTION_STRING=

#Specify Database User Name
JDBC_USERNAME=
[tomcat@otds-1 workspace_otds]$
Finally, the “otds.properties” file (normally generated during the installation) was also not present yet:
[tomcat@otds-1 workspace_otds]$ ls -l $APP_DATA/otds/config/otds.properties
ls: cannot access '/app/tomcat/app_data/otds/config/otds.properties': No such file or directory
[tomcat@otds-1 workspace_otds]$
I tried launching the installer multiple times, on that OTDS Replica, while making small changes to the silent properties file to see if something specific would cause it to fail. Starting by modifying the “JDBC_CONNECTION_STRING” parameter, since that is what the installer complained about, but without success. I then suspected the password parameter. Because passwords are masked in the logs (“*“), it is impossible to see whether the value is parsed correctly or not.
Therefore, I replaced the OTDS Admin password in the silent properties file with “dummyPassword“, and the installer suddenly proceeded further… I cancelled the installation because this was not the real password of the “otadmin” account on the Primary instance, but in this case the “JDBC_CONNECTION_STRING” parameter was no longer empty and the installer continued normally.
Note: the OTDS documentation specifies that passwords must contain at least eight characters, including one lowercase letter, one uppercase letter, one number, and one special character. However, it appears that this rule may not be strictly validated during Replica installations (and possibly not for the Primary either?).
At that point it became clear that the password itself was involved in the issue, somehow. Looking at the script “tools/setup.sh“, you can see that the installer extracts the value of “OTDS_PASS“, applies a function called “AsctoHex“, and then encrypts it. My original “otadmin” password was 16 characters long and satisfied all complexity requirements. However, I noticed that the password contained the string “HEX“. Since the installer converts the password to hexadecimal before encryption, I wondered whether the presence of the string “HEX” might interfere with this process. That would be quite unbelievable, right?
5. A problem with the password length or content?To test this idea, I removed the “E” in the middle, transforming “HEX” into “HX” and effectively reducing the password length by one character:
[tomcat@otds-1 workspace_otds]$ grep OTDS_PASS otds/silent.properties | awk -F= '{print $2}' | wc -c
17
[tomcat@otds-1 workspace_otds]$ # 17 means 16 char since wc -c count the new line in this command
[tomcat@otds-1 workspace_otds]$
[tomcat@otds-1 workspace_otds]$ sed -i 's,HEX,HX,' otds/silent.properties
[tomcat@otds-1 workspace_otds]$
[tomcat@otds-1 workspace_otds]$ grep OTDS_PASS otds/silent.properties | awk -F= '{print $2}' | wc -c
16
[tomcat@otds-1 workspace_otds]$ # 16 means 15 char now
To re-execute the installer after a failure, you must remove the content of the “/etc/opentext” directory (which kind of caches the content from the “silent.properties” file) and also delete the “otds.properties” file if it exists (not in my case):
[tomcat@otds-1 workspace_otds]$ rm -rf /etc/opentext/*
[tomcat@otds-1 workspace_otds]$
In addition to modifying the “silent.properties” file, I also changed the “otadmin” password through the OTDS otds-admin UI (see the OTDS Install & Admin Guide, section 7.2.5 “Resetting a user password”). Then I started a new Replica installation to see whether changing “HEX” to “HX” from the password would resolve the issue:
[tomcat@otds-1 workspace_otds]$ /app/scripts/workspace_otds/otds/setup -qbi -rf /app/scripts/workspace_otds/otds/silent.properties

OpenText Directory Services 24.4.0

------------------------------------------------------------------------------
  OpenText Directory Services
------------------------------------------------------------------------------
Installing OpenText Directory Services Component
Please wait .
Installation of OpenText Directory Services Component OK

Installation completed. Results:

OpenText Directory Services Component OK

Installation finished.

[tomcat@otds-1 workspace_otds]$
… It worked …?
If the issue was really caused by the presence of “HEX” in the password, then replacing it with “HXE” should also work, right? Unfortunately, when I tried that, the issue came back… This indicates that the real problem is not the literal “HEX” string but maybe something related to password length, complexity, or how the installer processes and encrypts the password internally?
6. ConclusionIn the end, I reverted to the shorter 15-character password that worked and prepared all higher environments at this customer to use 15-character passwords. This approach worked without issue for five additional environments until, of course, it failed again, in Production…
Since it failed in another environment even with a 15-character password, the length alone does not seem to be the root cause. When reviewing previously installed environments across multiple customers, I found a few instances running with “otadmin” passwords of up to 19 characters long (about 111/120 bits of entropy according to a password manager like KeePass). This is significantly stronger than the 15-character password (96 bits) used in the Production environment where the issue occurred.
Therefore, since I couldn’t find any logical reasons why the issue happened on some environments but not with others, I opened a ticket with OpenText. I described everything and we went through several weeks of exchanges to try to find an explanation but without success. As of today, I still don’t know why ~10% of the OTDS Replicas that I installed faced an issue with the OT Admin password, but the fix, was simply to change the password in the UI and start the silent installation again. I don’t have an environment to test / debug that issue anymore, since it’s not easily reproducible. Guess I will need to wait for next time to get more debug logs from the OTDS installer (“-debug” option). In the meantime, I can only assume something is probably wrong in the way OTDS manages the password or its hash.
L’article OTDS – Installation of Replicas fail if the OT Admin password is too long? est apparu en premier sur dbi Blog.
Protected: Upgrade RHEL from 9.6 to 10.1 (when running PostgreSQL/Patroni)
This content is password-protected. To view it, please enter the password below.
Password:
L’article Protected: Upgrade RHEL from 9.6 to 10.1 (when running PostgreSQL/Patroni) est apparu en premier sur dbi Blog.
Deployment Creation INS-85037 Error With GoldenGate 26ai for DB2 z/OS
Among all the automation I was doing around a GoldenGate installation for DB2, I recently ended up with an INS-85037 error when running the configuration assistant oggca.sh. And because this error is quite common and has many different possible root causes, I wanted to write about it.
If you’re wondering how to set up GoldenGate 26ai for DB2 z/OS, it is very similar to what you would do with GoldenGate for Oracle. For more information on standard GoldenGate setups, you can read my blog posts about both 26ai and 23ai installations.
For the binary installation, the main difference is that INSTALL_OPTION should be set to DB2ZOS. A complete oggcore.rsp response file would look like this:
oracle.install.responseFileVersion=/oracle/install/rspfmt_ogginstall_response_schema_v23_1_0
INSTALL_OPTION=DB2ZOS
SOFTWARE_LOCATION=/u01/app/oracle/product/oggzos
INVENTORY_LOCATION=/u01/app/oraInventory
UNIX_GROUP_NAME=oinstall
When running the configuration assistant, some options are not available, but the main difference is in the environment variables section of the response file. You should have an IBMCLIDRIVER variable set to your DB2 driver’s path.
ENV_LD_LIBRARY_PATH=${IBMCLIDRIVER}/1ib:${OGG_HOME}/1ib
IBMCLIDRIVER=/path/to/ibmclidriver
ENV_USER_VARS=That being said, here is the exact error I had when running the Configuration Assistant oggca.sh:
[FATAL] [INS-85037] Deployment creation failed.
  ACTION: Check logs at /u01/app/oraInventory/logs/OGGCAConfigActions2026-03-22_15-19-15PM for more information.
*MORE DETAILS*
Return code 503 (Service Unavailable) does not match the expected code 201 (Created).
Verification failed for REST call to 'http://127.0.0.1:7810/services/v2/authorizations/security/ogguser'
Results for "Add a new deployment":
..."Verifying Service Manager deployment status.": SUCCEEDED
..."Adding 'zos_test' deployment.": SUCCEEDED
...."Configuring and starting the Administration Service.": SUCCEEDED
..."Verifying the initial Administration Service configuration.": SUCCEEDED
..."Adding user 'ogguser' to administer the deployment.": FAILED
Log of this session available at: /u01/app/oraInventory/logs/OGGCAConfigActions2026-03-22_15-19-15PM
The deployment creation failed and the associated files will be deleted from disk. Oracle recommends that if you want to keep the log files, you should move them to another location.
Log files will be copied to:
/u01/app/oraInventory/logs/OGGCAConfigActions2026-03-22_15-19-15PM/userdeploy_logs_2026-03-22_15-19-15PM
[WARNING] [INS-32090] Software installation was unsuccessful.
ACTION: Refer to the log files for details or contact Oracle Support Services.
Unfortunately, the installation logs did not show anything other than the following:
SEVERE: Deployment creation job failed.
INFO: Service Manager deployment that was created as part of the process needs to be removed.
INFO: Running clean-up job for Service Manager.
SEVERE: Removing Service Manager deployment.
The deployment and the service manager get deleted after the installation failure, but the logs are also copied to the oraInventory installation logs. Looking at the ServiceManager.log in the smdeploy folder, we don’t get much information.
ERROR| Configuration does not contain a 'config/network' specification. (ServiceManager.Topology)The same applies to the restapi.log, where the logs start after the initial deployment creation error. Unfortunately, none of this was really helpful in my case. After quite some digging, I found that the response file I was using when running oggca.sh had an error. In the custom section for environment variables, I had the following settings:
# SECTION G - ENVIRONMENT VARIABLES
ENY_LD_LIBRARY_PATH-S{IBMCLIDRIVER}/1ib:${OGG_HOME}/11b
IBMCLIDRIVER=/u01/app/ibm/db2_odbc_cli_11_5
ENV_USER_VARS=
It looks like what I gave earlier, except that the path for the clidriver was incomplete.
oracle@vmogg:/home/oracle/ [ogg] ls -l /u01/app/ibm/db2_odbc_cli_11_5
drwxr-xr-x 3 oracle oinstall 23 Mar 22 2026 odbc_cli

oracle@vmogg:/home/oracle/ [ogg] ls -l /u01/app/ibm/db2_odbc_cli_11_5/odbc_cli/clidriver/
-r-xr-xr-x 1 oracle oinstall 4170 Mar 17 2021 Readme.txt
drwxr-xr-x 2 oracle oinstall 36 Mar 22 2026 adm
drwxr-xr-x 2 oracle oinstall 122 Mar 22 2026 bin
drwxr-xr-x 2 oracle oinstall 197 Mar 22 2026 bnd
drwxr-xr-x 2 oracle oinstall 157 Mar 22 09:16 cfg
drwxr-xr-x 2 oracle oinstall 24 Mar 22 2026 cfecache
drwxr-xr-x 4 oracle oinstall 27 Mar 22 2026 conv
drwxr-xr-x 3 oracle oinstall 49 Mar 22 09:26 db2dump
drwxr-xr-x 3 oracle oinstall 217 Mar 22 2026 lib
drwxr-xr-x 3 oracle oinstall 124 Mar 22 09:26 license
drwxr-xr-x 3 oracle oinstall 28 Mar 22 2026 msg
drwxr-xr-x 3 oracle oinstall 21 Mar 22 2026 properties
drwxr-xr-x 3 oracle oinstall 20 Mar 22 2026 security32
drwxr-xr-x 3 oracle oinstall 20 Mar 22 2026 security64
After correcting the oggca.rsp response file with the correct path, the configuration assistant ran successfully.
oracle@vmogg:/u01/app/oracle/product/ogg26/bin [ogg] oggca.sh -silent -responseFile /home/oracle/oggca.rsp
Successfully Setup Software.
Next time you encounter an error like this when setting up GoldenGate for DB2, make sure to check not only the variable value but also the actual content of the IBMCLIDRIVER directory !
NB: If you had this error for any other kind of setup, make sure to always check all the content of the response file you are using, as well as the prerequisites. (CLIDRIVER in this case, but it could be XAG, etc.)
L’article Deployment Creation INS-85037 Error With GoldenGate 26ai for DB2 z/OS est apparu en premier sur dbi Blog.
Discover refreshable clone PDB with Autoupgrade
AutoUpgrade with a refreshable clone is basically “zero‑panic upgrades with a live copy of your database.”.
What problem it solvesTraditionally you had to schedule a maintenance window, stop everything, take a backup, upgrade, and hope nothing went wrong.
With a refreshable clone PDB, AutoUpgrade builds and continuously syncs a copy of your database while production stays online. At cutover time, you just stop users, do a last refresh, convert/upgrade the clone, and switch them over. If something goes wrong, the original source is untouched and you can fall back quickly.
Core idea in simple termsThink of your non‑CDB or old‑version PDB as the “master” and the refreshable clone PDB as a “follow‑me” copy sitting in the target CDB.
AutoUpgrade:
- Creates a PDB in the target CDB via database link (initial clone of datafiles).
- Marks it as refreshable, so redo from the source is applied and it keeps rolling forward.
- Lets you test the clone (read‑only) while users are still working on the source.
- At a controlled start time, runs a last refresh, disconnects it from the source, converts it to a normal PDB, and upgrades it.
From your point of view: you prepare everything days in advance, and the real downtime shrinks to “final refresh + upgrade + app switch.”
High‑level lifecycleFor a non‑CDB to PDB migration or a PDB upgrade, the flow looks like this:
Preparation- You have a source: non‑CDB 12.2/19c or older PDB.
- You have a target: a higher‑version CDB (for example 23ai/26ai) with enough space and network.
- You configure AutoUpgrade with the source and target, plus the parameter telling it to use refreshable clone PDB.
- In deploy mode, AutoUpgrade creates the pluggable database in the target CDB via DB link, copies the datafiles, and defines it as refreshable.
- From now on, redo is shipped from source to target and applied, so the clone stays close to current.
- The source database stays fully online; business keeps running.
- The refreshable clone is read‑only, so you can query it, run app smoke tests, check performance characteristics, etc.
- AutoUpgrade keeps the job running in the background, doing periodic refreshes.
- When you reach the maintenance window, users leave the system and you quiesce activity on the source.
- AutoUpgrade performs a final refresh: last redo from source is applied on the clone so you don’t lose any committed data.
- The clone is then disconnected from the source, turned into a regular PDB, and AutoUpgrade moves into the upgrade and conversion steps (non‑CDB to PDB conversion if needed, then catalog/PSU/UTLRP, etc.).
- You point applications to the new PDB in the target CDB.
- The original source database still exists; if you hit a show‑stopper, you can redirect apps back to it and plan a new attempt.
In practice, the “scary” part is only the final refresh and the moment you switch your apps.
Why DBAs like this patternSome clear advantages:
- Minimal downtime: Most of the heavy lifting (copy + sync) happens while production is running; downtime is limited to final refresh and upgrade.
- Built‑in rollback: Because the source stays untouched, you always have a clean fallback without restore/recovery.
- Realistic testing: You test against a clone built from real production data that is almost up‑to‑date, not a weeks‑old backup.
- Automation: AutoUpgrade orchestrates the create‑clone, refresh, disconnect, convert, and upgrade steps; you mostly steer with parameters and commands instead of custom scripts.
Trade‑offs are mainly around resources: you need disk, CPU, and network to maintain the refreshable clone, and you have to ensure redo shipping is reliable (archivelog gaps or network glitches can break the refresh and need fixing).
Typical exampleImagine you need to move a 19c non‑CDB to a new 26ai CDB on a different host, with less than 30 minutes downtime:
- Monday: you configure AutoUpgrade with the refreshable clone option, start the job. The tool creates the PDB clone in the 26ai CDB and starts streaming redo. Users never notice.
- Next days: you let it refresh every few minutes, developers connect read‑only to the clone and test their application against 26ai. Everything looks good.
- Saturday night: you enter the maintenance window, let open transactions finish, stop app traffic, and tell AutoUpgrade to proceed to the final refresh. Once that’s done, it disconnects the clone, upgrades it, and runs post‑upgrade steps.
- After checks, you change the service names on the app side so they point to the new PDB. Your downtime is mostly spent waiting for the upgrade scripts, not copying terabytes of data.
L’article Discover refreshable clone PDB with Autoupgrade est apparu en premier sur dbi Blog.
How to Standardize SQL Server Disks on VMs using Ansible
Today, the benefits of automation no longer need much explanation: saving time, reducing human error, and ensuring every environment remains aligned with internal standards. What is less obvious, however, is how using an Ansible Playbook can provide advantages that more traditional scripting approaches — such as large PowerShell scripts — struggle to offer. That is exactly what I want to explore here.
When you complete an automated deployment of a SQL Server environment on Windows Server, there is a real sense of achievement. You have invested time and effort, and you expect that investment to pay off thanks to the reliability and repeatability of automation.
But everything changes when the next Windows Server upgrade or SQL Server version arrives… or when corporate standards evolve. Suddenly, you need to reopen a multi-thousand‑line PowerShell script and:
- Integrate the required changes while keeping execution stable,
- Avoid subtle but potentially critical regressions,
- Maintain clear and usable logging,
- Retest the entire automation workflow,
- Troubleshoot new issues introduced by the modifications.
This is precisely the type of situation where Ansible becomes a far better long‑term investment. Its architecture and philosophy offer several advantages:
- Native idempotence, ensuring the same result even after multiple runs,
- A declarative YAML approach, focusing on the desired end state rather than the execution steps,
- Windows Server and SQL Server modules, providing built‑in idempotence and saving significant time,
- Agentless connectivity, simplifying deployment on new machines,
- A modular structure (roles, modules, variables), making adaptation and reuse of your automation much easier.
In this article, I will give you a concrete overview by walking you through how to configure the disks required for SQL Server using Ansible.
1-Map iSCSI controllers to disk numbersWhen developing an Ansible Playbook, one fundamental principle is to design for idempotence from the very start—not just rely on idempotent modules.
On Windows, disk numbering is not guaranteed: it depends on several factors – how disks are detected at startup, the firmware, and so on.
As a result, disk numbers may change from one reboot to another.
To ensure consistent and reliable execution of your deployment, this behavior must be accounted for directly in the design of your Playbook.
Otherwise, it may introduce wrong behaviors, and lead to:
- formatting the wrong disk,
- mounting volumes on incorrect devices,
- completely breaking the SQL Server provisioning workflow.
In other words, idempotence is no longer guaranteed.
To ensure stable and predictable executions, you must determine dynamically the correct disk numbering at each execution.
You can use Get-Disk PowerShell command to achieve your goal, by searching iSCSI controller number and LUN position from Location property.
$adapter = {{ disk.adapter }}
$lun = {{ disk.lun}}
(Get-Disk | Where-Object {
      $_.Location -match "Adapter $adapter\s+:.*\s+LUN $lun"
    }).number
We have done our mapping between VM specifications and Windows disk numbers.
2-Loop SQL Server disksSince we often have several disks to configure — Data, Logs, TempDB — we need to perform the same actions repeatedly on each disk:
- dynamically determine the disk number,
- initialize it in GPT,
- create the partition and format the volume in NTFS with a 64 KB allocation unit size,
- assign an access path (drive letter or mountpoint),
- apply certain specific configuration settings, such as disabling indexing,
- verify the compliance of the disk configuration.
As these actions are identical for all disks, the best approach is to factorize the tasks.
The Ansible pattern, for such scenario, is to loop that call in a dedicated Task File.
---

- name: Manage all disk properties based on Location and Target numbers
  ansible.builtin.include_tasks: disks_properties.yml
  loop:
    - name: data
      location: "{{ disk_specs.data.location }}"
      target: "{{ disk_specs.data.target }}"
      label: "{{ disk_specs.data.label }}"
      letter: "{{ disk_specs.data.letter }}"
    - name: logs
      location: "{{ disk_specs.logs.location }}"
      target: "{{ disk_specs.logs.target }}"
      label: "{{ disk_specs.logs.label }}"
      letter: "{{ disk_specs.logs.letter }}"
    - name: tempdb
      location: "{{ disk_specs.tempdb.location }}"
      target: "{{ disk_specs.tempdb.target }}"
      label: "{{ disk_specs.tempdb.label }}"
      letter: "{{ disk_specs.tempdb.letter }}"
  loop_control:
    loop_var: disk

...
Since we performed our loop in the previous section on the disks_properties.yml file, we can now implement the configuration actions inside this file.
First, we will retrieve the disk number and then begin configuring the disk according to best practices and our internal standards.
To guarantee idempotence, we will mark this step as not changed: this is only a Get action:
---

- name: Identify the {{ disk.name }} disk number
  ansible.windows.win_shell: |
    $adapter = {{ disk.target }}
    $lun = {{ disk.location }}
    (Get-Disk | Where-Object {
      $_.Location -match "Adapter $adapter\s+:.*\s+LUN $lun"
    }).number
  register: disk_num
  changed_when: false
Then, we will register the disk number as an Ansible Fact for all this task file execution call.
- name: Set fact for {{ disk.name }} disk number
  ansible.builtin.set_fact:
    "disk_number_{{ disk.name }}": "{{ disk_num.stdout | trim | int }}"
We can now initialize the disk using community.windows module. Of course, use Ansible module if possible.
The parameter disk_bps.partition_style is a variable of my Ansible Role, to guarantee GPT will be used.
- name: Initialize disks
  community.windows.win_initialize_disk:
    disk_number: "{{ lookup('vars', 'disk_number_' + disk.name) }}"
    style: "{{ disk_bps.partition_style }}"
From there, we can create our partition:
- name: Create partition with letter {{ disk.letter }} for disk {{ disk.name }}
  community.windows.win_partition:
    drive_letter: "{{ disk.letter }}"
    partition_size: "-1"
    disk_number: "{{ lookup('vars', 'disk_number_' + disk.name) }}"
And now format our volume with allocation unit size 64KB:
- name: Create a partition letter {{ disk.letter }} on disk {{ disk.name }} with label {{ disk.label }}
  community.windows.win_format:
    drive_letter: "{{ disk.letter }}"
    allocation_unit_size: "{{ disk_bps.allocation_unit_size_bytes }}"
    new_label: "{{ disk.label }}"

...
As I mentioned earlier in previous section, we can also add tasks relative to some specific standards or a tasks to guarantee disk compliance.
4- Execute the PlaybookNow that our Ansible Role windows_disks is ready, we can call it through a Playbook.
Of course, we must adjust the reality of the iSCSI configuration of the Virtual Machine.
---
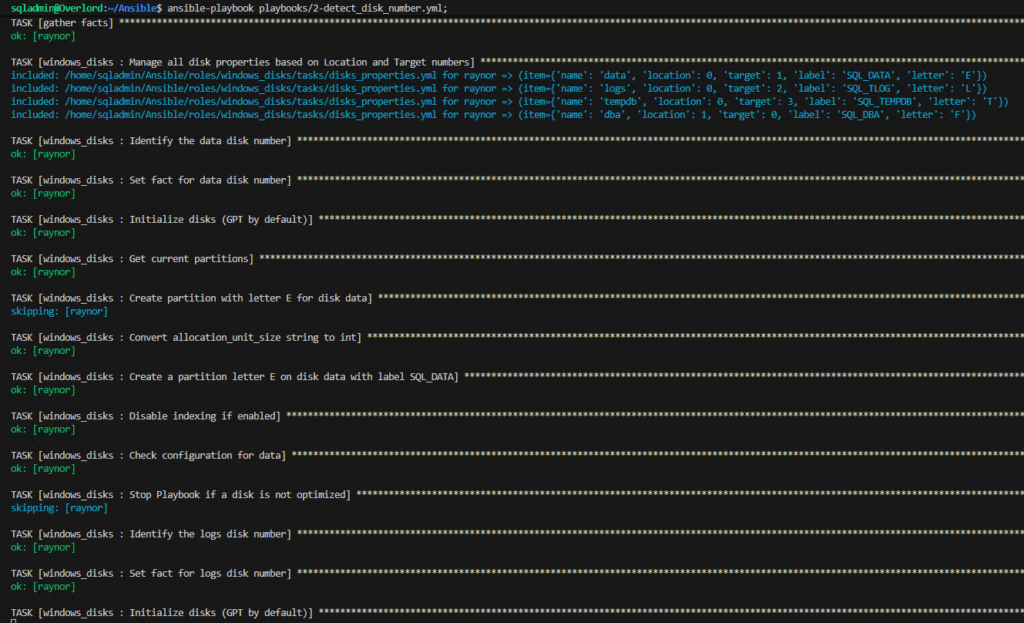
- name: Configure Disks by detecting Disk Number
hosts: Raynor
gather_facts: false
vars:
disk_specs:
data:
location: 0
target: 1
label: SQL_DATA
letter: E
logs:
location: 0
target: 2
label: SQL_TLOG
letter: L
tempdb:
location: 0
target: 3
label: SQL_TEMPDB
letter: T
tasks:
- name: gather facts
ansible.builtin.setup:
changed_when: false
tags: [always]
- name: Configure Disks
ansible.builtin.import_role:
name: windows_disks
tags: windows_disks
...
 CONCLUSION
We have had an overview of how Ansible makes automation easier to maintain and to evolve, by focusing on the logic of our deployment and not on the code to achieve it.
Now, updating your standards or upgrading versions will no longer require rewriting scripts, but mainly adapting variables.
However, it is important to be aware that idempotence must also be maintained through design.
L’article How to Standardize SQL Server Disks on VMs using Ansible est apparu en premier sur dbi Blog.
Creating Path Connections with GoldenGate REST API
When automating your GoldenGate deployment management, you might want to create path connections with the GoldenGate REST API. This is an important aspect when connecting GoldenGate deployments with distribution paths. A first step towards this is to create a path connection on the same deployment as the distribution server where the distribution path will run.
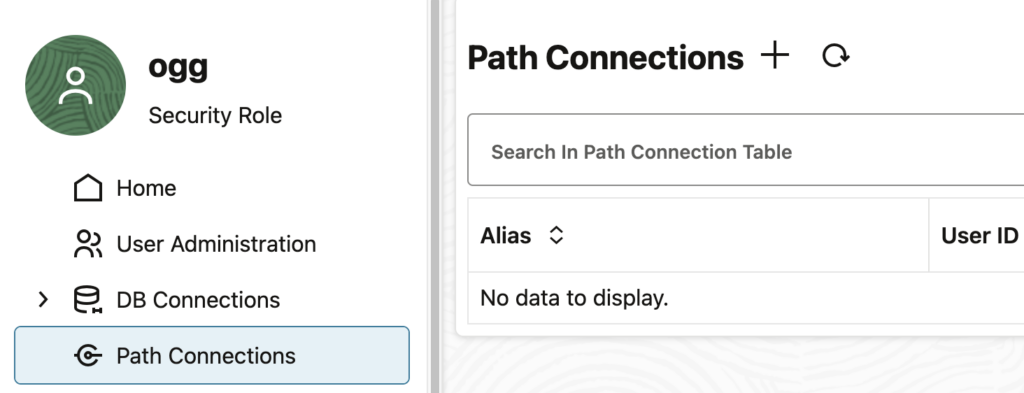
In the GoldenGate web UI, you can easily create Path Connections. Just go to the Path Connections tab, add a path, and specify the following information:
- Credential Alias: Alias used to connect to the target deployment. It doesn’t have to match any name on the target deployment.
- User ID: Real username that must exist on the target deployment.
- Password: Password associated with the User ID given before.
restapi.log analysis
But what about the REST API ? When looking at the list of endpoints given by Oracle, no REST endpoint explicitly refers to path connections, so how to create path connections through the REST API ?
The key point to understand is that path connections are not independent GoldenGate objects. In fact, they exist as a subset of another object, which you should know by now : aliases. Aliases are created to store credentials and are organized in domains. The default domain is called OracleGoldenGate, and Oracle has a reserved name for a subtype of domains : Network.
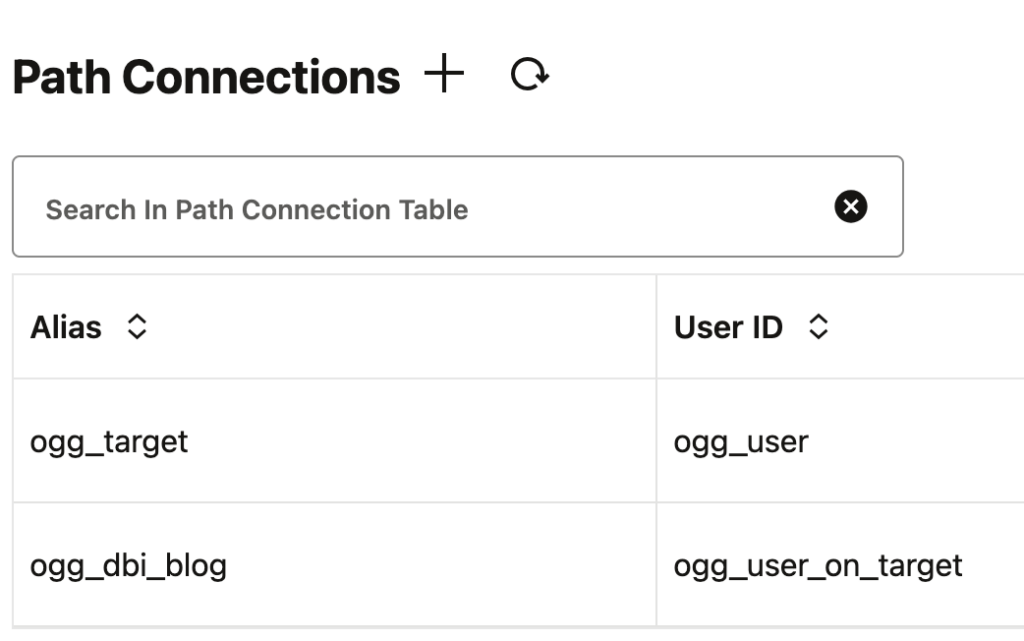
We can see this easily when creating a path connection through the web UI, and then looking at the restapi.log file. Open the log file located in the var/log folder of your deployment, or read the blog I wrote about restapi.log analysis. Using this method, we see the endpoint and the content of the API call. Here, for instance, I created a path connection from the web UI, to connect to ogg_user with the ogg_target alias.
oracle@vmogg: jq -c 'select (.request.context.verb == "POST" and .request.context.uriTemplate == "/services/{version}/credentials/{domain}/{alias}")' restapi.ndjson

{"request":{"context":{"verb":"POST","uri":"/services/v2/credentials/Network/ogg_target","uriTemplate":"/services/{version}/credentials/{domain}/{alias}"}},"content":{"userid":"ogg_user","password":"** Masked **"},...}To summarize, path connections are just aliases in the Network domain. This simplifies the creation of path connections. You just need to make a POST API call to the alias endpoint, specifying Network as the domain. The exact endpoint is then /services/{version}/credentials/Network/{alias}.
Quick example: using the GoldenGate Python client I presented in another blog, let’s create an alias in the Network domain :
>>> from oggrestapi import OGGRestAPI

>>> ogg_client = OGGRestAPI(
    url="https://vmogg",
    username="ogg",
    password="ogg")
Connected to OGG REST API at https://vmogg

>>> ogg_client.create_alias(
    alias='ogg_dbi_blog',
    domain='Network',
    data={
        "userid": "ogg_user_on_target",
        "password": "***"
    }
)
{'$schema': 'api:standardResponse', 'links': [{'rel': 'canonical', 'href': 'https://vmogg/services/v2/credentials/Network/ogg_dbi_blog', 'mediaType': 'application/json'}, {'rel': 'self', 'href': 'https://vmogg/services/v2/credentials/Network/ogg_dbi_blog', 'mediaType': 'application/json'}], 'messages': [{'$schema': 'ogg:message', 'title': 'Credential store altered.', 'code': 'OGG-15114', 'severity': 'INFO', 'issued': '2026-03-22T10:14:01Z', 'type': 'https://docs.oracle.com/en/middleware/goldengate/core/23.26/error-messages/'}]}
After refreshing the web UI, the newly created path connection is visible.
L’article Creating Path Connections with GoldenGate REST API est apparu en premier sur dbi Blog.
Dctm – Another DM_LICENSE_E_INVALID_LICENSE error but caused by JMS this time
At the end of last year, I published a first blog about a DM_LICENSE_E_INVALID_LICENSE error in D2 SSO login through OTDS. The root cause in that previous post was a duplicate user with one lowercase and one uppercase user_login_name. However, I did mention that there can be several reasons for that error. In this blog, I will describe another such case.
1. Symptoms in D2 logsThe generated D2 logs associated with this new issue are almost exactly the same. The only difference is that the Repository returns “null” as the userid (user_name). See the message “Authentication failed for user null with docbase REPO_NAME“. This wasn’t the case in the other blog post:
[tomcat@d2-0 logs]$ cat D2.log
...
2025-12-08 12:21:14,784 UTC [INFO ] (https-jsse-nio-8080-exec-47) - c.emc.x3.portal.server.X3HttpSessionListener  : Created http session 8531D373A3EA12A398B158AF656E7D20
2025-12-08 12:21:14,784 UTC [DEBUG] (https-jsse-nio-8080-exec-47) - c.e.x.p.s.f.authc.X3OTDSAuthenticationFilter  : OTDS : No user name on the Http session yet
2025-12-08 12:21:14,785 UTC [DEBUG] (https-jsse-nio-8080-exec-47) - c.e.x.p.s.f.authc.X3OTDSAuthenticationFilter  : OTDS : No access_token found in Http request or Cookie Redirecting to OTDS Server
2025-12-08 12:21:14,786 UTC [DEBUG] (https-jsse-nio-8080-exec-47) - c.e.x.p.s.f.a.X3TrustHttpAuthenticationFilter : Identified scheme : https
2025-12-08 12:21:14,786 UTC [DEBUG] (https-jsse-nio-8080-exec-47) - c.e.x.p.s.f.a.X3TrustHttpAuthenticationFilter : Identified server name : d2.domain.com
2025-12-08 12:21:14,787 UTC [DEBUG] (https-jsse-nio-8080-exec-47) - c.e.x.p.s.f.a.X3TrustHttpAuthenticationFilter : Identified server port : 443
2025-12-08 12:21:14,787 UTC [DEBUG] (https-jsse-nio-8080-exec-47) - c.e.x.p.s.f.a.X3TrustHttpAuthenticationFilter : Built server host is : https://d2.domain.com:443
2025-12-08 12:21:14,788 UTC [DEBUG] (https-jsse-nio-8080-exec-47) - o.o.e.logging.slf4j.Slf4JLogLevelHandlers$4   : [EVENT SUCCESS -> /D2/HTTPUtilities] header name=Host, value=d2.domain.com
2025-12-08 12:21:14,789 UTC [DEBUG] (https-jsse-nio-8080-exec-47) - o.o.e.logging.slf4j.Slf4JLogLevelHandlers$4   : [EVENT SUCCESS -> /D2/HTTPUtilities] MaxHeaderValueSize: 8192
2025-12-08 12:21:14,792 UTC [DEBUG] (https-jsse-nio-8080-exec-47) - o.o.e.logging.slf4j.Slf4JLogLevelHandlers$4   : [EVENT SUCCESS -> /D2/HTTPUtilities] validating the input valued2.domain.com
2025-12-08 12:21:14,793 UTC [DEBUG] (https-jsse-nio-8080-exec-47) - c.e.x.p.s.f.a.X3TrustHttpAuthenticationFilter : Identified host : d2.domain.com
2025-12-08 12:21:14,794 UTC [DEBUG] (https-jsse-nio-8080-exec-47) - c.e.x.p.s.f.a.X3TrustHttpAuthenticationFilter : Overall base URL built : https://d2.domain.com/D2
2025-12-08 12:21:14,795 UTC [DEBUG] (https-jsse-nio-8080-exec-47) - c.e.x.p.s.f.authc.X3OTDSAuthenticationFilter  : Redirection url post encoding - https%3A%2F%2Fd2.domain.com%2FD2%2Fd2_otds.html%3ForigUrl%3D%2FD2%2F
2025-12-08 12:21:14,797 UTC [DEBUG] (https-jsse-nio-8080-exec-47) - c.e.x.p.s.f.authc.X3OTDSAuthenticationFilter  : OTDS : OAUTH final login sendRedirect URL : https://otds-mfa.domain.com/otdsws/oauth2/auth?response_type=token&client_id=dctm-ns-d2&redirect_uri=https%3A%2F%2Fd2.domain.com%2FD2%2Fd2_otds.html%3ForigUrl%3D%2FD2%2F&logon_appname=Documentum+Client+CE+23.4
2025-12-08 12:21:14,798 UTC [DEBUG] (https-jsse-nio-8080-exec-47) - c.e.x.p.s.f.authc.X3OTDSAuthenticationFilter  : OTDS : Sending redirection as it's not a rpc call : https://otds-mfa.domain.com/otdsws/oauth2/auth?response_type=token&client_id=dctm-ns-d2&redirect_uri=https%3A%2F%2Fd2.domain.com%2FD2%2Fd2_otds.html%3ForigUrl%3D%2FD2%2F&logon_appname=Documentum+Client+CE+23.4
2025-12-08 12:21:15,018 UTC [DEBUG] (https-jsse-nio-8080-exec-5) - o.o.e.logging.slf4j.Slf4JLogLevelHandlers$4   : [EVENT SUCCESS -> /D2/HTTPUtilities] MaxHeaderKeySize: 256
2025-12-08 12:21:15,018 UTC [DEBUG] (https-jsse-nio-8080-exec-5) - o.o.e.logging.slf4j.Slf4JLogLevelHandlers$4   : [EVENT SUCCESS -> /D2/HTTPUtilities] MaxHeaderValueSize: 8192
2025-12-08 12:21:15,020 UTC [DEBUG] (https-jsse-nio-8080-exec-5) - c.e.x.p.s.f.authc.X3OTDSAuthenticationFilter  : OTDS : No user name on the Http session yet
2025-12-08 12:21:15,021 UTC [DEBUG] (https-jsse-nio-8080-exec-5) - c.e.x.p.s.f.authc.X3OTDSAuthenticationFilter  : OTDS : Found access_token on Http Cookie, invalidating the cookie by setting maxAge 0
2025-12-08 12:21:15,022 UTC [INFO ] (https-jsse-nio-8080-exec-5) - c.e.x.p.s.f.authc.X3OTDSAuthenticationFilter  : OTDS : setting the cookie as secure as its a https request
2025-12-08 12:21:15,024 UTC [DEBUG] (https-jsse-nio-8080-exec-5) - c.e.x.p.s.f.authc.X3OTDSAuthenticationFilter  : OTDS : OTDS responded with a oauth token
2025-12-08 12:21:15,025 UTC [INFO ] (https-jsse-nio-8080-exec-5) - c.e.x.p.s.f.authc.X3OTDSAuthenticationFilter  : ------ Begin getUntrustedJwtHeader : eyJraWQiOiI1YjM4...oSD8Xh3vVmkekcA
2025-12-08 12:21:15,026 UTC [INFO ] (https-jsse-nio-8080-exec-5) - c.e.x.p.s.f.authc.X3OTDSAuthenticationFilter  : getUntrustedJwtHeader oauthTokenWithoutSignature : eyJraWQiOiI1YjM4...i1xYWN0LWQyIn0.
2025-12-08 12:21:15,614 UTC [DEBUG] (https-jsse-nio-8080-exec-5) - c.e.x.p.s.f.authc.X3OTDSAuthenticationFilter  : ------ Begin validateOTDSTokenClaims : MYUSERID
2025-12-08 12:21:15,615 UTC [DEBUG] (https-jsse-nio-8080-exec-5) - c.e.x.p.s.f.authc.X3OTDSAuthenticationFilter  :  validateOTDSTokenClaims for user : MYUSERID , OTDS : currenttime: 1765196475615 expirationtime: 1765200074000
2025-12-08 12:21:15,615 UTC [INFO ] (https-jsse-nio-8080-exec-5) - c.e.x.p.s.f.authc.X3OTDSAuthenticationFilter  : ------ End validateOTDSTokenClaims : MYUSERID
2025-12-08 12:21:15,615 UTC [INFO ] (https-jsse-nio-8080-exec-5) - c.e.x.p.s.f.authc.X3OTDSAuthenticationFilter  : PublicKey for Key id : 5b38b...bf487 exists
2025-12-08 12:21:15,617 UTC [DEBUG] (https-jsse-nio-8080-exec-5) - c.e.x.p.s.f.authc.X3OTDSAuthenticationFilter  :  OTDS Deafault Repository from shiro configured : REPO_NAME
2025-12-08 12:21:15,617 UTC [DEBUG] (https-jsse-nio-8080-exec-5) - c.e.x.p.s.f.authc.X3OTDSAuthenticationFilter  : OTDS : generating DM_Ticket for user : MYUSERID in Repository : REPO_NAME
2025-12-08 12:21:16,522 UTC [ERROR] (https-jsse-nio-8080-exec-5) - c.e.x.p.s.f.authc.X3OTDSAuthenticationFilter  : OTDS : OAuth Token Error occurred while generating a DCTM MultiUse Ticket for user  : MYUSERID
2025-12-08 12:21:16,522 UTC [ERROR] (https-jsse-nio-8080-exec-5) - c.e.x.p.s.f.authc.X3OTDSAuthenticationFilter  : OTDS : OAuth Token Error please validate the OTDS Config of user exists in Repository
com.documentum.fc.client.DfAuthenticationException: [DM_SESSION_E_AUTH_FAIL]error:  "Authentication failed for user null with docbase REPO_NAME."
        at com.documentum.fc.client.impl.docbase.DocbaseExceptionMapper.newException(DocbaseExceptionMapper.java:52)
        at com.documentum.fc.client.impl.connection.docbase.MessageEntry.getException(MessageEntry.java:39)
        at com.documentum.fc.client.impl.connection.docbase.DocbaseMessageManager.getException(DocbaseMessageManager.java:137)
        at com.documentum.fc.client.impl.connection.docbase.netwise.NetwiseDocbaseRpcClient.checkForMessages(NetwiseDocbaseRpcClient.java:332)
        at com.documentum.fc.client.impl.connection.docbase.netwise.NetwiseDocbaseRpcClient.applyForObject(NetwiseDocbaseRpcClient.java:680)
        at com.documentum.fc.client.impl.connection.docbase.DocbaseConnection$8.evaluate(DocbaseConnection.java:1572)
        at com.documentum.fc.client.impl.connection.docbase.DocbaseConnection.evaluateRpc(DocbaseConnection.java:1272)
        at com.documentum.fc.client.impl.connection.docbase.DocbaseConnection.applyForObject(DocbaseConnection.java:1564)
        at com.documentum.fc.client.impl.docbase.DocbaseApi.authenticateUser(DocbaseApi.java:1894)
        at com.documentum.fc.client.impl.connection.docbase.DocbaseConnection.authenticate(DocbaseConnection.java:460)
        at com.documentum.fc.client.impl.connection.docbase.DocbaseConnection.open(DocbaseConnection.java:140)
        at com.documentum.fc.client.impl.connection.docbase.DocbaseConnection.<init>(DocbaseConnection.java:109)
        at com.documentum.fc.client.impl.connection.docbase.DocbaseConnection.<init>(DocbaseConnection.java:69)
        at com.documentum.fc.client.impl.connection.docbase.DocbaseConnectionFactory.newDocbaseConnection(DocbaseConnectionFactory.java:32)
        at com.documentum.fc.client.impl.connection.docbase.DocbaseConnectionManager.createNewConnection(DocbaseConnectionManager.java:202)
        at com.documentum.fc.client.impl.connection.docbase.DocbaseConnectionManager.getDocbaseConnection(DocbaseConnectionManager.java:132)
        at com.documentum.fc.client.impl.session.SessionFactory.newSession(SessionFactory.java:24)
        ...
        at org.apache.tomcat.util.net.SocketProcessorBase.run(SocketProcessorBase.java:52)
        at org.apache.tomcat.util.threads.ThreadPoolExecutor.runWorker(ThreadPoolExecutor.java:1190)
        at org.apache.tomcat.util.threads.ThreadPoolExecutor$Worker.run(ThreadPoolExecutor.java:659)
        at org.apache.tomcat.util.threads.TaskThread$WrappingRunnable.run(TaskThread.java:63)
        at java.base/java.lang.Thread.run(Thread.java:840)
2025-12-08 12:21:16,524 UTC [DEBUG] (https-jsse-nio-8080-exec-5) - c.e.x.p.s.f.authc.X3OTDSAuthenticationFilter  : redirectToErrorPage : Redirecting to Error Page as Login failed for user : null and exception : {}
com.emc.x3.portal.server.filters.authc.X3OTDSAuthenticationFilter$1: Authentication failed for user null with repository REPO_NAME.
        at com.emc.x3.portal.server.filters.authc.X3OTDSAuthenticationFilter.validateTokenAndGetUserId(X3OTDSAuthenticationFilter.java:1167)
        at com.emc.x3.portal.server.filters.authc.X3OTDSAuthenticationFilter.onAccessDenied(X3OTDSAuthenticationFilter.java:293)
        at org.apache.shiro.web.filter.AccessControlFilter.onAccessDenied(AccessControlFilter.java:133)
        at org.apache.shiro.web.filter.AccessControlFilter.onPreHandle(AccessControlFilter.java:162)
        at org.apache.shiro.web.filter.PathMatchingFilter.isFilterChainContinued(PathMatchingFilter.java:223)
        at org.apache.shiro.web.filter.PathMatchingFilter.preHandle(PathMatchingFilter.java:198)
        ...
        at org.apache.tomcat.util.net.SocketProcessorBase.run(SocketProcessorBase.java:52)
        at org.apache.tomcat.util.threads.ThreadPoolExecutor.runWorker(ThreadPoolExecutor.java:1190)
        at org.apache.tomcat.util.threads.ThreadPoolExecutor$Worker.run(ThreadPoolExecutor.java:659)
        at org.apache.tomcat.util.threads.TaskThread$WrappingRunnable.run(TaskThread.java:63)
        at java.base/java.lang.Thread.run(Thread.java:840)
2025-12-08 12:21:16,524 UTC [INFO ] (https-jsse-nio-8080-exec-5) - c.e.x.p.s.f.authc.X3OTDSAuthenticationFilter  : Adding the LicenseException to the Session : DM_SESSION_E_AUTH_FAIL
2025-12-08 12:21:16,526 UTC [DEBUG] (https-jsse-nio-8080-exec-5) - c.e.x.p.s.f.a.X3TrustHttpAuthenticationFilter : Identified scheme : https
2025-12-08 12:21:16,526 UTC [DEBUG] (https-jsse-nio-8080-exec-5) - c.e.x.p.s.f.a.X3TrustHttpAuthenticationFilter : Identified server name : d2.domain.com
2025-12-08 12:21:16,526 UTC [DEBUG] (https-jsse-nio-8080-exec-5) - c.e.x.p.s.f.a.X3TrustHttpAuthenticationFilter : Identified server port : 443
2025-12-08 12:21:16,528 UTC [DEBUG] (https-jsse-nio-8080-exec-5) - c.e.x.p.s.f.a.X3TrustHttpAuthenticationFilter : Built server host is : https://d2.domain.com:443
2025-12-08 12:21:16,529 UTC [DEBUG] (https-jsse-nio-8080-exec-5) - o.o.e.logging.slf4j.Slf4JLogLevelHandlers$4   : [EVENT SUCCESS -> /D2/HTTPUtilities] header name=Host, value=d2.domain.com
2025-12-08 12:21:16,530 UTC [DEBUG] (https-jsse-nio-8080-exec-5) - o.o.e.logging.slf4j.Slf4JLogLevelHandlers$4   : [EVENT SUCCESS -> /D2/HTTPUtilities] MaxHeaderValueSize: 8192
2025-12-08 12:21:16,531 UTC [DEBUG] (https-jsse-nio-8080-exec-5) - o.o.e.logging.slf4j.Slf4JLogLevelHandlers$4   : [EVENT SUCCESS -> /D2/HTTPUtilities] validating the input valued2.domain.com
2025-12-08 12:21:16,532 UTC [DEBUG] (https-jsse-nio-8080-exec-5) - c.e.x.p.s.f.a.X3TrustHttpAuthenticationFilter : Identified host : d2.domain.com
2025-12-08 12:21:16,533 UTC [DEBUG] (https-jsse-nio-8080-exec-5) - c.e.x.p.s.f.a.X3TrustHttpAuthenticationFilter : Overall base URL built : https://d2.domain.com/D2
2025-12-08 12:21:16,534 UTC [DEBUG] (https-jsse-nio-8080-exec-5) - c.e.x.p.s.f.authc.X3OTDSAuthenticationFilter  :  D2 redirecting to errorPage JSP  : https://d2.domain.com/D2/errors/authenticationError.jsp
2025-12-08 12:21:16,567 UTC [DEBUG] (https-jsse-nio-8080-exec-26) - o.o.e.logging.slf4j.Slf4JLogLevelHandlers$4   : [EVENT SUCCESS -> /D2/HTTPUtilities] MaxHeaderKeySize: 256
2025-12-08 12:21:16,567 UTC [DEBUG] (https-jsse-nio-8080-exec-26) - o.o.e.logging.slf4j.Slf4JLogLevelHandlers$4   : [EVENT SUCCESS -> /D2/HTTPUtilities] MaxHeaderValueSize: 8192
2025-12-08 12:21:16,568 UTC [DEBUG] (https-jsse-nio-8080-exec-26) - c.e.x.p.s.f.authc.X3OTDSAuthenticationFilter  : No LicenseExcepton found on HttpSession hence not Redirectling to License ErrorPage
2025-12-08 12:21:16,571 UTC [DEBUG] (https-jsse-nio-8080-exec-26) - c.e.x.p.s.f.a.X3TrustHttpAuthenticationFilter :  Selected Repository : REPO_NAME
2025-12-08 12:21:16,573 UTC [DEBUG] (https-jsse-nio-8080-exec-26) - o.o.e.logging.slf4j.Slf4JLogLevelHandlers$4   : [EVENT SUCCESS -> /D2/HTTPUtilities] MaxHeaderKeySize: 256
2025-12-08 12:21:16,574 UTC [DEBUG] (https-jsse-nio-8080-exec-26) - o.o.e.logging.slf4j.Slf4JLogLevelHandlers$4   : [EVENT SUCCESS -> /D2/HTTPUtilities] MaxHeaderValueSize: 8192
2025-12-08 12:21:16,578 UTC [INFO ] (https-jsse-nio-8080-exec-26) - c.emc.x3.portal.server.X3HttpSessionListener  : Expired Http session id : 8531D373A3EA12A398B158AF656E7D20
2025-12-08 12:21:16,578 UTC [DEBUG] (https-jsse-nio-8080-exec-26) - com.emc.x3.server.context.ContextManager      : Create a new context manager
...
[tomcat@d2-0 logs]$
As usual, the next step is to check the Repository logs with the authentication trace enabled:
[dmadmin@cs-0 ~]$ cat $DOCUMENTUM/dba/log/$DOCBASE_NAME.log
...
2025-12-08T12:21:16.235912      3567122[3567122]        0101234580c77e96        [AUTH]  Entering RPC AUTHENTICATE_USER
2025-12-08T12:21:16.236052      3567122[3567122]        0101234580c77e96        [AUTH]  Start Authentication : LOGON_NAME=MYUSERID, DOMAIN_NAME=, OS_LOGON_NAME=tomcat, OS_LOGON_DOMAIN=, ASSUME_USER=0, TRUSTED_LOGIN_ALLOWED=1, PRINCIPAL_AUTH=0, DO_SET_LOCALE=0, RECONNECT=0, CLIENT_TOKEN=[-36, 8, 66, 12, 89, 102, -85, -11, 6, -115, -34, -68, -123, 11, 100]
2025-12-08T12:21:16.236115      3567122[3567122]        0101234580c77e96        [AUTH]  Start Authenticate Client Instance
2025-12-08T12:21:16.236215      3567122[3567122]        0101234580c77e96        [AUTH]  Start Verify Signature, Client : dfc_327WHMY40Mglbp4taDgajZEM39Lc , Host : d2-0.d2.dctm-ns.svc.cluster.local
2025-12-08T12:21:16.244603      3567122[3567122]        0101234580c77e96        [AUTH]  End Verify Signature, Client : dfc_327WHMY40Mglbp4taDgajZEM39Lc , Host : d2-0.d2.dctm-ns.svc.cluster.local
2025-12-08T12:21:16.244657      3567122[3567122]        0101234580c77e96        [AUTH]  End Authenticate Client Instance
2025-12-08T12:21:16.303325      3567122[3567122]        0101234580c77e96        [AUTH]  Start-AuthenticateUser: ClientHost(d2-0.d2.dctm-ns.svc.cluster.local), LogonName(null), LogonOSName(tomcat), LogonOSDomain(), UserExtraDomain(), ServerDomain()
2025-12-08T12:21:16.303410      3567122[3567122]        0101234580c77e96        [AUTH]  Start-AuthenticateUserName:
2025-12-08T12:21:16.303442      3567122[3567122]        0101234580c77e96        [AUTH]  dmResolveNamesForCredentials: auth_protocol()
2025-12-08T12:21:16.305698      3567122[3567122]        0101234580c77e96        [AUTH]  [DM_USER_E_NOT_DOCUMENTUM_USER]error:  "User null does not exist in the docbase"
2025-12-08T12:21:16.305720      3567122[3567122]        0101234580c77e96        [AUTH]  End-AuthenticateUserName: dm_user.user_login_domain(), Result: 0
2025-12-08T12:21:16.305730      3567122[3567122]        0101234580c77e96        [AUTH]  Not Found dm_user.user_login_name(null), dm_user.user_login_domain()
2025-12-08T12:21:16.519331      3567122[3567122]        0101234580c77e96        [AUTH]  Final Auth Result=F, LOGON_NAME=null, AUTHENTICATION_LEVEL=1, OS_LOGON_NAME=tomcat, OS_LOGON_DOMAIN=, CLIENT_HOST_NAME=d2-0.d2.dctm-ns.svc.cluster.local, CLIENT_HOST_ADDR=172.1.1.1, USER_LOGON_NAME_RESOLVED=1, AUTHENTICATION_ONLY=0, USER_NAME=, USER_OS_NAME=null, USER_LOGIN_NAME=null, USER_LOGIN_DOMAIN=, USER_EXTRA_CREDENTIAL[0]=, USER_EXTRA_CREDENTIAL[1]=, USER_EXTRA_CREDENTIAL[2]=e2, USER_EXTRA_CREDENTIAL[3]=, USER_EXTRA_CREDENTIAL[4]=, USER_EXTRA_CREDENTIAL[5]=, SERVER_SESSION_ID=0101234580c77e96, AUTH_BEGIN_TIME=Mon Dec  8 12:21:16 2025, AUTH_END_TIME=Mon Dec  8 12:21:16 2025, Total elapsed time=0 seconds
2025-12-08T12:21:16.519359      3567122[3567122]        0101234580c77e96        [AUTH]  Exiting RPC AUTHENTICATE_USER
...
[dmadmin@cs-0 ~]$
There is one thing that is quite strange in these logs. If you look at the beginning, it traces the authentication for “MYUSERID“. But then, in the middle of the process, that user_name becomes “null“. I do not recall seeing that behavior before, so I started investigating what might have caused it.
The account “MYUSERID” existed in the Repository. This issue occurred on the same application as in the previous blog post, but this time in the TEST/QA environment (instead of DEV). The same OTDS and users were present, so my account was definitely there (without duplicates in TEST/QA).
3. Investigating OTDS authentication logsSince the dm_user object had a “user_source” of OTDS, I then checked the OTDS Authentication log file from the JMS. For this Documentum 23.4 version, the log file was “$JMS_HOME/logs/otdsauth.log“. Starting from version 25.4, this log file is located inside “$DOCUMENTUM/dba/log” instead:
[dmadmin@cs-0 ~]$ cat $JMS_HOME/logs/otdsauth.log
...
2025-12-08 11:49:46,106 UTC ERROR [] (https-jsse-nio-9082-exec-36) Thread[https-jsse-nio-9082-exec-36,5,main] java.io.IOException: Unable to tunnel through proxy. Proxy returns "HTTP/1.1 502 Bad Gateway"
        at java.base/sun.net.www.protocol.http.HttpURLConnection.doTunneling0(HttpURLConnection.java:2311)
        at java.base/sun.net.www.protocol.http.HttpURLConnection.doTunneling(HttpURLConnection.java:2181)
        at java.base/sun.net.www.protocol.https.AbstractDelegateHttpsURLConnection.connect(AbstractDelegateHttpsURLConnection.java:185)
        at java.base/sun.net.www.protocol.http.HttpURLConnection.getOutputStream0(HttpURLConnection.java:1465)
        at java.base/sun.net.www.protocol.http.HttpURLConnection.getOutputStream(HttpURLConnection.java:1436)
        at java.base/sun.net.www.protocol.https.HttpsURLConnectionImpl.getOutputStream(HttpsURLConnectionImpl.java:220)
        at com.documentum.cs.otds.OTDSAuthenticationServlet.validatePassword(OTDSAuthenticationServlet.java:275)
        at com.documentum.cs.otds.OTDSAuthenticationServlet.doPost(OTDSAuthenticationServlet.java:175)
        at jakarta.servlet.http.HttpServlet.service(HttpServlet.java:590)
        ...
        at org.apache.tomcat.util.net.NioEndpoint$SocketProcessor.doRun(NioEndpoint.java:1740)
        at org.apache.tomcat.util.net.SocketProcessorBase.run(SocketProcessorBase.java:52)
        at org.apache.tomcat.util.threads.ThreadPoolExecutor.runWorker(ThreadPoolExecutor.java:1191)
        at org.apache.tomcat.util.threads.ThreadPoolExecutor$Worker.run(ThreadPoolExecutor.java:659)
        at org.apache.tomcat.util.threads.TaskThread$WrappingRunnable.run(TaskThread.java:61)
        at java.base/java.lang.Thread.run(Thread.java:840)

2025-12-08 12:21:16,302 UTC ERROR [] (https-jsse-nio-9082-exec-50) Exception while fetching certificates from jwks url
[dmadmin@cs-0 ~]$
The first error message (11:49) occurred about 30 minutes before the authentication attempt. On the other hand, the last line (12:21) is directly linked to the problem according to its timestamp. This indicates that the Documentum Server was trying to fetch the JWKS certificate. This happens when the OTDS Authentication Servlet is configured with the “auto_cert_refresh=true” parameter (see the “otdsauth.properties” file).
This forces the Documentum Server to contact the OTDS Server in order to retrieve the correct or current SSL certificate to use. However, that request failed. Even though it is not explicitly written, it is easy to deduce that the first error, related to a proxy communication issue, is the root cause.
4. Checking newly added proxy and correcting itAs far as I knew, there should not have been any proxy configured on Documentum, since all components are internal to the customer and located within the same network. However, when checking the startup logs of the JMS, I noticed that a new proxy configuration had recently been added when the Tomcat process restarted less than two hours earlier:
[dmadmin@cs-0 ~]$ grep proxy $JMS_HOME/logs/catalina.out
...
2025-12-08 10:54:56,385 UTC INFO [main] org.apache.catalina.startup.VersionLoggerListener.log Command line argument: -Dhttp.proxyHost=proxy.domain.com
2025-12-08 10:54:56,385 UTC INFO [main] org.apache.catalina.startup.VersionLoggerListener.log Command line argument: -Dhttp.proxyPort=2010
2025-12-08 10:54:56,385 UTC INFO [main] org.apache.catalina.startup.VersionLoggerListener.log Command line argument: -Dhttps.proxyHost=proxy.domain.com
2025-12-08 10:54:56,385 UTC INFO [main] org.apache.catalina.startup.VersionLoggerListener.log Command line argument: -Dhttps.proxyPort=2011
...
[dmadmin@cs-0 ~]$
After checking with the relevant teams, it turned out that this issue was not really related to Documentum itself. Someone had simply restarted the JMS after adding proxy settings as new JVM parameters while testing an external service that required internet access. Yes, directly in TEST/QA without validating in DEV first – it happens apparently.
However, since no exceptions were configured through the no_proxy setting (“-Dhttp.nonProxyHosts” JVM parameter), it meant that 100% of the requests initiated by the JVM were forwarded to the proxy. That proxy had no knowledge of the OTDS server (which is expected), so the communication simply failed.
After correcting the proxy configuration (either by removing it or by adding all internal domains to the no_proxy setting), the JVM was able to communicate with OTDS again. As a consequence, the D2 SSO started working successfully and the environment was back “online” for all testers. These two blog posts clearly demonstrate that just because D2 displays an error, it doesn’t mean that the real root cause is obvious. Careful investigation and analysis of the log files is always essential.
L’article Dctm – Another DM_LICENSE_E_INVALID_LICENSE error but caused by JMS this time est apparu en premier sur dbi Blog.
Credential Errors (OGG-15409) with GoldenGate Migration Utility
The GoldenGate migration utility provided by Oracle allows you to quickly upgrade your classic architecture into GoldenGate 26ai with Microservices Architecture. But even after some updates, it still has a few bugs, as I explained in a previous blog post.
One of them can lead to an OGG-15409 error during the migration. This error will not appear when running the migration tool in dryrun mode. You might then be faced with this issue only when doing the real migration. Here is the exact error:
ERROR: Unable to patch EXTRACT EXT, response is HTTP Status-Code 400: Bad Request..
[ERROR] OGG-15409 - Alias 'ggadmin_alias' not found in credential store domain 'OracleGoldenGate'.
Extract EXT Process Definitions patched.The first step is to understand what is causing the issue. For this, you need to understand how the GoldenGate migration utility works.
When migrating extracts (or replicats), GoldenGate will make API calls to the new Microservices Architecture administration service to register the extract (or replicat). Once created, it will alter it with a PATCH request to update the credentials used.
We can see it in the restapi.log:
{"context":{"verb":"PATCH","uri":"/services/v2/extract/EXT",...},"content":{"credentials":{"alias":"ggadmin_alias","domain":"OracleGoldenGate"}},...}Unfortunately, once the migration is done, you cannot re-run the migration. You will need to fix this manually.
But since this is the only post-migration task made on extracts and replicats, it is rather easy to do. You can just create the aliases first, and call the REST API to alter all extracts and replicats. In Python, using the client I presented in a previous blog post, it would look like the following. First, create the client connection.
from oggrestapi import OGGRestAPI
ogg_client = OGGRestAPI(url='https://vmogg:7810', username='ogg', password='***')
Then, check the content of the extract (or replicat) using the retrieve_extract (or retrieve_replicat) method. For the moment, we don’t see any credentials key.
# This retrieves all the configuration of an extract, except for the configuration file
>>> {k:v for k,v in ogg_client.retrieve_extract('EXT').items() if k != 'config'}
{'$schema': 'ogg:extract', 'targets': [{'name': 'aa', 'path': 'source', 'sizeMB': 500, ...}], 'description': 'dbi blog migration', 'source': 'tranlogs', 'type': 'Integrated'}
Then, create the alias(es) with the create_alias method.
ogg_client.create_alias(
    alias='ggadmin_alias',
    domain='OracleGoldenGate',
    data={
        "userid":"ggadmin@vmora:1521/DB",
        "password": "***"
    }
)
And finally, alter the extracts with the update_extract method.
ogg_client.update_extract(
    extract='EXT',
    data={
        "alias": "ggadmin_alias",
        "domain": "OracleGoldenGate"
    }
)
If you had the issue with a replicat, the syntax is exactly the same, with the update_replicat method.
ogg_client.update_replicat(
    replicat='REP',
    data={
        "alias": "ggadmin_alias",
        "domain": "OracleGoldenGate"
    }
)
You can check that the credentials are there by reusing the retrieve_extract (or retrieve_replicat) method. This time, we see the credentials key !
>>> {k:v for k,v in ogg_client.retrieve_extract('EXT').items() if k != 'config'}
{'$schema': 'ogg:extract', 'credentials': {'alias': 'ggadmin_alias', 'domain': 'OracleGoldenGate'}, 'targets': [{'name': 'aa', 'path': 'source', 'sizeMB': 500, ...}], 'description': 'dbi blog migration', 'source': 'tranlogs', 'type': 'Integrated', ...}For some reason, the credentials of the source setup will not always be migrated. If you don’t have too many aliases, I would suggest creating the aliases in the target environment. This way, you know they are working even before attempting the migration. This should definitely be part of your new deployment tests.
L’article Credential Errors (OGG-15409) with GoldenGate Migration Utility est apparu en premier sur dbi Blog.
Remove grant to public in Oracle databases
The Center for Internet Security publishes the “CIS Oracle database 19c Benchmark” with recommendations to enhance the security of Oracle databases.
One type of recommendations is to remove grant execute to public (chapter 5.1.1.1-5.1.1.7 Public Privileges). There is a list of powerful SYS packages. And for security reasons, only users that really need this functionality should have access to it. But per default, it is granted to public and all users can use it.
In theory, to fix that is easy, e.g.
REVOKE EXECUTE ON DBMS_LDAP FROM PUBLIC;But is that really a good idea?
Who is using an object from another schema?If the object is used in a program unit, a named PL/SQL block (package, function, procedure, trigger), you can see the dependency in the view dba_dependencies.
select distinct owner from dba_dependencies
where referenced_name='DBMS_LDAP' and owner<>'SYS'
order by 2,1;
And for these objects, the users already have a direct grant for it. So, remove of the public grant does not affect these user-objects.
But wait! Rarely used, but there are named blocks with invokers right’s (create procedure procname AUTHID CURRENT_USER is…) . See How Roles Work in PL/SQL Blocks
select owner, object_name from dba_procedures where authid='CURRENT_USER';
In this case the user can also access objects used in program units he has granted via a role. You have to check which users have access to these program units. These users are potentially affected by the change!
For objects used outside of above program units: If a user has a direct grant, or an indirect grant via a role to the object, removing the grant to public does not affect the work of this user with these objects.
So, what about the other users without direct/indirect grants to the object (except “public”)? How can we see if above mentioned objects are used (e.g. from external code in a Perl script or an application server connecting to the database)?
To see the usage of an object, we can use unified auditing and create an audit policy for the object.
create audit policy CIS_CHECK_USAGE
actions
execute on sys.dbms_ldap
when 'SYS_CONTEXT(''USERENV'', ''CURRENT_USER'') != ''SYS''' EVALUATE PER STATEMENT;

audit policy CIS_CHECK_USAGE;
alter audit policy cis_check_usage add actions EXECUTE on SYS.DBMS_LOB;
alter audit policy cis_check_usage add actions ...
Hint: Unified auditing can also be used if the Oracle binary is not relinked for unified audit (the relink only deactivates traditional auditing, unified auditing is always active)
To automate above steps, you can do it dynamically with the Perl script below (run it with $ORACLE_HOME/perl/bin/perl, so the required Oracle modules are present):
  use DBI;
  my $dbh = DBI->connect('dbi:Oracle:', '', '',{ PrintError => 1, ora_session_mode=>2 });
  my @pdblist;
  my $sth=$dbh->prepare(q{select PDB_NAME from cdb_pdbs where pdb_name<>'PDB$SEED' union select 'CDB$ROOT' from dual});
  $sth->execute();
  while (my @row = $sth->fetchrow_array) {
    push(@pdblist, $row[0]);
  }

  foreach my $pdb (@pdblist){
    # switch PDB
    print "PDB=$pdb\n";
    $dbh->do("alter session set container=$pdb");

    # create cis_check_usage
    print q{ create audit policy cis_check_usage actions all on sys.AUD$ when 'SYS_CONTEXT(''USERENV'', ''CURRENT_USER'') != ''SYS''' EVALUATE PER STATEMENT}."\n";
    $dbh->do(q{ create audit policy cis_check_usage actions all on sys.AUD$ when 'SYS_CONTEXT(''USERENV'', ''CURRENT_USER'') != ''SYS''' EVALUATE PER STATEMENT});
    $dbh->do(q{ audit policy cis_check_usage});

    # add execute to public
    my $sql=q{
     SELECT  PRIVILEGE||' on '||owner||'.'||table_name FROM DBA_TAB_PRIVS WHERE GRANTEE='PUBLIC' AND PRIVILEGE='EXECUTE' AND TABLE_NAME IN (
     'DBMS_LDAP','UTL_INADDR','UTL_TCP','UTL_MAIL','UTL_SMTP','UTL_DBWS','UTL_ORAMTS','UTL_HTTP','HTTPURITYPE',
     'DBMS_ADVISOR','DBMS_LOB','UTL_FILE',
     'DBMS_CRYPTO','DBMS_OBFUSCATION_TOOLKIT', 'DBMS_RANDOM',
     'DBMS_JAVA','DBMS_JAVA_TEST',
     'DBMS_SCHEDULER','DBMS_JOB',
     'DBMS_SQL', 'DBMS_XMLGEN', 'DBMS_XMLQUERY','DBMS_XMLSTORE','DBMS_XMLSAVE','DBMS_AW','OWA_UTIL','DBMS_REDACT',
     'DBMS_CREDENTIAL'
      )};
    $sth=$dbh->prepare("$sql");
    $sth->execute();
    while (my @result = $sth->fetchrow_array) {
      print  "alter audit policy cis_check_usage add actions $result[0]\n";
      $dbh->do("alter audit policy cis_check_usage add actions $result[0]");
    }
  }
After some days/weeks, you can evaluate the usage of dbms_ldap or other objects audited by the cis_check_usage policy
select dbusername, current_user, object_schema||'.'||object_name as object,
      sql_text, system_privilege_used,
       system_privilege, unified_audit_policies, con_id , event_timestamp
from cdb_unified_audit_trail
where unified_audit_policies like '%CIS_CHECK_USAGE%';
With this query, we see the usage of the objects we audited with the CIS_CHECK_USAGE policy. If there are no rows, check if you really enabled the policy (select * from audit_unified_enabled_policies where policy_name='CIS_CHECK_USAGE';)
With the next query, we exclude the objects per user that can be accessed by a direct grant or a grant via a role, so, a revoke from public will not affect this user.
select distinct current_user, action_name, object_schema, object_name, con_id
from cdb_unified_audit_trail a
where unified_audit_policies like '%CIS_CHECK_USAGE%'
and current_user not in (
  select grantee from cdb_tab_privs -- direct grant
  where owner=a.object_schema and table_name=a.object_name and con_id=a.con_id
union all
  select r.grantee from cdb_role_privs r, cdb_tab_privs t -- grant via role
  where r.granted_role=t.grantee and r.con_id=t.con_id
  and r.grantee=a.current_user   and t.owner=a.object_schema
  and t.table_name=a.object_name and r.con_id=a.con_id
);
And what is left, needs attention.
Sometimes the objects are used by a background process, e.g. if you see the object_name DBMS_SQL, but in sql_text it is not used, then the user probably does not need it. But if it is present in sql_text, then the user definitely needs a grant. I recommend to grant the object via a role, so it behaves as before, the user can use it directly, but not in procedures/functions/packages.
create  role cis_dbms_sql ;
grant execute on sys.dbms_sql to cis_dbms_sql;
grant cis_dbms_sql to user1;
Then pragmatically, remove the execute rights from public on a test system and check if the application still works as expected. Generate the revoke commands dynamically, and do not forget to also dynamically generate an undo script in case of problems:
SELECT  'revoke '||PRIVILEGE||' on '||owner||'.'||table_name||' from PUBLIC;'
FROM DBA_TAB_PRIVS
WHERE GRANTEE='PUBLIC' AND PRIVILEGE='EXECUTE' AND TABLE_NAME IN (
   'DBMS_LDAP',' UTL_INADDR' ,'UTL_TCP', 'UTL_MAIL', 'UTL_SMTP', 'UTL_DBWS',
 'UTL_ORAMTS','UTL_HTTP','HTTPURITYPE',
'DBMS_ADVISOR','DBMS_LOB','UTL_FILE',
'DBMS_CRYPTO','DBMS_OBFUSCATION_TOOLKIT', 'DBMS_RANDOM',
'DBMS_JAVA','DBMS_JAVA_TEST',
'DBMS_SCHEDULER','DBMS_JOB',
'DBMS_SQL', 'DBMS_XMLGEN', 'DBMS_XMLQUERY','DBMS_XMLSTORE','DBMS_XMLSAVE','DBMS_AW','OWA_UTIL','DBMS_REDACT',
'DBMS_CREDENTIAL'
);

SELECT  'grant '||PRIVILEGE||' on '||owner||'.'||table_name||' to PUBLIC;'
FROM DBA_TAB_PRIVS
WHERE GRANTEE='PUBLIC' AND PRIVILEGE='EXECUTE' AND TABLE_NAME IN (
   'DBMS_LDAP',' UTL_INADDR' ,'UTL_TCP', 'UTL_MAIL', 'UTL_SMTP', 'UTL_DBWS',
 'UTL_ORAMTS','UTL_HTTP','HTTPURITYPE',
'DBMS_ADVISOR','DBMS_LOB','UTL_FILE',
'DBMS_CRYPTO','DBMS_OBFUSCATION_TOOLKIT', 'DBMS_RANDOM',
'DBMS_JAVA','DBMS_JAVA_TEST',
'DBMS_SCHEDULER','DBMS_JOB',
'DBMS_SQL', 'DBMS_XMLGEN', 'DBMS_XMLQUERY','DBMS_XMLSTORE','DBMS_XMLSAVE','DBMS_AW','OWA_UTIL','DBMS_REDACT',
'DBMS_CREDENTIAL'
);
It has to be run in each PDB and CDB$ROOT.
If all works as expected, then it is fine.
Installation of patches and new componentsBut keep that in mind if you want to install something later. It may fail. For example, install an rman catalog:
RMAN> create catalog;
create catalog;
error creating dbms_rcvcat package body
RMAN-00571: ===========================================================
RMAN-00569: =============== ERROR MESSAGE STACK FOLLOWS ===============
RMAN-00571: ===========================================================
RMAN-06433: error installing recovery catalog
RMAN Client Diagnostic Trace file : /u01/app/oracle/diag/clients/user_oracle/RMAN_1732619876_110/trace/ora_rman_635844_0.trc
To create a valid rman catalog, you need to grant the execute right for UTL_HTTP, DBMS_LOB, DBMS_XMLGEN and DBMS_SQL directly to the rman user. Strange for me: it does not work if you grant it to a role (e.g. recovery_catalog_owner), but it works with a grant to public.
My recommendation to install new softare or patches is:
- Run the undo-script mentioned above (grant execute to public)
- Apply the Oracle or application patch or new application installation
- Check for invalid objects
- Run the hardening-script (revoke execute from public)
- Check for additional invalid objects and determine the missing grants
- Extend your hardening script with the required grants and re-run it.
Generally, the CIS hardening about revoking execute from public is possible. But it is very dangerous that the functionality of the application could be compromised. Especially with components that are used very rarely, this could only be noticed very late at best, e.g. in the case of end-of-year processing.
L’article Remove grant to public in Oracle databases est apparu en premier sur dbi Blog.
ECM: Low-code, high value
First, for those unfamiliar with the term, low-code is a software development approach that uses visual, drag-and-drop interfaces and pre-built components to create applications, rather than manual coding.
Low-code doesn’t always have a good reputation in the IT world because “real” programmers write code. But why reinvent the wheel?

I have worked in the ECM world for more than fifteen years and have seen many organizations rely on heavy custom development to adapt systems to their business needs.
It is often a work habit, but sometimes, it can also be a way of making our work more complicated than it needs to be. Complicating things allows to maintain control over customers (or management for internals) and their need for modifications or maintenance.
However, the reality is that low-code doesn’t mean low competencies. It requires a thorough understanding of existing features and how to optimize them.
This is especially true in a cloud environment, where we cannot control the update or upgrade cycle. Updates are frequently pushed (monthly for M-Files), bringing architectural changes, API adjustments, performance optimizations, and security enhancements. Custom code poses a permanent risk of unexpected breakdowns, compatibility issues, authentication errors, and API errors. Sometimes these issues occur silently after an update, and root cause analysis can be difficult.
What worked last month might suddenly stop working tomorrow, and you may not even know until a critical business process fails.
Every custom development requires regression testing, debugging after updates, code refactoring, documentation and QA validation. Since many companies don’t keep the original developer on staff, the risk grows every year.
In contrast, using embedded modules, like Compliance Kit or Properties Calculator for M-Files. They evolve with the platform, not against it.
Another cost factor is security and compliance responsibility. Adding custom code means adding a new piece of software to your ecosystem. You become responsible for its security and must ensure that it complies with data protection rules. Auditors may request documentation and evidence of validation.
On the other hand, native configuration tools are secure by design and part of the editor’s audited code base.
The rise of low-code ECM platformsTo address these issues, modern ECM vendors are moving toward low-code or configuration-driven models.
Low-code ECM platforms focus on:
- configuration instead of custom code
- rules instead of scripts
- metadata-driven logic instead of hard-coded business rules
- cloud compatibility from the ground up
This shift dramatically reduces implementation effort, accelerates time to value, and improves overall system stability.
When low-code matters the most
Low-code ECM becomes critical in situations such as:
- cloud deployments
- rapid prototyping and agile implementations
- regulated environments with strict audit requirements
- organizations with limited IT resources
- multi-country deployments requiring frequent adaptations
In all these scenarios, platforms that rely heavily on custom development struggle.
Low-code ECM thrives.
Where Custom Development Still Has a Role
Low-code doesn’t eliminate custom development, but it changes where it belongs.
Custom code should be used primarily for:
- complex integrations
- external workflow orchestration
- advanced business systems
- analytics or reporting pipelines
But this logic belongs outside the ECM platform, not inside the vault.
This modular approach reduces risk and simplifies lifecycle management.
As the ECM landscape accelerates toward cloud-first delivery, the industry is moving away from heavy customization. Organizations are demanding systems that:
- are stable across updates
- reduce maintenance
- accelerate deployment
- adapt quickly
- remain secure and compliant
Low-code ECM is the answer, and M-Files is one of the most advanced platforms in this space thanks to:
- metadata-driven design
- powerful configuration tools
- no-code automation capabilities
- cloud-safe architecture
While many ECM platforms still rely on fragile customizations, M-Files demonstrates that flexibility doesn’t have to mean complexity.
Low-code is no longer a trend, it’s the foundation of modern ECM.
And M-Files is years ahead of many competitors in embracing this approach.
As usual if you want more information about this topic feel free to contact us
L’article ECM: Low-code, high value est apparu en premier sur dbi Blog.
OGG-12020 Payload Error in GoldenGate Migration Utility
While migrating a GoldenGate classic architecture setup with the migration utility, I recently had the following OGG-12020 error:
[ERROR] OGG-12020 - The request payload for 'POST /services/v2/config/files/ext.prm' is not defined as an objectIt is a very cryptic error at first glance, but let’s try to understand what happened.
Where does the error come from ?The first step is to understand what is causing the issue. For this, you need to understand how the GoldenGate migration utility works.
When migrating extracts (or any other GoldenGate object), GoldenGate will make API calls to the new microservices architecture administration service to register the extracts. The OGG-12020 error is just the API telling you that the POST call is invalid.
Let’s use the API log reader from a previous blog post to ease the analysis. You can also just read through the restapi.log of your target deployment, but it will be harder to read.
python3 restapi_to_ndjson.py $OGG_DEPLOYMENT_HOME/var/log restapi.ndjsonUsing jq, we filter the failed POST calls against the URI given in the migration logs (/services/v2/config/files/ext.prm).
> jq -c 'select (.request.context.verb == "POST" and .request.context.uri == "/services/v2/config/files/ext.prm" and .restapi_status == "ERROR")' restapi.ndjson
{"request":{"context":{"httpContextKey":140077954104240,"verbId":4,"verb":"POST","originalVerb":"POST","uri":"/services/v2/config/files/ext.prm","protocol":"https","headers":{"Authorization":"** Masked **","Content-type":"application/json","User-Agent":"Java/1.8.0_482","Host":"oggma:port","Accept":"text/html, image/gif, image/jpeg, *; q=.2, */*; q=.2","Connection":"keep-alive","Content-Length":"12417", "Content-Type":null,"X-OGG-Requestor-Id":"","X-OGG-Feature-List":""},"host":"oggma:port","securityEnabled":true,"authorization":{"authUserName":"ogg_user","authPassword":"** Masked **", "authMode":"Basic","authUserRole":"Security"},"requestId":5,"uriTemplate":"/services/{version}/config/files/{file}"},"content":null,"isScaRequest":true,"parameters":{"uri":{"file":"ext.prm","version":"v2"}}},"response":{"context":{"httpContextKey":140077954104240,"requestId":5,"code":"400 Bad Request","headers":{"Content-Type":"application/json","Strict-Transport-Security":"max-age=31536000;includeSubDomains","Set-Cookie":"** Masked **"},"Content-Type":"application/json","contentType":"text/html"},"isScaResponse":true,"content":{"$schema":"api:standardResponse","links":[{"rel":"canonical","href":"https://oggma:port/services/v2/config/files/ext.prm","mediaType":"text/html"},{"rel":"self","href":"https://oggma:port/services/v2/config/files/ext.prm","mediaType":"text/html"}],"messages":[{"$schema":"ogg:message","title":"The request payload for 'POST /services/v2/config/files/ext.prm' is not defined as an object.","code":"OGG-12020","severity":"ERROR","issued":"2026-03-05T09:55:24Z","type":"https://docs.oracle.com/en/middleware/goldengate/core/23.26/error-messages/"}]}},"restapi_datetime":"2026-03-05 10:55:24.448+0100","restapi_epoch":1772704524,"restapi_status":"ERROR","restapi_service":"adminsrvr","restapi_reqno":18}
You might not see the root cause at first, but if we only retrieve the content object:
> jq -c 'select (.request.context.verb == "POST" and .request.context.uri == "/services/v2/config/files/ext.prm" and .restapi_status == "ERROR") | {content:.request.content, message:.response.content.messages[0].title}' restapi.ndjson
{"content":null,"message":"The request payload for 'POST /services/v2/config/files/ext.prm' is not defined as an object."}
The migration utility is sending a request to the API with a null content, which obviously fails. Normally, the content key should contain a list with all the lines from the parameter file.
Unfortunately, there is no easy solution here. But here are the steps I took to solve the issue.
- First, you should make sure that the
dryrunof the migration utility did not highlight any error in the formatting of the file. - Then, make sure you are using the latest version of the migration utility.
- If it still doesn’t work, you unfortunately found a bug in the migration utility, and there is little you can do.
However, you can still use the tool to migrate. In my case, I managed to pinpoint the error to this line of the extract parameter file:
TOKENS (
    [...]
    TK_COL = [...] @STRSUB(column_name, '|', '\|', '\', '\\') [...]
);
The migration utility seems to have poor handling of these escape characters and does not fail properly. It should either fail before attempting the API call or send proper content to the API.
If you are sure that the incriminated syntax is valid in your target GoldenGate version, migrate with the following steps:
- Remove the incriminated syntax from the file. In my case, it meant removing the
STRSUBsection of the file. - Migrate with the temporary parameter file
- Modify the parameter file in the target GoldenGate deployment, undoing the changes.
If you have a lot of extracts and replicats that need to be migrated, using this temporary file trick might be your best chance to secure your GoldenGate migration.
L’article OGG-12020 Payload Error in GoldenGate Migration Utility est apparu en premier sur dbi Blog.
PostgreSQL 19: pg_plan_advice
In our performance tuning workshop, especially when attendees have an Oracle background, one question for sure pops up every time: How can I use optimizer hints in PostgreSQL. Up until today there are three answers to this:
- You simply can’t, there are no hints
- You might consider using the pg_hint_plan extension
- Not really hints, but you can tell the optimizer to make certain operations more expensive, so other operations might be chosen
Well, now we need to update the workshop material because this was committed for PostgreSQL 19 yesterday. The feature is not called “hints” but it does exactly that: Tell the optimizer what to do because you (might) know it better and you want a specific plan for a given query. Just be aware that this comes with the same issues as listed here.
The new feature comes as an extension so you need to enable it before you can use it. There are three ways to do this:
-- current session
postgres=# load 'pg_plan_advice';
LOAD

-- for all new sessions
postgres=# alter system set session_preload_libraries = 'pg_plan_advice';
ALTER SYSTEM
postgres=# select pg_reload_conf();
 pg_reload_conf
----------------
 t
(1 row)

-- instance wide
postgres=# alter system set shared_preload_libraries = 'pg_plan_advice';
ALTER SYSTEM
postgres=# select pg_reload_conf();
 pg_reload_conf
----------------
 t
(1 row)
To see this in action, let’s create a small demo setup:
postgres=# create table t1 ( a int primary key, b text );
CREATE TABLE
postgres=# create table t2 ( a int, b int references t1(a), v text );
CREATE TABLE
postgres=# insert into t1 select i, md5(i::text) from generate_series(1,1000000) i;
INSERT 0 1000000
postgres=# insert into t2 select i, i, md5(i::text) from generate_series(1,1000000) i;
INSERT 0 1000000
postgres=# insert into t2 select i, 1, md5(i::text) from generate_series(1000000,2000000) i;
INSERT 0 1000001
A simple parent child relation having a single match from one to one million and one million and one matches for the value one of the parent table.
EXPLAIN comes with a new option to generate the so called advice string for a given query, e.g.:
postgres=# explain (plan_advice) select * from t1 join t2 on t1.a = t2.b;
                                        QUERY PLAN
------------------------------------------------------------------------------------------
 Nested Loop  (cost=0.43..111805.81 rows=2000001 width=78)
   ->  Seq Scan on t2  (cost=0.00..48038.01 rows=2000001 width=41)
   ->  Memoize  (cost=0.43..0.47 rows=1 width=37)
         Cache Key: t2.b
         Cache Mode: logical
         Estimates: capacity=29629 distinct keys=29629 lookups=2000001 hit percent=98.52%
         ->  Index Scan using t1_pkey on t1  (cost=0.42..0.46 rows=1 width=37)
               Index Cond: (a = t2.b)
 JIT:
   Functions: 8
   Options: Inlining false, Optimization false, Expressions true, Deforming true
 Generated Plan Advice:
   JOIN_ORDER(t2 t1)
   NESTED_LOOP_MEMOIZE(t1)
   SEQ_SCAN(t2)
   INDEX_SCAN(t1 public.t1_pkey)
   NO_GATHER(t1 t2)
(17 rows)
What you see here are advice tags, and the full list of those tags is documented in documentation of the extension. First we have the join order, then nested loop memoize, a sequential scan on t2 and an index scan on the primary key of the parent table and finally an instruction that neither t1 nor t2 should appear under a gather node.
This can be given as an advice to the optimizer/planner:
postgres=# SET pg_plan_advice.advice = 'JOIN_ORDER(t2 t1) NESTED_LOOP_MEMOIZE(t1) SEQ_SCAN(t2) INDEX_SCAN(t1 public.t1_pkey) NO_GATHER(t1 t2)';
SET
postgres=# explain (plan_advice) select * from t1 join t2 on t1.a = t2.b;
                                        QUERY PLAN
------------------------------------------------------------------------------------------
 Nested Loop  (cost=0.43..111805.81 rows=2000001 width=78)
   ->  Seq Scan on t2  (cost=0.00..48038.01 rows=2000001 width=41)
   ->  Memoize  (cost=0.43..0.47 rows=1 width=37)
         Cache Key: t2.b
         Cache Mode: logical
         Estimates: capacity=29629 distinct keys=29629 lookups=2000001 hit percent=98.52%
         ->  Index Scan using t1_pkey on t1  (cost=0.42..0.46 rows=1 width=37)
               Index Cond: (a = t2.b)
 JIT:
   Functions: 8
   Options: Inlining false, Optimization false, Expressions true, Deforming true
 Supplied Plan Advice:
   SEQ_SCAN(t2) /* matched */
   INDEX_SCAN(t1 public.t1_pkey) /* matched */
   JOIN_ORDER(t2 t1) /* matched */
   NESTED_LOOP_MEMOIZE(t1) /* matched */
   NO_GATHER(t1) /* matched */
   NO_GATHER(t2) /* matched */
 Generated Plan Advice:
   JOIN_ORDER(t2 t1)
   NESTED_LOOP_MEMOIZE(t1)
   SEQ_SCAN(t2)
   INDEX_SCAN(t1 public.t1_pkey)
   NO_GATHER(t1 t2)
(24 rows)
Running the next explain with that advice will show you what you’ve advised the planner to do and what was actually done. In this case all the advises matched and you get the same plan as before.
Once you play e.g. with the join order, the plan will change because you told the planner to do so:
postgres=# SET pg_plan_advice.advice = 'JOIN_ORDER(t1 t2)';
SET
postgres=# explain (plan_advice) select * from t1 join t2 on t1.a = t2.b;
                                    QUERY PLAN
-----------------------------------------------------------------------------------
 Merge Join  (cost=323875.24..390697.00 rows=2000001 width=78)
   Merge Cond: (t1.a = t2.b)
   ->  Index Scan using t1_pkey on t1  (cost=0.42..34317.43 rows=1000000 width=37)
   ->  Materialize  (cost=318880.31..328880.31 rows=2000001 width=41)
         ->  Sort  (cost=318880.31..323880.31 rows=2000001 width=41)
               Sort Key: t2.b
               ->  Seq Scan on t2  (cost=0.00..48038.01 rows=2000001 width=41)
 JIT:
   Functions: 7
   Options: Inlining false, Optimization false, Expressions true, Deforming true
 Supplied Plan Advice:
   JOIN_ORDER(t1 t2) /* matched */
 Generated Plan Advice:
   JOIN_ORDER(t1 t2)
   MERGE_JOIN_MATERIALIZE(t2)
   SEQ_SCAN(t2)
   INDEX_SCAN(t1 public.t1_pkey)
   NO_GATHER(t1 t2)
(18 rows)
Really nice, now there is an official way to influence the planner using advises but please be aware of the current limitations. Needless to say, that you should use this with caution, because you can easily make things slower by advising what is not optimal for a query.
Thanks to all involved with this, this is really a great improvement.
L’article PostgreSQL 19: pg_plan_advice est apparu en premier sur dbi Blog.
USERID Syntax Warning in GoldenGate Migration Utility
When running the GoldenGate migration utility, which I presented in an previous blog post, you might encounter the following warning on USERID syntax:
WARNING: USERID/PASSWORD parameter is no longer supported and will be modified to use USERIDALIAS for the database credentials.This is not really a surprise, since USERID is an old syntax that should not be used anymore. In fact, it is not even part of the latest versions of GoldenGate. Let’s see a very basic example of a replicat running in the GoldenGate 19c Classic Architecture.
GGSCI (ogg) 1> view params rep
REPLICAT rep
USERIDALIAS dbi_blog
MAP PDB1.APP_PDB1.SOURCE, PDB2.APP_PDB2.TARGET,
COLMAP (
    COL_SOURCE_USER = COL_TARGET_USER,
    COL_SOURCE_USERID = COL_TARGET_USERID
);
Nothing here should be a cause for concern, because the database connection is done with the USERIDALIAS syntax. Yet, when running the migration utility in dryrun mode, I get the following warning:
Migration of Extract E2T Completed Successfully.

Parameter file for REPLICAT REP has the following warnings:
        WARNING: USERID/PASSWORD parameter is no longer supported and will be modified to use USERIDALIAS for the database credentials.

Migrating REPLICAT REP to http://oggma:port.

Parameter File rep.prm Saved Successfully.

Checkpoint File(s) Copied and Converted Successfully.

REPLICAT REP patched.

...

Migration Summary

    Migration of Replicat REP ..............................: Successful
...
It is technically not an error, and the migration utility seems to have no problem migrating this replicat to the new Microservices Architecture. However, a question remains. Will USERID be replaced in the process ? Of course, we do not want all USERID occurrences to be replaced with USERIDALIAS, if these are not connection keywords.
Let’s run the migration utility, for real this time, to see what happens. The output of the migration utility is exactly the same as before. The process is migrated with a warning on the USERID syntax.
WARNING: USERID/PASSWORD parameter is no longer supported and will be modified to use USERIDALIAS for the database credentials.And if we look at the migrated parameter file:
> grep USERID $OGG_DEPLOYMENT_HOME/etc/conf/ogg/rep.prm
USERIDALIAS dbi_blog
    COL_SOURCE_USER = COL_TARGET_USER,
    COL_SOURCE_USERID = COL_TARGET_USERID
In this specific case, despite the warning on USERID, the migration utility did not change the parameter file. But of course, if you get the warning, you should always check the migrated parameter file before restarting your GoldenGate processes:
> diff $OLD_OGG_HOME/dirprm/rep.prm $OGG_DEPLOYMENT_HOME/etc/conf/ogg/rep.prmL’article USERID Syntax Warning in GoldenGate Migration Utility est apparu en premier sur dbi Blog.
Dctm – IDS Source 16.7.5 config.bin crash during execution
Around six months ago, I faced a confusing issue with IDS Source 16.7.5 where the “config.bin” executable always crashed when I tried to run it. The installation of IDS binaries itself completed successfully without any errors. However, the configurator, which is supposed to set up the required objects inside the Repository, consistently crashed.
1. Environment context and IDS upgradeThis Documentum environment had just been upgraded to 23.4. The next step was to upgrade the associated IDS component. The latest version of IDS compatible with recent Documentum versions is 16.7.5.
The execution of the “idsLinuxSuiteSetup.bin” installer properly extracted all binaries and deployed the WebCache application in its Tomcat server. To quickly verify that, you can check the version properties file and try starting/stopping the Tomcat instance of the IDS. On my side, there were no problems with that.
To verify the installed version of IDS and ensure that the configurator was also updated:
[dmadmin@cs-0 ~]$ cd $DM_HOME/webcache
[dmadmin@cs-0 webcache]$
[dmadmin@cs-0 webcache]$ cat version/version.properties
#Please don't remove this values
#Fri Oct 10 09:52:49 UTC 2025
INSTALLER_NAME=IDS
PRODUCT_VERSION=16.7.5
[dmadmin@cs-0 webcache]$
[dmadmin@cs-0 webcache]$ ls -l install/config.bin
-rwxrwxr-x 1 dmadmin dmadmin 54943847 Oct 19  2024 install/config.bin
[dmadmin@cs-0 webcache]$
The above confirms that WebCache was properly updated to version 16.7.5 on October 10. It also confirms that the “config.bin” is fairly recent (Q4 2024), i.e. much more recent that the old 16.7.4 file.
2. Running the IDS configurator in silentMy next step was therefore to execute the configurator, still in silent mode, as I have done for all previous IDS installations and configurations. I have not written a blog about IDS silent installation yet, but I have done so for several other components. For example, you can refer to this post for the latest one published.
The silent properties file for the IDS Source configurator is quite simple, as it only requires the Repository name to configure:
[dmadmin@cs-0 webcache]$ cat ${install_file}
### Silent installation response file for IDS configurator
INSTALLER_UI=silent
KEEP_TEMP_FILE=true

### Configuration parameters
DOC_BASE_NAME=REPO_01

[dmadmin@cs-0 webcache]$
Initially, I simply executed “config.bin“. Since it crashed and there was absolutely nothing in the logs, I had to run it again with the DEBUG flag enabled:
[dmadmin@cs-0 webcache]$ $DM_HOME/webcache/install/config.bin -DLOG_LEVEL=DEBUG -f ${install_file}
Preparing to install
Extracting the installation resources from the installer archive...
Configuring the installer for this system's environment...

Launching installer...

Picked up JAVA_TOOL_OPTIONS: -Djdk.util.zip.disableZip64ExtraFieldValidation=true -Djava.locale.providers=COMPAT,SPI --add-exports=java.base/sun.security.provider=ALL-UNNAMED --add-exports=java.base/sun.security.pkcs=ALL-UNNAMED --add-exports=java.base/sun.security.x509=ALL-UNNAMED --add-exports=java.base/sun.security.util=ALL-UNNAMED --add-exports=java.base/sun.security.tools.keytool=ALL-UNNAMED --add-opens=java.base/java.lang=ALL-UNNAMED --add-opens=java.base/java.lang.invoke=ALL-UNNAMED
[dmadmin@cs-0 webcache]$
[dmadmin@cs-0 webcache]$ echo $?
1
[dmadmin@cs-0 webcache]$
As shown above, the execution failed, as the return code was “1“. With DEBUG enabled and after checking the generated files, I found the following:
[dmadmin@cs-0 webcache]$ find . -type f -mmin -20 -ls
92475248907    380 -rw-rw-r--   1  dmadmin  dmadmin    384222 Oct 10 11:58 ./install/logs/install.log
92470810541      4 -rw-rw-r--   1  dmadmin  dmadmin       219 Oct 10 11:57 ./install/installer.properties
92475252084     12 -rwxrwxrwx   1  dmadmin  dmadmin     10564 Oct 10 11:57 ./install/config_log/OpenText_Documentum_Interactive_Delivery_Services_Configuration_Install_10_10_2025_11_57_42.log
[dmadmin@cs-0 webcache]$
[dmadmin@cs-0 webcache]$ grep -iE "_E_|_F_|ERROR|WARN|FATAL" install/logs/install.log
TYPE ERROR_TYPE 0000000000000000 0 0 0
13:24:12,192 DEBUG [main] com.documentum.install.shared.common.error.DiException - null/dba/config/GR_REPO/webcache.ini (No such file or directory)
13:24:12,193 DEBUG [main] com.documentum.install.shared.common.error.DiException - null
13:24:12,194 DEBUG [main] com.documentum.install.shared.common.error.DiException - null/dba/config/REPO_01/webcache.ini (No such file or directory)
13:24:12,194 DEBUG [main] com.documentum.install.shared.common.error.DiException - null
13:24:12,199 DEBUG [main] com.documentum.install.shared.common.error.DiException - null/dba/config/GR_REPO/webcache.ini (No such file or directory)
13:24:12,199 DEBUG [main] com.documentum.install.shared.common.error.DiException - null
13:24:12,199 DEBUG [main] com.documentum.install.shared.common.error.DiException - null/dba/config/REPO_01/webcache.ini (No such file or directory)
13:24:12,199 DEBUG [main] com.documentum.install.shared.common.error.DiException - null
13:24:12,200 DEBUG [main] com.documentum.install.shared.common.error.DiException - null/dba/config/REPO_01/webcache.ini (No such file or directory)
13:24:12,200 DEBUG [main] com.documentum.install.shared.common.error.DiException - null
TYPE ERROR_TYPE 0000000000000000 0 0 0
[dmadmin@cs-0 webcache]$
The DEBUG logs above might make it look like the “$DOCUMENTUM” environment variable is missing, since it complains about “null/dba/xxx” not being found. However, that is not the issue. I checked all parameters and environment variables, and everything was configured correctly. In addition, Documentum had just been successfully upgraded from version 20.2 to 23.4 from start to finish, which confirmed that there was no problem with the OS or environment configuration. So I checked the second file:
[dmadmin@cs-0 webcache]$ cat install/config_log/OpenText_Documentum_Interactive_Delivery_Services_Configuration_Install_10_10_2025_11_57_42.log

__________________________________________________________________________

Fri Oct 10 11:57:50 UTC 2025

Free Memory: 15947 kB
Total Memory: 49152 kB
...
Summary
-------

Installation: Successful with errors.

8 Successes
0 Warnings
1 NonFatalErrors
0 FatalErrors
...

Custom Action:            com.documentum.install.webcache.CustomActions.DiWAWebcsConfigureDocbase
                          Status: ERROR
                          Additional Notes: ERROR -     class com.documentum.install.webcache.CustomActions.DiWAWebcsConfigureDocbase.install() runtime exception:

...
====================STDERR ENTRIES==================

RepositoryManager: Trying fallback repository location...
8. final log file name=$DM_HOME/webcache/install/config_log/OpenText_Documentum_Interactive_Delivery_Services_Configuration_Install_10_10_2025_11_57_42.log
java.lang.NumberFormatException: For input string: ""
        at java.base/java.lang.NumberFormatException.forInputString(NumberFormatException.java:67)
        at java.base/java.lang.Integer.parseInt(Integer.java:678)
        at java.base/java.lang.Integer.parseInt(Integer.java:786)
        at com.documentum.install.webcache.CustomActions.DiWAWebcsConfigureDocbase.configureDocbase(DiWAWebcsConfigureDocbase.java:329)
        at com.documentum.install.webcache.CustomActions.DiWAWebcsConfigureDocbase.install(DiWAWebcsConfigureDocbase.java:202)
        at com.zerog.ia.installer.actions.CustomAction.installSelf(Unknown Source)
        at com.zerog.ia.installer.InstallablePiece.install(Unknown Source)
        at com.zerog.ia.installer.InstallablePiece.install(Unknown Source)
        at com.zerog.ia.installer.GhostDirectory.install(Unknown Source)
        at com.zerog.ia.installer.InstallablePiece.install(Unknown Source)
        at com.zerog.ia.installer.Installer.install(Unknown Source)
        at com.zerog.ia.installer.LifeCycleManager.consoleInstallMain(Unknown Source)
        at com.zerog.ia.installer.LifeCycleManager.executeApplication(Unknown Source)
        at com.zerog.ia.installer.Main.main(Unknown Source)
        at java.base/jdk.internal.reflect.NativeMethodAccessorImpl.invoke0(Native Method)
        at java.base/jdk.internal.reflect.NativeMethodAccessorImpl.invoke(NativeMethodAccessorImpl.java:77)
        at java.base/jdk.internal.reflect.DelegatingMethodAccessorImpl.invoke(DelegatingMethodAccessorImpl.java:43)
        at java.base/java.lang.reflect.Method.invoke(Method.java:569)
        at com.zerog.lax.LAX.launch(Unknown Source)
        at com.zerog.lax.LAX.main(Unknown Source)
Execute Custom Code
    class com.documentum.install.webcache.CustomActions.DiWAWebcsConfigureDocbase.install() runtime exception:
java.awt.HeadlessException:
No X11 DISPLAY variable was set,
but this program performed an operation which requires it.
        at java.desktop/java.awt.GraphicsEnvironment.checkHeadless(GraphicsEnvironment.java:164)
        at java.desktop/java.awt.Window.<init>(Window.java:553)
        at java.desktop/java.awt.Frame.<init>(Frame.java:428)
        at java.desktop/java.awt.Frame.<init>(Frame.java:393)
        at java.desktop/javax.swing.JFrame.<init>(JFrame.java:180)
        at com.documentum.install.webcache.CustomActions.DiWAWebcsConfigureDocbase.install(DiWAWebcsConfigureDocbase.java:215)
        at com.zerog.ia.installer.actions.CustomAction.installSelf(Unknown Source)
        at com.zerog.ia.installer.InstallablePiece.install(Unknown Source)
        at com.zerog.ia.installer.InstallablePiece.install(Unknown Source)
        at com.zerog.ia.installer.GhostDirectory.install(Unknown Source)
        at com.zerog.ia.installer.InstallablePiece.install(Unknown Source)
        at com.zerog.ia.installer.Installer.install(Unknown Source)
        at com.zerog.ia.installer.LifeCycleManager.consoleInstallMain(Unknown Source)
        at com.zerog.ia.installer.LifeCycleManager.executeApplication(Unknown Source)
        at com.zerog.ia.installer.Main.main(Unknown Source)
        at java.base/jdk.internal.reflect.NativeMethodAccessorImpl.invoke0(Native Method)
        at java.base/jdk.internal.reflect.NativeMethodAccessorImpl.invoke(NativeMethodAccessorImpl.java:77)
        at java.base/jdk.internal.reflect.DelegatingMethodAccessorImpl.invoke(DelegatingMethodAccessorImpl.java:43)
        at java.base/java.lang.reflect.Method.invoke(Method.java:569)
        at com.zerog.lax.LAX.launch(Unknown Source)
        at com.zerog.lax.LAX.main(Unknown Source)
Retrying Installables deferred in pass 0
Deferral retries done because:
There were no deferrals in the last pass.
8. final log file name=$DM_HOME/webcache/install/config_log/OpenText_Documentum_Interactive_Delivery_Services_Configuration_Install_10_10_2025_11_57_42.log
====================STDOUT ENTRIES==================
...
[dmadmin@cs-0 webcache]$
That log file appeared to indicate that a certain “Number” value might be missing (“NumberFormatException“). Without access to the IDS source code (and I always avoid de-compiling Documentum source files), it was impossible to determine exactly what was missing. There were no additional details in the logs, so in the end I had to reach out to OpenText support to find out what was causing the issue.
4. Root cause: missing value for TOMCAT_PORT_SELECTEDAfter several back-and-forth exchanges and around 12 days of waiting for a solution, I finally received confirmation that this was a bug in the IDS Source 16.7.5 software. This version is the first one deployed on Tomcat instead of WildFly, so it was somewhat expected that some issues might appear.
When installing the IDS Source binaries, the silent installation properties file requires you to define the port that Tomcat will use. This parameter is “USER_PORT_CHOICE=6677“. You can of course change the port if needed, but 6677 was the default port used with previous IDS versions running on WildFly, so I kept the same value when installing IDS 16.7.5 on Tomcat.
The bug is that even though this value is used correctly during the Tomcat installation step, it is not properly written into the properties file that the configuration process later relies on. The IDS Source “config.bin” looks for the file “$DM_HOME/webcache/scs_tomcat.properties” and reads the port from the “TOMCAT_PORT_SELECTED” parameter.
However, in IDS 16.7.5 this file is not updated during installation. As a result, the port value remains empty, which corresponds to the missing number referenced in the logs and causes the configurator to crash.
5. Fix: updating scs_tomcat.propertiesThe solution is fairly simple: manually update that file and run the configurator again. In my case, I used the HTTPS port 6679, since my Tomcat was already in SSL (6677 + 2 = 6679):
[dmadmin@cs-0 webcache]$ port=6679
[dmadmin@cs-0 webcache]$ sed -i "s,\(TOMCAT_PORT_SELECTED=\).*,\1${port}," $DM_HOME/webcache/scs_tomcat.properties
[dmadmin@cs-0 webcache]$
[dmadmin@cs-0 webcache]$
[dmadmin@cs-0 webcache]$ $DM_HOME/webcache/install/config.bin -DLOG_LEVEL=DEBUG -f ${install_file}
Preparing to install
Extracting the installation resources from the installer archive...
Configuring the installer for this system's environment...

Launching installer...

Picked up JAVA_TOOL_OPTIONS: -Djdk.util.zip.disableZip64ExtraFieldValidation=true -Djava.locale.providers=COMPAT,SPI --add-exports=java.base/sun.security.provider=ALL-UNNAMED --add-exports=java.base/sun.security.pkcs=ALL-UNNAMED --add-exports=java.base/sun.security.x509=ALL-UNNAMED --add-exports=java.base/sun.security.util=ALL-UNNAMED --add-exports=java.base/sun.security.tools.keytool=ALL-UNNAMED --add-opens=java.base/java.lang=ALL-UNNAMED --add-opens=java.base/java.lang.invoke=ALL-UNNAMED
[dmadmin@cs-0 webcache]$
[dmadmin@cs-0 webcache]$ echo $?
0
[dmadmin@cs-0 webcache]$
As you can see above, the return code is now “0“, which indicates a successful execution. The logs generated during this new attempt are much cleaner, and there are no longer any exceptions or errors:
[dmadmin@cs-0 webcache]$ cat install/config_log/OpenText_Documentum_Interactive_Delivery_Services_Configuration_Install_10_22_2025_13_37_46.log
__________________________________________________________________________

Wed Oct 22 01:39:40 UTC 2025

Free Memory: 14800 kB
Total Memory: 49152 kB
...
Summary
-------

Installation: Successful.

9 Successes
0 Warnings
0 NonFatalErrors
0 FatalErrors
...

Custom Action:            com.documentum.install.webcache.CustomActions.DiWAWebcsConfigureDocbase
                          Status: SUCCESSFUL

...
====================STDERR ENTRIES==================

RepositoryManager: Trying fallback repository location...
8. final log file name=$DM_HOME/webcache/install/config_log/OpenText_Documentum_Interactive_Delivery_Services_Configuration_Install_10_22_2025_13_37_46.log
Retrying Installables deferred in pass 0
Deferral retries done because:
There were no deferrals in the last pass.
8. final log file name=$DM_HOME/webcache/install/config_log/OpenText_Documentum_Interactive_Delivery_Services_Configuration_Install_10_22_2025_13_37_46.log
====================STDOUT ENTRIES==================
...
[dmadmin@cs-0 webcache]$
As mentioned earlier, this configurator is responsible for installing components inside the Repository. It creates the required IDS objects or updates them if they already exist. The DAR files were also successfully installed:
[dmadmin@cs-0 webcache]$ iapi $DOCBASE_NAME -Udmadmin -Pxxx << EOC
> ?,c,select r_object_id, r_modify_date, object_name from dmc_dar order by r_modify_date asc;
> EOC

        OpenText Documentum iapi - Interactive API interface
        Copyright (c) 2023. OpenText Corporation
        All rights reserved.
        Client Library Release 23.4.0000.0180

Connecting to Server using docbase REPO_01
[DM_SESSION_I_SESSION_START]info:  "Session 011234568027fb88 started for user dmadmin."

Connected to OpenText Documentum Server running Release 23.4.0000.0143  Linux64.Oracle
1> 2>
r_object_id       r_modify_date              object_name
----------------  -------------------------  ---------------------------------
...               ...                        ...
08123456800c99a5  10/22/2025 13:38:32        SCSDocApp
08123456800c99be  10/22/2025 13:38:58        SCSWorkflow
08123456800c99e1  10/22/2025 13:39:29        icmRating

(43 rows affected)
1>
[dmadmin@cs-0 webcache]$
However, I later discovered another small bug. The “scs_admin_config.product_version” attribute in the Repository was not updated correctly. Previously installed version was 16.7.4, so it’s unclear whether the configurator updated the value (with 16.7.4 still) or not at all. In any case, the stored product version was incorrect.
This value is used by IDS to verify version compatibility during execution. For example, you can see this version referenced during the End-to-End tests. Therefore, I had to update the value manually. To correct the issue:
[dmadmin@cs-0 webcache]$ iapi $DOCBASE_NAME -Udmadmin -Pxxx << EOC
> ?,c,select product_version from scs_admin_config;
> ?,c,update scs_admin_config object set product_version='16.7.5' where product_version='16.7.4';
> ?,c,select product_version from scs_admin_config;
> exit
> EOC

        OpenText Documentum iapi - Interactive API interface
        Copyright (c) 2023. OpenText Corporation
        All rights reserved.
        Client Library Release 23.4.0000.0180

Connecting to Server using docbase REPO_01
[DM_SESSION_I_SESSION_START]info:  "Session 011234568027fd13 started for user dmadmin."

Connected to OpenText Documentum Server running Release 23.4.0000.0143  Linux64.Oracle
Session id is s0
API>
product_version
------------------------
16.7.4
(1 row affected)

API>
objects_updated
---------------
              1
(1 row affected)
[DM_QUERY_I_NUM_UPDATE]info:  "1 objects were affected by your UPDATE statement."

API>
product_version
------------------------
16.7.5
(1 row affected)

API> Bye
[dmadmin@cs-0 webcache]$
OpenText mentioned that both of these bugs should normally be fixed in a future update of the binaries. I have not checked in the last six months, but hopefully the issue has already been resolved. If not, at least you now have the information needed to fix it!
L’article Dctm – IDS Source 16.7.5 config.bin crash during execution est apparu en premier sur dbi Blog.
Commercial PostgreSQL distributions with TDE (3) Cybertec PostgreSQL EE (1) Setup
In the lasts posts in this series we’ve looked at Fujitsu’s distribution of PostgreSQL (here and here) and EnterpriseDB’s distribution of PostgreSQL (here and here) which both come with support for TDE (Transparent Data Encryption). A third player is Cybertec with it’s Cybertec PostgreSQL EE distribution of PostgreSQL and this is the distribution we’re looking at in this and the next post.
Cybertec provides free access to their repositories with the limitation of 1GB data per table. As with Fujitsu, the supported versions of Linux distributions are based RHEL (8,9 & 10) and SLES (15 & 16).
Installing Cybertec’s distribution of PostgreSQL is, the same as with Fujitsu and EnterpriseDB, just a matter of attaching the repository and installing the packages. Before I am going to do that I’ll disable the EnterpriseDB repositories for not running into any issues with those when installing another distribution of PostgreSQL:
[root@postgres-tde ~]$ dnf repolist
Updating Subscription Management repositories.
repo id                                         repo name
enterprisedb-enterprise                         enterprisedb-enterprise
enterprisedb-enterprise-noarch                  enterprisedb-enterprise-noarch
enterprisedb-enterprise-source                  enterprisedb-enterprise-source
rhel-9-for-x86_64-appstream-rpms                Red Hat Enterprise Linux 9 for x86_64 - AppStream (RPMs)
rhel-9-for-x86_64-baseos-rpms                   Red Hat Enterprise Linux 9 for x86_64 - BaseOS (RPMs)
[root@postgres-tde ~]$ dnf config-manager --disable enterprisedb-*
Updating Subscription Management repositories.
[root@postgres-tde ~]$ dnf repolist
Updating Subscription Management repositories.
repo id                                                                                                   repo name
rhel-9-for-x86_64-appstream-rpms                                                                          Red Hat Enterprise Linux 9 for x86_64 - AppStream (RPMs)
rhel-9-for-x86_64-baseos-rpms                                                                             Red Hat Enterprise Linux 9 for x86_64 - BaseOS (RPMs)
[root@postgres-tde ~]$
Attaching the Cybertec repository for version 18 of PostgreSQL:
[root@postgres-tde ~]$ version=18
[root@postgres-tde ~]$ sudo tee /etc/yum.repos.d/cybertec-pg$version.repo <<EOF
[cybertec_pg$version]
name=CYBERTEC PostgreSQL $version repository for RHEL/CentOS \$releasever - \$basearch
baseurl=https://repository.cybertec.at/public/$version/redhat/\$releasever/\$basearch
gpgkey=https://repository.cybertec.at/assets/cybertec-rpm.asc
enabled=1
[cybertec_common]
name=CYBERTEC common repository for RHEL/CentOS \$releasever - \$basearch
baseurl=https://repository.cybertec.at/public/common/redhat/\$releasever/\$basearch
gpgkey=https://repository.cybertec.at/assets/cybertec-rpm.asc
enabled=1
EOF
[cybertec_pg18]
name=CYBERTEC PostgreSQL 18 repository for RHEL/CentOS $releasever - $basearch
baseurl=https://repository.cybertec.at/public/18/redhat/$releasever/$basearch
gpgkey=https://repository.cybertec.at/assets/cybertec-rpm.asc
enabled=1
[cybertec_common]
name=CYBERTEC common repository for RHEL/CentOS $releasever - $basearch
baseurl=https://repository.cybertec.at/public/common/redhat/$releasever/$basearch
gpgkey=https://repository.cybertec.at/assets/cybertec-rpm.asc
enabled=1
[root@postgres-tde ~]$ dnf repolist
Updating Subscription Management repositories.
repo id                                                                                                 repo name
cybertec_common                                                                                         CYBERTEC common repository for RHEL/CentOS 9 - x86_64
cybertec_pg18                                                                                           CYBERTEC PostgreSQL 18 repository for RHEL/CentOS 9 - x86_64
rhel-9-for-x86_64-appstream-rpms                                                                        Red Hat Enterprise Linux 9 for x86_64 - AppStream (RPMs)
rhel-9-for-x86_64-baseos-rpms                                                                           Red Hat Enterprise Linux 9 for x86_64 - BaseOS (RPMs)
[root@postgres-tde ~]$
Let’s check what we have available:
[root@postgres-tde ~]$ dnf search postgresql18-ee
Updating Subscription Management repositories.
Last metadata expiration check: 0:00:10 ago on Mon 09 Mar 2026 09:33:05 AM CET.
================================================================================================== Name Exactly Matched: postgresql18-ee ===================================================================================================
postgresql18-ee.x86_64 : PostgreSQL client programs and libraries
================================================================================================= Name & Summary Matched: postgresql18-ee ==================================================================================================
postgresql18-ee-contrib-debuginfo.x86_64 : Debug information for package postgresql18-ee-contrib
postgresql18-ee-debuginfo.x86_64 : Debug information for package postgresql18-ee
postgresql18-ee-devel-debuginfo.x86_64 : Debug information for package postgresql18-ee-devel
postgresql18-ee-ecpg-devel-debuginfo.x86_64 : Debug information for package postgresql18-ee-ecpg-devel
postgresql18-ee-ecpg-libs-debuginfo.x86_64 : Debug information for package postgresql18-ee-ecpg-libs
postgresql18-ee-libs-debuginfo.x86_64 : Debug information for package postgresql18-ee-libs
postgresql18-ee-libs-oauth-debuginfo.x86_64 : Debug information for package postgresql18-ee-libs-oauth
postgresql18-ee-llvmjit-debuginfo.x86_64 : Debug information for package postgresql18-ee-llvmjit
postgresql18-ee-plperl-debuginfo.x86_64 : Debug information for package postgresql18-ee-plperl
postgresql18-ee-plpython3-debuginfo.x86_64 : Debug information for package postgresql18-ee-plpython3
postgresql18-ee-pltcl-debuginfo.x86_64 : Debug information for package postgresql18-ee-pltcl
postgresql18-ee-server-debuginfo.x86_64 : Debug information for package postgresql18-ee-server
====================================================================================================== Name Matched: postgresql18-ee =======================================================================================================
postgresql18-ee-contrib.x86_64 : Contributed source and binaries distributed with PostgreSQL
postgresql18-ee-devel.x86_64 : PostgreSQL development header files and libraries
postgresql18-ee-docs.x86_64 : Extra documentation for PostgreSQL
postgresql18-ee-ecpg-devel.x86_64 : Development files for ECPG (Embedded PostgreSQL for C)
postgresql18-ee-ecpg-libs.x86_64 : Run-time libraries for ECPG programs
postgresql18-ee-libs.x86_64 : The shared libraries required for any PostgreSQL clients
postgresql18-ee-libs-oauth.x86_64 : The shared libraries required for any PostgreSQL clients - OAuth flow
postgresql18-ee-llvmjit.x86_64 : Just-in-time compilation support for PostgreSQL
postgresql18-ee-plperl.x86_64 : The Perl procedural language for PostgreSQL
postgresql18-ee-plpython3.x86_64 : The Python3 procedural language for PostgreSQL
postgresql18-ee-pltcl.x86_64 : The Tcl procedural language for PostgreSQL
postgresql18-ee-server.x86_64 : The programs needed to create and run a PostgreSQL server
postgresql18-ee-test.x86_64 : The test suite distributed with PostgreSQL
This are the usual suspects, so for getting it installed:
[root@postgres-tde ~]$ dnf install postgresql18-ee-server postgresql18-ee postgresql18-ee-contrib
Updating Subscription Management repositories.
Last metadata expiration check: 0:00:29 ago on Mon 09 Mar 2026 10:30:17 AM CET.
Dependencies resolved.
============================================================================================================================================================================================================================================
 Package                                                       Architecture                                 Version                                                               Repository                                           Size
============================================================================================================================================================================================================================================
Installing:
 postgresql18-ee                                               x86_64                                       18.3-EE~demo.rhel9.cybertec2                                          cybertec_pg18                                       2.0 M
 postgresql18-ee-contrib                                       x86_64                                       18.3-EE~demo.rhel9.cybertec2                                          cybertec_pg18                                       755 k
 postgresql18-ee-server                                        x86_64                                       18.3-EE~demo.rhel9.cybertec2                                          cybertec_pg18                                       7.2 M
Installing dependencies:
 postgresql18-ee-libs                                          x86_64                                       18.3-EE~demo.rhel9.cybertec2                                          cybertec_pg18                                       299 k

Transaction Summary
============================================================================================================================================================================================================================================
Install  4 Packages

Total download size: 10 M
Installed size: 46 M
Is this ok [y/N]: y
Downloading Packages:
(1/4): postgresql18-ee-libs-18.3-EE~demo.rhel9.cybertec2.x86_64.rpm                                                                                                                                         1.4 MB/s | 299 kB     00:00
(2/4): postgresql18-ee-contrib-18.3-EE~demo.rhel9.cybertec2.x86_64.rpm                                                                                                                                      3.1 MB/s | 755 kB     00:00
(3/4): postgresql18-ee-18.3-EE~demo.rhel9.cybertec2.x86_64.rpm                                                                                                                                              6.8 MB/s | 2.0 MB     00:00
(4/4): postgresql18-ee-server-18.3-EE~demo.rhel9.cybertec2.x86_64.rpm                                                                                                                                        13 MB/s | 7.2 MB     00:00
--------------------------------------------------------------------------------------------------------------------------------------------------------------------------------------------------------------------------------------------
Total                                                                                                                                                                                                        13 MB/s |  10 MB     00:00
CYBERTEC PostgreSQL 18 repository for RHEL/CentOS 9 - x86_64                                                                                                                                                 42 kB/s | 3.1 kB     00:00
Importing GPG key 0x2D1B5F59:
 Userid     : "Cybertec International (Software Signing Key) <build@cybertec.at>"
 Fingerprint: FCFF 012F 4B39 9019 1352 BB03 AA6F 3CC1 2D1B 5F59
 From       : https://repository.cybertec.at/assets/cybertec-rpm.asc
Is this ok [y/N]: y
Key imported successfully
Running transaction check
Transaction check succeeded.
Running transaction test
Transaction test succeeded.
Running transaction
  Preparing        :                                                                                                                                                                                                                    1/1
  Installing       : postgresql18-ee-libs-18.3-EE~demo.rhel9.cybertec2.x86_64                                                                                                                                                           1/4
  Running scriptlet: postgresql18-ee-libs-18.3-EE~demo.rhel9.cybertec2.x86_64                                                                                                                                                           1/4
  Installing       : postgresql18-ee-18.3-EE~demo.rhel9.cybertec2.x86_64                                                                                                                                                                2/4
  Running scriptlet: postgresql18-ee-18.3-EE~demo.rhel9.cybertec2.x86_64                                                                                                                                                                2/4
  Running scriptlet: postgresql18-ee-server-18.3-EE~demo.rhel9.cybertec2.x86_64                                                                                                                                                         3/4
  Installing       : postgresql18-ee-server-18.3-EE~demo.rhel9.cybertec2.x86_64                                                                                                                                                         3/4
  Running scriptlet: postgresql18-ee-server-18.3-EE~demo.rhel9.cybertec2.x86_64                                                                                                                                                         3/4
  Installing       : postgresql18-ee-contrib-18.3-EE~demo.rhel9.cybertec2.x86_64                                                                                                                                                        4/4
  Running scriptlet: postgresql18-ee-contrib-18.3-EE~demo.rhel9.cybertec2.x86_64                                                                                                                                                        4/4
  Verifying        : postgresql18-ee-18.3-EE~demo.rhel9.cybertec2.x86_64                                                                                                                                                                1/4
  Verifying        : postgresql18-ee-contrib-18.3-EE~demo.rhel9.cybertec2.x86_64                                                                                                                                                        2/4
  Verifying        : postgresql18-ee-libs-18.3-EE~demo.rhel9.cybertec2.x86_64                                                                                                                                                           3/4
  Verifying        : postgresql18-ee-server-18.3-EE~demo.rhel9.cybertec2.x86_64                                                                                                                                                         4/4
Installed products updated.

Installed:
  postgresql18-ee-18.3-EE~demo.rhel9.cybertec2.x86_64  postgresql18-ee-contrib-18.3-EE~demo.rhel9.cybertec2.x86_64  postgresql18-ee-libs-18.3-EE~demo.rhel9.cybertec2.x86_64  postgresql18-ee-server-18.3-EE~demo.rhel9.cybertec2.x86_64

Complete!
… and that’s it. As with the other posts in this little series, we’ll have a look at how to start the instance and enable TDE in the next post.
L’article Commercial PostgreSQL distributions with TDE (3) Cybertec PostgreSQL EE (1) Setup est apparu en premier sur dbi Blog.
OGG-08048 after patching GoldenGate: explanations and solutions
When patching GoldenGate Classic Architecture, you might encounter an OGG-08048 error when restarting your extracts and replicats.
OGG-08048: Failed to initialize timezone information. Check location of ORACLE_HOME.What should you do exactly, and how do you avoid this error in the future ? In fact, this error is easy to reproduce, which also makes it easy to avoid. Usually, it happens when following the official documentation instructions for patching. They always include a modification of the ORACLE_HOME variable.
export ORACLE_HOME=GoldenGate_Installation_PathThis is a good practice to make sure the OPatch utility knows what to patch. However, it might cause issues when restarting. As a rule of thumb, the modified environment should only be used to patch and roll back your installation. You shouldn’t do any management tasks with it !
The most important thing to remember is that you should start the manager with the correct environment variables ! If the manager is already started, you might still have the error when starting the extracts. What this means if that correcting your environment variables after restarting the manager might not solve the issue !
With this explanation, you now understand why rolling back the patch will not solve the OGG-08048. The rollback will work, but you will not be able to restart the extracts !
OGG-08048 error ?
If you have an OGG-08048 error when starting GoldenGate processes:
- If your environment is patched, do not attempt to rollback. Just load your usual GoldenGate environment, restart the manager and attempt to restart the processes.
- If you already rolled back the patch, you can apply it again. Then, follow the steps described above: load a standard GoldenGate environment, restart the manager and the GoldenGate processes.
And in the future, remember to always use your classic environment to manage your installation before and after applying a GoldenGate patch. To make it safer, I would suggest using separate sessions to avoid any confusion.
And after patching your GoldenGate classic architecture setup, you should definitely consider upgrading to GoldenGate 26ai, using the migration utility.
L’article OGG-08048 after patching GoldenGate: explanations and solutions est apparu en premier sur dbi Blog.
Dctm – Upgrade from 23.4 to 25.4 fails with DM_SERVER_E_SOCKOPT
Since its release in Q4 2025, I have worked on several upgrades from 23.4 to 25.4. The first one I worked on was for a customer using our own custom Documentum images. If you have followed my posts for some time, you might recall a previous blog post where I discussed a Documentum 20.2 to 23.4 upgrade and some issues related to IPv6 being disabled (c.f. this blog).
1. Environment detailsThe source Documentum 23.4 environment was configured exactly like the one from that previous blog post, with the fix to ensure the components could start and run on IPv4 only. Using the exact same source code, I simply rebuilt the image with the same OS version (RHEL8 for Dctm 23.4). One difference was that I was previously running on a vanilla Kubernetes cluster, while for this blog I used RKE2 (from SUSE), meaning the OS and Kubernetes cluster were not the same.
At the Documentum level, the Connection Broker was configured with “host=${Current-IPv4}” to force it to start with IPv4 only. The Repository had “ip_mode = V4ONLY” in its “server.ini” to achieve the same behavior. With these two configurations, the Documentum 23.4 environment was installed from scratch without any issues and was running properly. I performed several pod restarts over the next few days, and everything was running smoothly.
2. Upgrade to Documentum 25.4Then it was time to upgrade the environment to 25.4. For that purpose, I built a new image on RHEL9 (switching from ubi8 to ubi9 for the base image). I had no problems with the preparation or the installation of the other binaries.
I then triggered the upgrade process, which completed successfully for the Connection Broker. However, when it reached the Repository part, things were not that simple. The Repository upgrade log file contained the following:
[dmadmin@cs-0 ~]$ cat $DM_HOME/install/logs/install.log
20:30:29,056  INFO [main] com.documentum.install.shared.installanywhere.actions.InitializeSharedLibrary - Log is ready and is set to the level - INFO
20:30:29,060  INFO [main] com.documentum.install.shared.installanywhere.actions.InitializeSharedLibrary - The product name is: UniversalServerConfigurator
20:30:29,060  INFO [main] com.documentum.install.shared.installanywhere.actions.InitializeSharedLibrary - The product version is: 25.4.0000.0143
20:30:29,060  INFO [main]  -
20:30:29,089  INFO [main] com.documentum.install.shared.installanywhere.actions.InitializeSharedLibrary - Done InitializeSharedLibrary ...
20:30:29,117  INFO [main] com.documentum.install.server.installanywhere.actions.DiWASilentCheckVaultStatus - Checking the vault status: Silent mode
20:30:29,117  INFO [main] com.documentum.install.server.installanywhere.actions.DiWASilentCheckVaultStatus - Checking whether vault enabled or not
20:30:29,121  INFO [main] com.documentum.install.server.installanywhere.actions.DiWAServerInformation - Setting CONFIGURE_DOCBROKER value to TRUE for SERVER
20:30:29,121  INFO [main] com.documentum.install.server.installanywhere.actions.DiWAServerInformation - Setting CONFIGURE_DOCBASE value to TRUE for SERVER
20:30:30,124  INFO [main] com.documentum.install.server.installanywhere.actions.DiWAServerCheckEnvrionmentVariable - The installer was started using the dm_launch_server_config_program.sh script.
20:30:30,124  INFO [main] com.documentum.install.server.installanywhere.actions.DiWAServerCheckEnvrionmentVariable - The installer will determine the value of environment variable DOCUMENTUM.
20:30:30,124  INFO [main] com.documentum.install.server.installanywhere.actions.DiWAServerCheckEnvrionmentVariable - existingVersion : 25.4serverMajorversion : 25.4
20:30:33,125  INFO [main] com.documentum.install.server.installanywhere.actions.DiWAServerCheckEnvrionmentVariable - The installer will determine the value of environment variable PATH.
20:30:33,125  INFO [main] com.documentum.install.server.installanywhere.actions.DiWAServerCheckEnvrionmentVariable - existingVersion : 25.4serverMajorversion : 25.4
20:30:36,126  INFO [main]  - existingVersion : 25.4serverMajorversion : 25.4
20:30:36,136  INFO [main] com.documentum.install.server.installanywhere.actions.DiWASilentConfigurationInstallationValidation - Start to validate docbase parameters.
20:30:36,140  INFO [main] com.documentum.install.server.installanywhere.actions.DiWAServerPatchExistingDocbaseAction - The installer will obtain all the DOCBASE on the machine.
20:30:38,146  INFO [main] com.documentum.install.server.installanywhere.actions.DiWAServerDocAppFolder - The installer will obtain all the DocApps which could be installed for the repository.
20:30:38,148  INFO [main] com.documentum.install.server.installanywhere.actions.DiWAServerLoadDocBaseComponentInfo - The installer will gather information about the component GR_REPO.
20:30:41,151  INFO [main] com.documentum.install.server.installanywhere.actions.DiWAServerReadServerIniForLockbox - Lockbox disabled for the repository : GR_REPO.
20:30:41,153  INFO [main] com.documentum.install.server.installanywhere.actions.DiWAServerCheckKeepAEKUnchanged - vaule of isVaultEnabledinPrevious : null
20:30:41,156  INFO [main] com.documentum.install.server.installanywhere.actions.DiWAServerCheckKeystoreStatusForOld - The installer will check old AEK key status.
20:30:41,219  INFO [main] com.documentum.install.server.installanywhere.actions.DiWAServerCheckKeystoreStatus - Executed dm_crypto_create -check command and the return code - 1
20:30:41,221  INFO [main] com.documentum.install.server.installanywhere.actions.DiWAServerLoadValidAEKs - AEK key type provided in properties is  : Local
20:30:41,266  INFO [main] com.documentum.install.server.installanywhere.actions.DiWAServerCheckKeystoreStatus - Executed dm_crypto_create -check command and the return code - 1
20:30:41,269  INFO [main] com.documentum.install.server.installanywhere.actions.DiWAServerEnableLockBoxValidation - The installer will validate AEK fields.
20:30:41,272  INFO [main]  - Is Vault enabled :false
20:30:41,273  INFO [main]  - Is Vault enabled :false
20:30:41,326  INFO [main] com.documentum.install.server.installanywhere.actions.DiWAServerValidateLockboxPassphrase - Installer will boot AEK key
20:31:11,376  INFO [main]  - Is Vault enabled :false
20:31:11,377  INFO [main] com.documentum.install.server.installanywhere.actions.DiWAServerCheckKeystoreStatus - The installer will check keystore status.
20:31:11,419  INFO [main] com.documentum.install.server.installanywhere.actions.DiWAServerCheckKeystoreStatus - Executed dm_crypto_create -check command and the return code - 1
20:31:11,419  INFO [main] com.documentum.install.server.installanywhere.actions.DiWAServerCheckKeystoreStatus - The installer detected the keystore already exists and was created using user password.
20:31:11,425  INFO [main] com.documentum.install.server.installanywhere.actions.DiWAServerQueryDatabaseInformation - The installer is gathering database connection information from the local machine.
20:31:11,427  INFO [main] com.documentum.install.appserver.services.DiAppServerUtil - appServer == null
20:31:11,427  INFO [main] com.documentum.install.appserver.services.DiAppServerUtil - isTomcatInstalled == true -- tomcat version is null
20:31:11,431  INFO [main] com.documentum.install.appserver.tomcat.TomcatApplicationServer - setApplicationServer sharedDfcLibDir is:$DOCUMENTUM/dfc
20:31:11,431  INFO [main] com.documentum.install.appserver.tomcat.TomcatApplicationServer - getFileFromResource for templates/appserver.properties
20:31:11,434  INFO [main] com.documentum.install.appserver.tomcat.TomcatApplicationServer - Tomcat Home = $DOCUMENTUM/tomcat
20:31:11,438  INFO [main] com.documentum.install.server.installanywhere.actions.DiWAServerModifyDocbaseDirectory - The installer will create the folder structure for repository GR_REPO.
20:31:11,440  INFO [main]  - The installer will stop component process for GR_REPO.
20:31:11,479  INFO [main] com.documentum.install.server.installanywhere.actions.DiWAServerUpdateTCSUnixServiceFile - The installer will check service entries for repository GR_REPO.
20:31:11,483  INFO [main] com.documentum.install.server.installanywhere.actions.DiWAServerModifyDfcProperties - The installer will update dfc.properties file.
20:31:11,485  INFO [main] com.documentum.install.shared.common.services.dfc.DiDfcProperties - Installer is not adding connection broker information as it is already added.
20:31:13,488  INFO [main]  - The installer will update server.ini file for the repository.
20:31:13,493  INFO [main] com.documentum.install.server.installanywhere.actions.DiWAServerDataIniGenerator - The installer will create data_dictionary.ini for the repository.
20:31:13,496  INFO [main]  - The installer will obtain database server name for database dctmdb.
20:31:13,497  INFO [main] com.documentum.install.server.installanywhere.actions.DiWAServerLoadServerWebcacheInfo - The installer will obtain database information of dctmdb.
20:31:13,498  INFO [main] com.documentum.install.server.installanywhere.actions.DiWAServerWebCacheIniGenerator - The installer will update webcache.ini file for the repository.
20:31:13,503  INFO [main] com.documentum.install.server.installanywhere.actions.DiWAServerTestDatabaseConnection4Docbase_Upgrade - The installer is testing the database connection information
20:31:13,503  INFO [main] com.documentum.install.server.common.services.db.DiServerDbSvrOracleServer - The installer is validating the database version is supported.
20:31:13,638  INFO [main] com.documentum.install.server.common.services.db.DiServerDbSvrOracleServer - The installer is validating the database connection information in the server.ini file.
20:31:13,910  INFO [main] com.documentum.install.server.installanywhere.actions.DiWAServerCheckIfDMSUpgraded - Check if upgrade of DMS tables is needed for current docbase.
20:31:13,911  INFO [main] com.documentum.install.server.installanywhere.actions.DiWAServerCheckIfDMSUpgraded - The current repository doesn't need to upgrade DMS table.
20:31:13,922  INFO [main] com.documentum.install.server.installanywhere.actions.DiWAServerUpdateDocbaseServiceScript - The installer will update start script for  repository GR_REPO.
20:31:13,929  INFO [main] com.documentum.install.server.installanywhere.actions.DiWAServerUpdateDocbaseServiceScript - The installer will update stop script for  repository GR_REPO.
20:31:13,937  INFO [main] com.documentum.install.server.installanywhere.actions.DiWAServerUpgradeAEKUtility - will not execute start and stop services
20:31:13,944  INFO [main] com.documentum.install.server.installanywhere.actions.DiWAServerUpgradeAEKUtility - will not execute start and stop services
20:31:13,947  INFO [main]  - The installer will start component process for GR_REPO.
20:31:14,997  INFO [main] com.documentum.install.server.installanywhere.actions.DiWAUnixServiceControl - logPath is $DOCUMENTUM/dba/log/GR_REPO.log
20:31:16,005  INFO [main] com.documentum.install.server.installanywhere.actions.DiWAUnixServiceControl - logPath is $DOCUMENTUM/dba/log/GR_REPO.log
20:31:17,015  INFO [main] com.documentum.install.server.installanywhere.actions.DiWAUnixServiceControl - logPath is $DOCUMENTUM/dba/log/GR_REPO.log
20:31:18,024  INFO [main] com.documentum.install.server.installanywhere.actions.DiWAUnixServiceControl - logPath is $DOCUMENTUM/dba/log/GR_REPO.log
20:31:19,030  INFO [main] com.documentum.install.server.installanywhere.actions.DiWAUnixServiceControl - logPath is $DOCUMENTUM/dba/log/GR_REPO.log
20:31:20,038  INFO [main] com.documentum.install.server.installanywhere.actions.DiWAUnixServiceControl - logPath is $DOCUMENTUM/dba/log/GR_REPO.log
20:31:21,045  INFO [main] com.documentum.install.server.installanywhere.actions.DiWAUnixServiceControl - logPath is $DOCUMENTUM/dba/log/GR_REPO.log
20:31:22,053  INFO [main] com.documentum.install.server.installanywhere.actions.DiWAUnixServiceControl - logPath is $DOCUMENTUM/dba/log/GR_REPO.log
...
20:31:43,060  INFO [main] com.documentum.install.server.installanywhere.actions.DiWAUnixServiceControl - logPath is $DOCUMENTUM/dba/log/GR_REPO.log
20:31:44,066  INFO [main] com.documentum.install.server.installanywhere.actions.DiWAUnixServiceControl - logPath is $DOCUMENTUM/dba/log/GR_REPO.log
...
20:32:10,073  INFO [main] com.documentum.install.server.installanywhere.actions.DiWAUnixServiceControl - logPath is $DOCUMENTUM/dba/log/GR_REPO.log
20:32:11,080  INFO [main] com.documentum.install.server.installanywhere.actions.DiWAUnixServiceControl - logPath is $DOCUMENTUM/dba/log/GR_REPO.log
[dmadmin@cs-0 ~]$
Everything looked fine at the beginning of the log file, at least until the start of the Repository process. After waiting a little less than one minute, there was still nothing happening, which was not normal. Therefore, I checked the OS processes and found none for the Repository “GR_REPO“:
[dmadmin@cs-0 ~]$ ps uxf | grep GR_REPO
dmadmin  2233289  0.0  0.0   3348  1824 pts/0    S+   20:32   0:00  \_ grep --color=auto GR_REPO
[dmadmin@cs-0 ~]$
Therefore, something happened to the Repository process, which means that the upgrade process failed or will remain stuck in that loop. When checking the Repository log file, I saw the following:
[dmadmin@cs-0 dba]$ cat $DOCUMENTUM/dba/log/GR_REPO.log

    OpenText Documentum Content Server (version 25.4.0000.0143 Linux64.Oracle)
    Copyright (c) 2025. OpenText Corporation
    All rights reserved.

2026-02-05T20:31:15.702051	2235323[2235323]	0000000000000000	[DM_SERVER_I_START_SERVER]info:  "Docbase GR_REPO attempting to open"

2026-02-05T20:31:15.802801	2235323[2235323]	0000000000000000	[DM_SERVER_I_START_KEY_STORAGE_MODE]info:  "Docbase GR_REPO is using database for cryptographic key storage"

2026-02-05T20:31:15.802878	2235323[2235323]	0000000000000000	[DM_SERVER_I_START_SERVER]info:  "Docbase GR_REPO process identity: user(dmadmin)"

2026-02-05T20:31:16.073327	2235323[2235323]	0000000000000000	[DM_SESSION_I_INIT_BEGIN]info:  "Initialize Post Upgrade Processing."

2026-02-05T20:31:16.073843	2235323[2235323]	0000000000000000	[DM_SESSION_I_INIT_BEGIN]info:  "Initialize Base Types."

2026-02-05T20:31:16.074476	2235323[2235323]	0000000000000000	[DM_SESSION_I_INIT_BEGIN]info:  "Initialize dmRecovery."

2026-02-05T20:31:16.089286	2235323[2235323]	0000000000000000	[DM_SESSION_I_INIT_BEGIN]info:  "Initialize dmACL."

...

2026-02-05T20:31:17.886348	2235323[2235323]	0000000000000000	[DM_SESSION_I_INIT_BEGIN]info:  "Initialize Acs Config List."

2026-02-05T20:31:17.886487	2235323[2235323]	0000000000000000	[DM_SESSION_I_INIT_BEGIN]info:  "Initialize dmLiteSysObject."

2026-02-05T20:31:17.886957	2235323[2235323]	0000000000000000	[DM_SESSION_I_INIT_BEGIN]info:  "Initialize dmBatchManager."

2026-02-05T20:31:17.891417	2235323[2235323]	0000000000000000	[DM_SESSION_I_INIT_BEGIN]info:  "Initialize Partition Scheme."

2026-02-05T20:31:17.891883	2235323[2235323]	0000000000000000	[DM_SESSION_I_INIT_BEGIN]info:  "Initialize Critical Event Registry."

2026-02-05T20:31:17.891947	2235323[2235323]	0000000000000000	[DM_SESSION_I_INIT_BEGIN]info:  "Initialize Transaction Tracking Event Registry."

2026-02-05T20:31:17.892014	2235323[2235323]	0000000000000000	[DM_SESSION_I_INIT_BEGIN]info:  "Initialize Initialze External User Event Set."

2026-02-05T20:31:17.893580	2235323[2235323]	0000000000000000	[DM_SESSION_I_INIT_BEGIN]info:  "Initialize Authentication Plugins."

2026-02-05T20:31:17.895070	2235323[2235323]	0000000000000000	[DM_SESSION_I_AUTH_PLUGIN_LOADED]info:  "Loaded Authentication Plugin with code 'dm_krb' ($DOCUMENTUM/dba/auth/libkerberos.so)."

2026-02-05T20:31:17.895090	2235323[2235323]	0000000000000000	[DM_SESSION_I_AUTH_PLUGIN_LOAD_INIT]info:  "Authentication plugin ( 'dm_krb' ) was disabled. This is expected if no keytab file(s) at location ($DOCUMENTUM/dba/auth/kerberos).Please refer the content server installation guide."

2026-02-05T20:31:17.896397	2235323[2235323]	0000000000000000	[DM_SERVER_I_START_SERVER]info:  "Docbase GR_REPO opened"

2026-02-05T20:31:17.896463	2235323[2235323]	0000000000000000	[DM_SERVER_I_SERVER]info:  "Setting exception handlers to catch all interrupts"

2026-02-05T20:31:17.896475	2235323[2235323]	0000000000000000	[DM_SERVER_I_START]info:  "Starting server using service name:  GR_REPO"

2026-02-05T20:31:17.933282	2235323[2235323]	0000000000000000	[DM_LICENSE_E_NO_LICENSE_CONFIG]error:  "Could not find dm_otds_license_config object."

2026-02-05T20:31:17.998180	2235323[2235323]	0000000000000000	[DM_SERVER_I_LAUNCH_MTHDSVR]info:  "Launching Method Server succeeded."

2026-02-05T20:31:17.999298	2235323[2235323]	0000000000000000	[DM_SERVER_E_SOCKOPT]error:  "setsockopt failed for (SO_REUSEADDR (client)) with error (88)"

[dmadmin@cs-0 dba]$
The Repository log file was also quite clean. Everything at the beginning was as expected, until the very last line. The Repository was about to become available when suddenly a “DM_SERVER_E_SOCKOPT” error appeared and crashed the Repository process.
I tried to start the Repository again, but without success. It always ended up with the exact same error as the last line. It was my first time encountering that error “DM_SERVER_E_SOCKOPT“, so I checked the official documentation and the OpenText support website. But I had no luck there either; there was not a single reference to that error anywhere.
So, what should I do next? As usual, I just tried things that could make sense based on the information available.
The error refers to SOCKOPT, which I assumed meant socket options, so possibly something related to networking or communications. I checked the “setsockopt” documentation (c.f. this man page), which indeed seemed related to networking protocols. I also reviewed the “SO_REUSEADDR” documentation (c.f. this other man page), which refers to address binding apparently.
5. Fix & ResolutionWith that in mind, I remembered the IPv4 versus IPv6 issue I encountered back in 2024 and the blog post I wrote about it (linked earlier). Since there was no issue starting the Connection Broker with the “host=${Current-IPv4}” setting, I focused on the Repository configuration.
Therefore, I tried disabling what I had added for 23.4 to work. Specifically, I commented out the line “#ip_mode = V4ONLY” in “server.ini” so that it would return to the default value:
[dmadmin@cs-0 ~]$ grep ip_mode $DOCUMENTUM/dba/config/GR_REPO/server.ini
ip_mode = V4ONLY
[dmadmin@cs-0 ~]$
[dmadmin@cs-0 ~]$ sed -i 's/^\(ip_mode\)/#\1/' $DOCUMENTUM/dba/config/GR_REPO/server.ini
[dmadmin@cs-0 ~]$
[dmadmin@cs-0 ~]$ grep ip_mode $DOCUMENTUM/dba/config/GR_REPO/server.ini
#ip_mode = V4ONLY
[dmadmin@cs-0 ~]$
Then I tried starting the Repository again:
[dmadmin@cs-0 ~]$ $DOCUMENTUM/dba/dm_start_GR_REPO
starting Documentum server for repository: [GR_REPO]
with server log: [$DOCUMENTUM/dba/log/GR_REPO.log]
server pid: 2268601
[dmadmin@cs-0 ~]$
[dmadmin@cs-0 ~]$ cat $DOCUMENTUM/dba/log/GR_REPO.log

    OpenText Documentum Content Server (version 25.4.0000.0143 Linux64.Oracle)
    Copyright (c) 2025. OpenText Corporation
    All rights reserved.

2026-02-05T20:57:34.417095	2268601[2268601]	0000000000000000	[DM_SERVER_I_START_SERVER]info:  "Docbase GR_REPO attempting to open"

2026-02-05T20:57:34.517792	2268601[2268601]	0000000000000000	[DM_SERVER_I_START_KEY_STORAGE_MODE]info:  "Docbase GR_REPO is using database for cryptographic key storage"

2026-02-05T20:57:34.517854	2268601[2268601]	0000000000000000	[DM_SERVER_I_START_SERVER]info:  "Docbase GR_REPO process identity: user(dmadmin)"

2026-02-05T20:57:34.750986	2268601[2268601]	0000000000000000	[DM_SESSION_I_INIT_BEGIN]info:  "Initialize Post Upgrade Processing."

2026-02-05T20:57:34.751390	2268601[2268601]	0000000000000000	[DM_SESSION_I_INIT_BEGIN]info:  "Initialize Base Types."

2026-02-05T20:57:34.751810	2268601[2268601]	0000000000000000	[DM_SESSION_I_INIT_BEGIN]info:  "Initialize dmRecovery."

2026-02-05T20:57:34.763115	2268601[2268601]	0000000000000000	[DM_SESSION_I_INIT_BEGIN]info:  "Initialize dmACL."

...

2026-02-05T20:57:35.977776	2268601[2268601]	0000000000000000	[DM_SESSION_I_INIT_BEGIN]info:  "Initialize Acs Config List."

2026-02-05T20:57:35.977873	2268601[2268601]	0000000000000000	[DM_SESSION_I_INIT_BEGIN]info:  "Initialize dmLiteSysObject."

2026-02-05T20:57:35.978265	2268601[2268601]	0000000000000000	[DM_SESSION_I_INIT_BEGIN]info:  "Initialize dmBatchManager."

2026-02-05T20:57:35.981015	2268601[2268601]	0000000000000000	[DM_SESSION_I_INIT_BEGIN]info:  "Initialize Partition Scheme."

2026-02-05T20:57:35.981417	2268601[2268601]	0000000000000000	[DM_SESSION_I_INIT_BEGIN]info:  "Initialize Critical Event Registry."

2026-02-05T20:57:35.981479	2268601[2268601]	0000000000000000	[DM_SESSION_I_INIT_BEGIN]info:  "Initialize Transaction Tracking Event Registry."

2026-02-05T20:57:35.981543	2268601[2268601]	0000000000000000	[DM_SESSION_I_INIT_BEGIN]info:  "Initialize Initialze External User Event Set."

2026-02-05T20:57:35.983046	2268601[2268601]	0000000000000000	[DM_SESSION_I_INIT_BEGIN]info:  "Initialize Authentication Plugins."

2026-02-05T20:57:35.984583	2268601[2268601]	0000000000000000	[DM_SESSION_I_AUTH_PLUGIN_LOADED]info:  "Loaded Authentication Plugin with code 'dm_krb' ($DOCUMENTUM/dba/auth/libkerberos.so)."

2026-02-05T20:57:35.984604	2268601[2268601]	0000000000000000	[DM_SESSION_I_AUTH_PLUGIN_LOAD_INIT]info:  "Authentication plugin ( 'dm_krb' ) was disabled. This is expected if no keytab file(s) at location ($DOCUMENTUM/dba/auth/kerberos).Please refer the content server installation guide."

2026-02-05T20:57:35.986125	2268601[2268601]	0000000000000000	[DM_SERVER_I_START_SERVER]info:  "Docbase GR_REPO opened"

2026-02-05T20:57:35.986189	2268601[2268601]	0000000000000000	[DM_SERVER_I_SERVER]info:  "Setting exception handlers to catch all interrupts"

2026-02-05T20:57:35.986199	2268601[2268601]	0000000000000000	[DM_SERVER_I_START]info:  "Starting server using service name:  GR_REPO"

2026-02-05T20:57:36.016709	2268601[2268601]	0000000000000000	[DM_LICENSE_E_NO_LICENSE_CONFIG]error:  "Could not find dm_otds_license_config object."

2026-02-05T20:57:36.067861	2268601[2268601]	0000000000000000	[DM_SERVER_I_LAUNCH_MTHDSVR]info:  "Launching Method Server succeeded."

2026-02-05T20:57:36.073641	2268601[2268601]	0000000000000000	[DM_SERVER_I_LISTENING]info:  "The server is listening on network address (Service Name: GR_REPO, Host Name: cs-0 :V4 IP)"

2026-02-05T20:57:36.082139	2268601[2268601]	0000000000000000	[DM_SERVER_I_LISTENING]info:  "The server is listening on network address (Service Name: GR_REPO_s, Host Name: cs-0 :V4 IP)"

2026-02-05T20:57:37.135498	2268601[2268601]	0000000000000000	[DM_WORKFLOW_I_AGENT_START]info:  "Workflow agent master (pid : 2268748, session 0101234580000007) is started sucessfully."
IsProcessAlive: Process ID 0 is not > 0
2026-02-05T20:57:37.136533	2268601[2268601]	0000000000000000	[DM_WORKFLOW_I_AGENT_START]info:  "Workflow agent worker (pid : 2268749, session 010123458000000a) is started sucessfully."
IsProcessAlive: Process ID 0 is not > 0
2026-02-05T20:57:38.137780	2268601[2268601]	0000000000000000	[DM_WORKFLOW_I_AGENT_START]info:  "Workflow agent worker (pid : 2268770, session 010123458000000b) is started sucessfully."
IsProcessAlive: Process ID 0 is not > 0
2026-02-05T20:57:39.139572	2268601[2268601]	0000000000000000	[DM_WORKFLOW_I_AGENT_START]info:  "Workflow agent worker (pid : 2268823, session 010123458000000c) is started sucessfully."
2026-02-05T20:57:40.139741	2268601[2268601]	0000000000000000	[DM_SERVER_I_START]info:  "Sending Initial Docbroker check-point "

2026-02-05T20:57:40.143121	2268601[2268601]	0000000000000000	[DM_MQ_I_DAEMON_START]info:  "Message queue daemon (pid : 2268845, session 0101234580000456) is started sucessfully."
2026-02-05T20:57:42.758073	2268844[2268844]	0101234580000003	[DM_DOCBROKER_I_PROJECTING]info:  "Sending information to Docbroker located on host (cs-0.cs.dctm-ns.svc.cluster.local) with port (1490).  Information: (Config(GR_REPO), Proximity(1), Status(Open), Dormancy Status(Active))."
[dmadmin@cs-0 ~]$
As you can see, it is working again. This means that what I previously had to add for the 23.4 environment to work is now causing an issue on 25.4. Obviously the OS is not the same (both the container and the real host), and the Kubernetes environment is also different. Still, it is interesting that something fixing an issue in a specific version can introduce a problem in a newer version.
As shown in the logs, the Repository still starts on IPv4, as it clearly states: “The server is listening on network address (Service Name: GR_REPO, Host Name: cs-0 :V4 IP)“. However, it does not accept the setting “ip_mode = V4ONLY“, somehow.
That’s pretty incredible, don’t you think? Anyway, once the Repository processes were running, I was able to restart the upgrade process properly by ensuring that ip_mode was not specified for version 25.4.
L’article Dctm – Upgrade from 23.4 to 25.4 fails with DM_SERVER_E_SOCKOPT est apparu en premier sur dbi Blog.
How to patch your ODA to 19.30?
Patch 19.30 is now available for Oracle Database Appliance series. Let’s find out what’s new and how to apply this patch.
What’s new?The real new feature is the possibility to rollback a server component patch done by an odacli update-servercomponents. Until now, in the rare cases you would need to do a rollback, you could only rely on ODABR. And guess what? This new rollback feature makes use of ODABR. So keep doing manual ODABR snapshots prior attempting to patch your ODA.
Regarding the odacli update-dcscomponents, it now has a dedicated job engine you can query with a new command odacli describe-admin-job to see the progress. This is useful because this job now lasts longer. It’s always good to know the involved steps and their status of such a process.
This version is 19.30, meaning that bare metal GI stack is still using 19c binaries. 23/26ai databases are still limited to DB Systems, meaning that bare metal databases are limited to 19c.
As you can guess, this patch is mainly a bundle patch for security and bug fixes. A bigger update is expected later this year.
Which ODA is compatible with this 19.30 release?The latest ODAs X11-HA, X11-L and X11-S are supported, as well as X10, X9-2 and X8-2 series. X7-2 series and older ones are not supported anymore. If you own one from these older generations, you will not be able to patch it anymore. If you’re using X8-2 ODAs, available from late 2019 to mid 2022, the last patch is planned for August 2027.
I still recommend keeping your ODA 7 years, not less, not more. This blog post is still relevant today: https://www.dbi-services.com/blog/why-you-should-consider-keeping-your-oda-more-than-5-years/.
Is this patch a cumulative one?The rule is now well established: you can apply a patch on top of the four previous ones. 19.30 can then be applied on top of 19.29, 19.28, 19.27 and 19.26. Patching once a year will prevent having to apply 2 or more patches, meaning a longer downtime.
What’s new since 19.29 is the additional monthly system patch. This is a special patch for system only, for those who cannot wait for the global patch to be released. First one was 19.29.0.1.0. 19.30 can be applied on top of it.
In my lab at dbi services, I will use an ODA X8-2M running 19.29 with one DB home, one database and one DB System. The DB System is already running a 26ai database. The given patching procedure should be the same if you come from 19.26 or later.
Is there also a patch for my databases?Only databases version 19c are supported on bare metal. Patch for 19c is obviously 19.30. For a 26ai database running inside a DB System, you will patch from 23.26.0.0 to 23.26.1.0. This is how the new version numbering works now.
Download the patch and clone filesThese files are mandatory:
38776074 => the patch itself
30403673 => the GI clone needed for deploying newer 19c GI version
30403662 => the DB clone for deploying newer version of 19c
These files are optional:
30403643 => ISO file for reimaging, not needed for patching
36524660 => System image for deploying a new 26ai DB System
36524627 => the GI clone needed for deploying/patching to newer 26ai GI version
36524642 => the DB clone for deploying/patching to newer 26ai version
32451228 => The newer system image for 19c DB Systems
38776071 => The patch for 26ai DB Systems
Be sure to choose the very latest 19.30 when downloading some files, patch number is the same for older versions of GI clones, DB clones and ISO files.
Prepare the patchingBefore starting, please check these prerequisites:
- filesystems /, /opt, /u01 and /root have at least 20% of available free space
- unzip the downloaded patch files
- additional manually installed rpms must be removed
- revert profile scripts to default’s one (for grid and oracle users)
- make sure you’ve planned a sufficient downtime (4+ hours depending on the number of databases and DB Systems)
- do a sanity reboot before patching to kill zombie processes
- use ODABR to make snapshots of the important filesystems prior patching: this tool is now included in the software distribution
df -h / /u01 /opt/
Filesystem                          Size  Used Avail Use% Mounted on
/dev/mapper/VolGroupSys-LogVolRoot   30G   13G   16G  46% /
/dev/mapper/VolGroupSys-LogVolU01    59G   23G   34G  40% /u01
/dev/mapper/VolGroupSys-LogVolOpt    69G   34G   33G  52% /opt

cd /opt/dbi
for a in `ls p*1930*.zip` ; do unzip -o $a ; rm -f $a ; done

reboot
...

pvs
  PV           VG          Fmt  Attr PSize   PFree
  /dev/md126p3 VolGroupSys lvm2 a--  446.09g 260.09g

/opt/odabr/odabr backup --snap
INFO: 2026-02-26 11:29:54: Please check the logfile '/opt/odabr/out/log/odabr_24079.log' for more details


│▒▒▒▒▒▒▒▒▒▒▒▒▒▒▒▒▒▒▒▒▒▒▒▒▒▒▒▒▒▒▒▒▒▒▒▒▒▒▒▒▒▒▒▒▒▒▒▒▒▒▒▒▒▒▒▒│
 odabr - ODA node Backup Restore - Version: 2.0.2-05
 Copyright 2013, 2025, Oracle and/or its affiliates.
 --------------------------------------------------------
 RACPack, Cloud Innovation and Solution Engineering Team
│▒▒▒▒▒▒▒▒▒▒▒▒▒▒▒▒▒▒▒▒▒▒▒▒▒▒▒▒▒▒▒▒▒▒▒▒▒▒▒▒▒▒▒▒▒▒▒▒▒▒▒▒▒▒▒▒│

INFO: 2026-02-26 11:29:54: Checking superuser
INFO: 2026-02-26 11:29:54: Checking Bare Metal

INFO: 2026-02-26 11:29:54: Removing existing LVM snapshots
WARNING: 2026-02-26 11:29:54: LVM snapshot for 'opt' does not exist
WARNING: 2026-02-26 11:29:54: LVM snapshot for 'u01' does not exist
WARNING: 2026-02-26 11:29:54: LVM snapshot for 'root' does not exist

INFO: 2026-02-26 11:29:54: Checking current OS version...
INFO: 2026-02-26 11:29:54: Checking LVM restore backgroud process
INFO: 2026-02-26 11:29:54: Checking LVM size

INFO: 2026-02-26 11:29:54: Boot device backup
INFO: 2026-02-26 11:29:54: Getting EFI device
INFO: 2026-02-26 11:29:54: ...step1 - unmounting EFI
INFO: 2026-02-26 11:29:54: ...step2 - making efi device backup
SUCCESS: 2026-02-26 11:29:57: ...EFI device backup saved as '/opt/odabr/out/hbi/efi.img'
INFO: 2026-02-26 11:29:57: ...step3 - checking EFI device backup
INFO: 2026-02-26 11:29:57: Getting boot device
INFO: 2026-02-26 11:29:57: ...step1 - making boot device backup using tar
SUCCESS: 2026-02-26 11:30:03: ...boot content saved as '/opt/odabr/out/hbi/boot.tar.gz'
INFO: 2026-02-26 11:30:03: ...step2 - unmounting boot
INFO: 2026-02-26 11:30:04: ...step3 - making boot device backup using dd
SUCCESS: 2026-02-26 11:30:09: ...boot device backup saved as '/opt/odabr/out/hbi/boot.img'
INFO: 2026-02-26 11:30:09: ...step4 - mounting boot
INFO: 2026-02-26 11:30:09: ...step5 - mounting EFI
INFO: 2026-02-26 11:30:10: ...step6 - checking boot device backup

INFO: 2026-02-26 11:30:10: Making OCR physical backup
INFO: 2026-02-26 11:30:11: ...ocr backup saved as '/opt/odabr/out/hbi/ocrbackup_24079.bck'
SUCCESS: 2026-02-26 11:30:11: OCR physical backup created successfully
INFO: 2026-02-26 11:30:11: OCR export backup
INFO: 2026-02-26 11:30:12: ...ocr export saved as '/opt/odabr/out/hbi/ocrexport_24079.bck'
SUCCESS: 2026-02-26 11:30:12: OCR export backup created successfully
INFO: 2026-02-26 11:30:12: Saving clusterware patch level as '/opt/odabr/out/hbi/clusterware_patch_level.info'
SUCCESS: 2026-02-26 11:30:12: Clusterware patch level saved successfully

INFO: 2026-02-26 11:30:12: Making LVM snapshot backup
SUCCESS: 2026-02-26 11:30:13: ...snapshot backup for 'opt' created successfully
SUCCESS: 2026-02-26 11:30:14: ...snapshot backup for 'u01' created successfully
SUCCESS: 2026-02-26 11:30:14: ...snapshot backup for 'root' created successfully
SUCCESS: 2026-02-26 11:30:14: LVM snapshots backup done successfullyStart to check the current version of the various components:
odacli describe-component
System Version
--------------
19.29.0.0.0

System Node Name
----------------
dbioda01

Local System Version
--------------------
19.29.0.0.0

Component                                Installed Version    Available Version
---------------------------------------- -------------------- --------------------
OAK                                      19.29.0.0.0          up-to-date

GI                                       19.29.0.0.251021     up-to-date

DB {
     OraDB19000_home9                    19.29.0.0.251021     up-to-date
     [CPROD19]
}

DCSCONTROLLER                            19.29.0.0.0          up-to-date

DCSCLI                                   19.29.0.0.0          up-to-date

DCSAGENT                                 19.29.0.0.0          up-to-date

DCSADMIN                                 19.29.0.0.0          up-to-date

OS                                       8.10                 up-to-date

ILOM                                     5.1.5.22.r165351     up-to-date

BIOS                                     52160100             up-to-date

LOCAL CONTROLLER FIRMWARE {
     [c4]                                8000D9AB             up-to-date
}

SHARED CONTROLLER FIRMWARE {
     [c0, c1]                            VDV1RL06             up-to-date
}

LOCAL DISK FIRMWARE {
     [c2d0, c2d1]                        XC311132             up-to-date
}

HMP                                      2.4.10.1.600         up-to-date
List the DB homes, databases, DB Systems and VMs:
odacli list-dbhomes
ID                                       Name                 DB Version           DB Edition Home Location                                            Status
---------------------------------------- -------------------- -------------------- ---------- -------------------------------------------------------- ----------
57c0dd7f-dcf4-4a38-9e79-4bf8c78e81bb     OraDB19000_home9     19.29.0.0.251021     EE         /u01/app/odaorahome/oracle/product/19.0.0.0/dbhome_9     CONFIGURED


odacli list-databases
ID                                       DB Name    DB Type  DB Version           CDB     Class    Edition  Shape    Storage  Status       DB Home ID
---------------------------------------- ---------- -------- -------------------- ------- -------- -------- -------- -------- ------------ ----------------------------------------
976a80f2-4653-469f-8cd4-ddc1a21aff51     CPROD19    SI       19.29.0.0.251021     true    OLTP     EE       odb8     ASM      CONFIGURED   57c0dd7f-dcf4-4a38-9e79-4bf8c78e81bb


odacli list-dbsystems
Name                  Shape       GI version          DB info                         Status                  Created                   Updated
--------------------  ----------  ------------------  ------------------------------  ----------------------  ------------------------  ------------------------
dbs-04-tst            dbs2        23.26.0.0.0         23.26(CONFIGURED=1)             CONFIGURED              2026-01-12 10:14:46 CET   2026-01-12 10:45:45 CET

odacli list-vms
No data found for resource VM.Updating DCS components is the first step, after registering the patch file:
odacli update-repository -f /opt/dbi/oda-sm-19.30.0.0.0-260210-server.zip
sleep 30 ; odacli describe-job -i e3ba068f-01db-45c3-949d-b79f43c8d6b7
Job details
----------------------------------------------------------------
                     ID:  e3ba068f-01db-45c3-949d-b79f43c8d6b7
            Description:  Repository Update
                 Status:  Success
                Created:  February 26, 2026 11:30:48 CET
                Message:  /opt/dbi/oda-sm-19.30.0.0.0-260210-server.zip

Task Name                                Start Time                               End Time                                 Status
---------------------------------------- ---------------------------------------- ---------------------------------------- ----------------
Unzip bundle                             February 26, 2026 11:30:49 CET           February 26, 2026 11:31:10 CET           Success


odacli describe-component
System Version
--------------
19.29.0.0.0

System Node Name
----------------
dbioda01

Local System Version
--------------------
19.29.0.0.0

Component                                Installed Version    Available Version
---------------------------------------- -------------------- --------------------
OAK                                      19.29.0.0.0          19.30.0.0.0

GI                                       19.29.0.0.251021     19.30.0.0.260120

DB {
     OraDB19000_home9                    19.29.0.0.251021     19.30.0.0.260120
     [CPROD19]
}

DCSCONTROLLER                            19.29.0.0.0          19.30.0.0.0

DCSCLI                                   19.29.0.0.0          19.30.0.0.0

DCSAGENT                                 19.29.0.0.0          19.30.0.0.0

DCSADMIN                                 19.29.0.0.0          19.30.0.0.0

OS                                       8.10                 up-to-date

ILOM                                     5.1.5.22.r165351     5.1.5.29.r167438

BIOS                                     52160100             52170100

LOCAL CONTROLLER FIRMWARE {
     [c4]                                8000D9AB             up-to-date
}

SHARED CONTROLLER FIRMWARE {
     [c0, c1]                            VDV1RL06             up-to-date
}

LOCAL DISK FIRMWARE {
     [c2d0, c2d1]                        XC311132             up-to-date
}

HMP                                      2.4.10.1.600         up-to-date
Let’s update the DCS components to 19.30:
odacli update-dcsadmin -v 19.30.0.0.0

sleep 90 ; odacli describe-job -i "c3c278ad-89e6-4c7d-b9fd-27833a187e43"
Job details
----------------------------------------------------------------
                     ID:  c3c278ad-89e6-4c7d-b9fd-27833a187e43
            Description:  DcsAdmin patching to 19.30.0.0.0
                 Status:  Success
                Created:  February 26, 2026 11:32:11 CET
                Message:

Task Name                                Start Time                               End Time                                 Status
---------------------------------------- ---------------------------------------- ---------------------------------------- ----------------
Dcs-admin upgrade                        February 26, 2026 11:32:11 CET           February 26, 2026 11:32:21 CET           Success
Ping DCS Admin                           February 26, 2026 11:32:21 CET           February 26, 2026 11:33:29 CET           Success


sleep 30 ;  odacli update-dcscomponents -v 19.30.0.0.0
sleep 300 ; odacli describe-admin-job -i 2aeda3f3-df4d-4f7c-a0ce-b57eeab0448b
Job details
----------------------------------------------------------------
                     ID:  2aeda3f3-df4d-4f7c-a0ce-b57eeab0448b
            Description:  Update-dcscomponents to 19.30.0.0.0
                 Status:  Success
                Created:  February 26, 2026 11:34:51 CET
                Message:

Task Name                                Start Time                               End Time                                 Status
---------------------------------------- ---------------------------------------- ---------------------------------------- ----------------
Pre-checks for update DCS components     February 26, 2026 11:34:57 CET           February 26, 2026 11:35:05 CET           Success
Update DCS components                    February 26, 2026 11:35:05 CET           February 26, 2026 11:35:05 CET           Success
Stop DCS-Agent                           February 26, 2026 11:35:05 CET           February 26, 2026 11:35:05 CET           Success
Update MySql                             February 26, 2026 11:35:05 CET           February 26, 2026 11:35:42 CET           Success
Apply metadata schema changes            February 26, 2026 11:35:42 CET           February 26, 2026 11:35:42 CET           Success
Modify MySQL Metadata                    February 26, 2026 11:35:42 CET           February 26, 2026 11:35:43 CET           Success
Update DCS-Agent                         February 26, 2026 11:35:43 CET           February 26, 2026 11:35:57 CET           Success
Update DCS-Cli                           February 26, 2026 11:35:57 CET           February 26, 2026 11:35:59 CET           Success
Update DCS-Controller                    February 26, 2026 11:35:59 CET           February 26, 2026 11:36:22 CET           Success
Update AHF RPM                           February 26, 2026 11:36:22 CET           February 26, 2026 11:38:41 CET           Success
Reset Keystore password                  February 26, 2026 11:38:41 CET           February 26, 2026 11:39:02 CET           Success
Update HAMI                              February 26, 2026 11:39:02 CET           February 26, 2026 11:39:54 CET           Success
Remove old library files                 February 26, 2026 11:39:54 CET           February 26, 2026 11:39:54 CET           Success
Post DCS update actions February 26, 2026 11:39:54 CET February 26, 2026 11:39:54 CET SuccessLet’s do the prepatching of the system:
odacli create-prepatchreport -sc -v 19.30.0.0.0

sleep 180 ; odacli describe-prepatchreport -i c06cd4d0-d30c-4063-a3c1-3b86db6625b0

Prepatch Report
------------------------------------------------------------------------
                 Job ID:  c06cd4d0-d30c-4063-a3c1-3b86db6625b0
            Description:  Patch pre-checks for [OS, ILOM, ORACHKSERVER, SERVER] to 19.30.0.0.0
                 Status:  SUCCESS
                Created:  February 26, 2026 11:40:17 AM CET
                 Result:  All pre-checks succeeded

Node Name
---------------
dbioda01

Pre-Check                      Status   Comments
------------------------------ -------- --------------------------------------
__OS__
Validate supported versions     Success   Validated minimum supported versions.
Validate patching tag           Success   Validated patching tag: 19.30.0.0.0.
Is patch location available     Success   Patch location is available.
Verify All OS patches           Success   No dependencies found for RPMs being
                                          removed, updated and installed. Check
                                          /opt/oracle/dcs/log/jobfiles/
                                          dnfdryrunout_2026-02-26_11-40-
                                          34.0688_236.log file for more details
Validate command execution      Success   Validated command execution

__ILOM__
Validate ILOM server reachable  Success   Successfully connected with ILOM
                                          server using public IP and USB
                                          interconnect
Validate supported versions     Success   Validated minimum supported versions.
Validate patching tag           Success   Validated patching tag: 19.30.0.0.0.
Is patch location available     Success   Patch location is available.
Checking Ilom patch Version     Success   Successfully verified the versions
Patch location validation       Success   Successfully validated location
Validate command execution      Success   Validated command execution

__ORACHK__
Running orachk                  Success   Successfully ran Orachk
Validate command execution      Success   Validated command execution

__SERVER__
Validate local patching         Success   Successfully validated server local
                                          patching
Validate all KVM ACFS           Success   All KVM ACFS resources are running
resources are running
Validate DB System VM states    Success   All DB System VMs states are expected
Validate DB System AFD state    Success   All DB Systems are on required
                                          versions
Validate command execution      Success   Validated command execution
OK let’s apply the system patch:
odacli update-servercomponents -v 19.30.0.0.0
...
The server will reboot at the end of the patching (it took 40 minutes on my X8-2M). Let’s then check the job:
odacli describe-job -i "8d5b4b63-3a92-46e4-b466-9fd46cdf8b3a"
Job details
----------------------------------------------------------------
                     ID:  8d5b4b63-3a92-46e4-b466-9fd46cdf8b3a
            Description:  Server Patching to 19.30.0.0.0
                 Status:  Success
                Created:  February 26, 2026 11:42:47 CET
                Message:

Task Name                                Start Time                               End Time                                 Status
---------------------------------------- ---------------------------------------- ---------------------------------------- ----------------
Validating GI user metadata              February 26, 2026 11:42:53 CET           February 26, 2026 11:42:54 CET           Success
Modify BM udev rules                     February 26, 2026 11:42:54 CET           February 26, 2026 11:43:05 CET           Success
Validate ILOM server reachable           February 26, 2026 11:42:54 CET           February 26, 2026 11:42:54 CET           Success
Stop oakd                                February 26, 2026 11:43:05 CET           February 26, 2026 11:43:08 CET           Success
Creating local repository                February 26, 2026 11:43:09 CET           February 26, 2026 11:43:11 CET           Success
OSPatchBaseRepo
Updating versionlock plugin              February 26, 2026 11:43:11 CET           February 26, 2026 11:43:14 CET           Success
Applying OS Patches                      February 26, 2026 11:43:14 CET           February 26, 2026 11:50:26 CET           Success
Applying HMP Patches                     February 26, 2026 11:50:27 CET           February 26, 2026 11:50:30 CET           Success
Creating local repository HMPPatchRepo   February 26, 2026 11:50:27 CET           February 26, 2026 11:50:27 CET           Success
Oda-hw-mgmt upgrade                      February 26, 2026 11:50:31 CET           February 26, 2026 11:51:02 CET           Success
Patch location validation                February 26, 2026 11:50:31 CET           February 26, 2026 11:50:31 CET           Success
Setting SELinux mode                     February 26, 2026 11:50:31 CET           February 26, 2026 11:50:31 CET           Success
Installing SQLcl software                February 26, 2026 11:51:02 CET           February 26, 2026 11:51:06 CET           Success
OSS Patching                             February 26, 2026 11:51:02 CET           February 26, 2026 11:51:02 CET           Success
Applying Firmware local Disk Patches     February 26, 2026 11:51:06 CET           February 26, 2026 11:51:10 CET           Success
Applying Firmware local Controller Patch February 26, 2026 11:51:10 CET           February 26, 2026 11:51:14 CET           Success
Applying Firmware shared Controller      February 26, 2026 11:51:15 CET           February 26, 2026 11:51:19 CET           Success
Patch
Checking Ilom patch Version              February 26, 2026 11:51:19 CET           February 26, 2026 11:51:19 CET           Success
Patch location validation                February 26, 2026 11:51:19 CET           February 26, 2026 11:51:19 CET           Success
Disabling IPMI v2                        February 26, 2026 11:51:20 CET           February 26, 2026 11:51:21 CET           Success
Save password in Wallet                  February 26, 2026 11:51:20 CET           February 26, 2026 11:51:20 CET           Success
Apply Ilom patch                         February 26, 2026 11:51:21 CET           February 26, 2026 12:02:07 CET           Success
Copying Flash Bios to Temp location      February 26, 2026 12:02:07 CET           February 26, 2026 12:02:07 CET           Success
Start oakd                               February 26, 2026 12:02:08 CET           February 26, 2026 12:02:24 CET           Success
Add SYSNAME in Env                       February 26, 2026 12:02:25 CET           February 26, 2026 12:02:25 CET           Success
Cleanup JRE Home                         February 26, 2026 12:02:25 CET           February 26, 2026 12:02:25 CET           Success
Starting the clusterware                 February 26, 2026 12:02:25 CET           February 26, 2026 12:03:59 CET           Success
Update lvm.conf file                     February 26, 2026 12:04:00 CET           February 26, 2026 12:04:00 CET           Success
Generating and saving BOM                February 26, 2026 12:04:01 CET           February 26, 2026 12:04:34 CET           Success
Update System full patch version         February 26, 2026 12:04:01 CET           February 26, 2026 12:04:01 CET           Success
Update System rebootless patch version   February 26, 2026 12:04:01 CET           February 26, 2026 12:04:01 CET           Success
PreRebootNode Actions                    February 26, 2026 12:04:34 CET           February 26, 2026 12:07:10 CET           Success
Reboot Node February 26, 2026 12:07:10 CET February 26, 2026 12:18:17 CET SuccessLet’s register the patch file, and do the precheck for GI:
odacli update-repository -f /opt/dbi/odacli-dcs-19.30.0.0.0-260210-GI-19.30.0.0.zip
sleep 70 ; odacli describe-job -i "5699a201-8f50-499c-98a8-18b2e79ca356"

Job details
----------------------------------------------------------------
                     ID:  5699a201-8f50-499c-98a8-18b2e79ca356
            Description:  Repository Update
                 Status:  Success
                Created:  February 26, 2026 12:32:04 CET
                Message:  /opt/dbi/odacli-dcs-19.30.0.0.0-260210-GI-19.30.0.0.zip

Task Name                                Start Time                               End Time                                 Status
---------------------------------------- ---------------------------------------- ---------------------------------------- ----------------
Unzip bundle                             February 26, 2026 12:32:05 CET           February 26, 2026 12:33:14 CET           Success

odacli create-prepatchreport -gi -v 19.30.0.0.0

sleep 180 ; odacli describe-prepatchreport -i ac157412-cfe2-4b2e-ae04-e7082cd4014f

Prepatch Report
------------------------------------------------------------------------
                 Job ID:  ac157412-cfe2-4b2e-ae04-e7082cd4014f
            Description:  Patch pre-checks for [RHPGI, GI] to 19.30.0.0.0
                 Status:  SUCCESS
                Created:  February 26, 2026 12:34:00 PM CET
                 Result:  All pre-checks succeeded

Node Name
---------------
dbioda01

Pre-Check                      Status   Comments
------------------------------ -------- --------------------------------------
__RHPGI__
Validate available space        Success   Validated free space under /u01
Evaluate GI patching            Success   Successfully validated GI patching
Validate command execution      Success   Validated command execution

__GI__
Validate GI metadata            Success   Successfully validated GI metadata
Validate supported GI versions  Success   Successfully validated minimum version
Is clusterware running          Success   Clusterware is running
Validate patching tag           Success   Validated patching tag: 19.30.0.0.0.
Is system provisioned           Success   Verified system is provisioned
Validate ASM is online          Success   ASM is online
Validate kernel log level       Success   Successfully validated the OS log
                                          level
Validate Central Inventory      Success   oraInventory validation passed
Validate patching locks         Success   Validated patching locks
Validate clones location exist  Success   Validated clones location
Validate DB start dependencies  Success   DBs START dependency check passed
Validate DB stop dependencies   Success   DBs STOP dependency check passed
Validate space for clones       Success   Clones volume is already created
volume
Validate command execution      Success   Validated command execution
Let’s apply the GI update now:
odacli update-gihome -v 19.30.0.0.0
sleep 500 ;  odacli describe-job -i "857bb637-82ec-4de9-a820-5ab9b895e9f8"

Job details
----------------------------------------------------------------
                     ID:  857bb637-82ec-4de9-a820-5ab9b895e9f8
            Description:  Patch GI with RHP to 19.30.0.0.0
                 Status:  Success
                Created:  February 26, 2026 12:38:29 CET
                Message:

Task Name                                Start Time                               End Time                                 Status
---------------------------------------- ---------------------------------------- ---------------------------------------- ----------------
Patch GI with RHP to 19.30.0.0.0         February 26, 2026 12:38:44 CET           February 26, 2026 12:46:00 CET           Success
Registering image                        February 26, 2026 12:38:45 CET           February 26, 2026 12:38:45 CET           Success
Registering working copy                 February 26, 2026 12:38:45 CET           February 26, 2026 12:38:46 CET           Success
Starting the clusterware                 February 26, 2026 12:38:45 CET           February 26, 2026 12:38:45 CET           Success
Creating GI home directories             February 26, 2026 12:38:46 CET           February 26, 2026 12:38:46 CET           Success
Extract GI clone                         February 26, 2026 12:38:46 CET           February 26, 2026 12:38:46 CET           Success
Provisioning Software Only GI with RHP   February 26, 2026 12:38:46 CET           February 26, 2026 12:38:46 CET           Success
Registering image                        February 26, 2026 12:38:46 CET           February 26, 2026 12:38:46 CET           Success
Patch GI with RHP                        February 26, 2026 12:39:20 CET           February 26, 2026 12:45:25 CET           Success
Set CRS ping target                      February 26, 2026 12:45:25 CET           February 26, 2026 12:45:25 CET           Success
Updating .bashrc                         February 26, 2026 12:45:25 CET           February 26, 2026 12:45:26 CET           Success
Updating GI home metadata                February 26, 2026 12:45:26 CET           February 26, 2026 12:45:26 CET           Success
Updating GI home version                 February 26, 2026 12:45:26 CET           February 26, 2026 12:45:31 CET           Success
Updating All DBHome version              February 26, 2026 12:45:31 CET           February 26, 2026 12:45:36 CET           Success
Starting the clusterware                 February 26, 2026 12:45:56 CET           February 26, 2026 12:45:56 CET           Success
Validate ACFS resources are running      February 26, 2026 12:45:56 CET           February 26, 2026 12:45:57 CET           Success
Validate GI availability                 February 26, 2026 12:45:56 CET           February 26, 2026 12:45:56 CET           Success
Validate DB System VMs states            February 26, 2026 12:45:57 CET           February 26, 2026 12:45:58 CET           Success
Patch CPU Pools distribution             February 26, 2026 12:45:58 CET           February 26, 2026 12:45:58 CET           Success
Patch DB System domain config            February 26, 2026 12:45:58 CET           February 26, 2026 12:45:58 CET           Success
Patch KVM CRS type                       February 26, 2026 12:45:58 CET           February 26, 2026 12:45:58 CET           Success
Patch VM vDisks CRS dependencies         February 26, 2026 12:45:58 CET           February 26, 2026 12:45:58 CET           Success
Save custom VNetworks to storage         February 26, 2026 12:45:58 CET           February 26, 2026 12:45:59 CET           Success
Add network filters to DB Systems        February 26, 2026 12:45:59 CET           February 26, 2026 12:46:00 CET           Success
Create network filters                   February 26, 2026 12:45:59 CET           February 26, 2026 12:45:59 CET           Success
Patch DB Systems custom scale metadata   February 26, 2026 12:46:00 CET           February 26, 2026 12:46:00 CET           Success
Patch DB Systems vDisks CRS dependencies February 26, 2026 12:46:00 CET           February 26, 2026 12:46:00 CET           Success
No reboot is needed for this patch.
Check the versionsodacli describe-component
System Version
--------------
19.30.0.0.0
System Node Name
----------------
dbioda01
Local System Version
--------------------
19.30.0.0.0
Component Installed Version Available Version
---------------------------------------- -------------------- --------------------
OAK 19.30.0.0.0 up-to-date
GI 19.30.0.0.260120 up-to-date
DB {
OraDB19000_home9 19.29.0.0.251021 19.30.0.0.260120
[CPROD19]
}
DCSCONTROLLER 19.30.0.0.0 up-to-date
DCSCLI 19.30.0.0.0 up-to-date
DCSAGENT 19.30.0.0.0 up-to-date
DCSADMIN 19.30.0.0.0 up-to-date
OS 8.10 up-to-date
ILOM 5.1.5.29.r167438 up-to-date
BIOS 52170100 up-to-date
LOCAL CONTROLLER FIRMWARE {
[c4] 8000D9AB up-to-date
}
SHARED CONTROLLER FIRMWARE {
[c0, c1] VDV1RL06 up-to-date
}
LOCAL DISK FIRMWARE {
[c2d0, c2d1] XC311132 up-to-date
}
HMP 2.4.10.1.600 up-to-datePatching the storage is only needed if describe-component tells you that you’re not up-to-date. On my X8-2M, it wasn’t needed. If your ODA need the storage patch, it’s easy:
odacli update-storage -v 19.30.0.0.0
odacli describe-job -i ...
The server will reboot once done.
Patching the DB homesIt’s now time to patch the DB home and the database on my ODA. Let’s first unzip and register the patch file in the repository:
odacli update-repository -f /opt/dbi/odacli-dcs-19.30.0.0.0-260210-DB-19.30.0.0.zip
sleep 60; odacli describe-job -i 5690c811-9030-427e-82f1-caeeba236329

Job details
----------------------------------------------------------------
                     ID:  5690c811-9030-427e-82f1-caeeba236329
            Description:  Repository Update
                 Status:  Success
                Created:  February 26, 2026 12:54:57 CET
                Message:  /opt/dbi/odacli-dcs-19.30.0.0.0-260210-DB-19.30.0.0.zip

Task Name                                Start Time                               End Time                                 Status
---------------------------------------- ---------------------------------------- ---------------------------------------- ----------------
Unzip bundle                             February 26, 2026 12:54:57 CET           February 26, 2026 12:55:50 CET           Success


odacli list-dbhomes
ID                                       Name                 DB Version           DB Edition Home Location                                            Status
---------------------------------------- -------------------- -------------------- ---------- -------------------------------------------------------- ----------
57c0dd7f-dcf4-4a38-9e79-4bf8c78e81bb     OraDB19000_home9     19.29.0.0.251021     EE         /u01/app/odaorahome/oracle/product/19.0.0.0/dbhome_9     CONFIGURED
Let’s check if the patch can be applied:
odacli create-prepatchreport -d -i 57c0dd7f-dcf4-4a38-9e79-4bf8c78e81bb -v 19.30.0.0.0

sleep 600; odacli describe-prepatchreport -i 3522c79c-7444-44d7-9422-9d1daab161d2

Prepatch Report
------------------------------------------------------------------------
                 Job ID:  3522c79c-7444-44d7-9422-9d1daab161d2
            Description:  Patch pre-checks for [DB, RHPDB, ORACHKDB] to 19.30.0.0.0: DbHome is OraDB19000_home9
                 Status:  FAILED
                Created:  February 26, 2026 12:56:59 PM CET
                 Result:  One or more pre-checks failed for [ORACHK, DB]

Node Name
---------------
dbioda01

Pre-Check                      Status   Comments
------------------------------ -------- --------------------------------------
__DB__
Validate data corruption in     Failed    DCS-10315 - Patch described in My
patching                                  Oracle Support Note KB867473 must be
                                          applied.
Validate DB Home ID             Success   Validated DB Home ID:
                                          57c0dd7f-dcf4-4a38-9e79-4bf8c78e81bb
Validate patching tag           Success   Validated patching tag: 19.30.0.0.0.
Is system provisioned           Success   Verified system is provisioned
Validate minimum agent version  Success   Validated minimum agent version
Is GI upgraded                  Success   Validated GI is upgraded
Validate available space for    Success   Validated free space required under
db                                        /u01
Validate there is usable        Success   Successfully validated Oracle Base
space under oracle base                   usable space
Validate glogin.sql file        Success   Successfully verified glogin.sql
                                          won't break patching
Validate dbHomesOnACFS          Success   User has configured disk group for
configured                                Database homes on ACFS
Validate Oracle base            Success   Successfully validated Oracle Base
Is DB clone available           Success   Successfully validated clone file
                                          exists
Validate command execution      Success   Validated command execution

__RHPDB__
Evaluate DBHome patching with   Success   Successfully validated updating
RHP                                       dbhome with RHP.  and local patching
                                          is possible
Validate command execution      Success   Validated command execution

__ORACHK__
Running orachk                  Failed    DCS-10702 - ORAchk validation failed:
                                          .
Validate command execution      Success   Validated command execution
Verify the Fast Recovery Area   Failed    AHF-2929: FRA space management
(FRA) has reclaimable space               problem file types are present
                                          without an RMAN backup completion
                                          within the last 7 days
I need to fix 2 problems. The first one is a bug that appeared in 19.29, let’s download and unzip the patch. Be careful because this patch is available for multiple versions: you will need the one for the version you’re currently using (19.29 in my case).
su - oracle
unzip -d /home/oracle /opt/dbi/p38854064_1929000DBRU_Linux-x86-64.zip
Archive:  /opt/dbi/p38854064_1929000DBRU_Linux-x86-64.zip
   creating: /home/oracle/38854064/
   creating: /home/oracle/38854064/files/
   creating: /home/oracle/38854064/files/lib/
   creating: /home/oracle/38854064/files/lib/libserver19.a/
  inflating: /home/oracle/38854064/files/lib/libserver19.a/kjfc.o
  inflating: /home/oracle/38854064/README.txt
   creating: /home/oracle/38854064/etc/
   creating: /home/oracle/38854064/etc/config/
  inflating: /home/oracle/38854064/etc/config/inventory.xml
  inflating: /home/oracle/38854064/etc/config/actions.xml
  inflating: /home/oracle/PatchSearch.xml
Let’s stop the database and apply this patch:
. oraenv <<< CPROD19
srvctl stop database -db CPROD19_S1

cd 38854064
$ORACLE_HOME/OPatch/opatch apply
Oracle Interim Patch Installer version 12.2.0.1.47
Copyright (c) 2026, Oracle Corporation.  All rights reserved.


Oracle Home       : /u01/app/odaorahome/oracle/product/19.0.0.0/dbhome_9
Central Inventory : /u01/app/oraInventory
   from           : /u01/app/odaorahome/oracle/product/19.0.0.0/dbhome_9/oraInst.loc
OPatch version    : 12.2.0.1.47
OUI version       : 12.2.0.7.0
Log file location : /u01/app/odaorahome/oracle/product/19.0.0.0/dbhome_9/cfgtoollogs/opatch/opatch2026-02-26_14-29-22PM_1.log

Verifying environment and performing prerequisite checks...
OPatch continues with these patches:   38854064

Do you want to proceed? [y|n]
y
User Responded with: Y
All checks passed.

Please shutdown Oracle instances running out of this ORACLE_HOME on the local system.
(Oracle Home = '/u01/app/odaorahome/oracle/product/19.0.0.0/dbhome_9')


Is the local system ready for patching? [y|n]
y
User Responded with: Y
Backing up files...
Applying interim patch '38854064' to OH '/u01/app/odaorahome/oracle/product/19.0.0.0/dbhome_9'

Patching component oracle.rdbms, 19.0.0.0.0...
Patch 38854064 successfully applied.
Log file location: /u01/app/odaorahome/oracle/product/19.0.0.0/dbhome_9/cfgtoollogs/opatch/opatch2026-02-26_14-29-22PM_1.log

OPatch succeeded.

srvctl start database -db CPROD19_S1
Second problem is because my database doesn’t have a proper backup strategy, let’s then remove the useless archivelogs:
rman target /
delete force noprompt archivelog all;
exit;
exit
Now let’s retry the precheck:
odacli create-prepatchreport -d -i 57c0dd7f-dcf4-4a38-9e79-4bf8c78e81bb -v 19.30.0.0.0

odacli describe-prepatchreport -i b932011d-cfcf-402d-901e-5c7eac888f1f

Prepatch Report
------------------------------------------------------------------------
                 Job ID:  b932011d-cfcf-402d-901e-5c7eac888f1f
            Description:  Patch pre-checks for [DB, RHPDB, ORACHKDB] to 19.30.0.0.0: DbHome is OraDB19000_home9
                 Status:  FAILED
                Created:  February 26, 2026 3:01:14 PM CET
                 Result:  One or more pre-checks failed for [ORACHK, DB]

Node Name
---------------
dbioda01

Pre-Check                      Status   Comments
------------------------------ -------- --------------------------------------
__DB__
Validate data corruption in     Failed    DCS-10315 - Patch described in My
patching                                  Oracle Support Note KB867473 must be
                                          applied.
Validate DB Home ID             Success   Validated DB Home ID:
                                          57c0dd7f-dcf4-4a38-9e79-4bf8c78e81bb
Validate patching tag           Success   Validated patching tag: 19.30.0.0.0.
Is system provisioned           Success   Verified system is provisioned
Validate minimum agent version  Success   Validated minimum agent version
Is GI upgraded                  Success   Validated GI is upgraded
Validate available space for    Success   Validated free space required under
db                                        /u01
Validate there is usable        Success   Successfully validated Oracle Base
space under oracle base                   usable space
Validate glogin.sql file        Success   Successfully verified glogin.sql
                                          won't break patching
Validate dbHomesOnACFS          Success   User has configured disk group for
configured                                Database homes on ACFS
Validate Oracle base            Success   Successfully validated Oracle Base
Is DB clone available           Success   Successfully validated clone file
                                          exists
Validate command execution      Success   Validated command execution

__RHPDB__
Evaluate DBHome patching with   Success   Successfully validated updating
RHP                                       dbhome with RHP.  and local patching
                                          is possible
Validate command execution      Success   Validated command execution

__ORACHK__
Running orachk                  Failed    DCS-10702 - ORAchk validation failed:
                                          .
Validate command execution      Success   Validated command execution
Verify the Fast Recovery Area   Failed    AHF-2929: FRA space management
(FRA) has reclaimable space               problem file types are present
                                          without an RMAN backup completion
                                          within the last 7 days
This view doesn’t look updated, and the ODA documentation tells us that updating the DB home will need to be forced, let’s do that:
odacli update-dbhome -i 57c0dd7f-dcf4-4a38-9e79-4bf8c78e81bb -v 19.30.0.0.0 --force

sleep 600;  odacli describe-job -i "bd511055-7a35-45b4-b9f2-3a003c7ecb31"
Job details
----------------------------------------------------------------
                     ID:  bd511055-7a35-45b4-b9f2-3a003c7ecb31
            Description:  DB Home Patching to 19.30.0.0.0: Home ID is 57c0dd7f-dcf4-4a38-9e79-4bf8c78e81bb
                 Status:  Success
                Created:  February 26, 2026 15:08:46 CET
                Message:

Task Name                                Start Time                               End Time                                 Status
---------------------------------------- ---------------------------------------- ---------------------------------------- ----------------
Creating wallet for DB Client            February 26, 2026 15:09:33 CET           February 26, 2026 15:09:33 CET           Success
Patch databases by RHP - [CPROD19]       February 26, 2026 15:09:33 CET           February 26, 2026 15:16:44 CET           Success
Updating database metadata               February 26, 2026 15:16:44 CET           February 26, 2026 15:16:44 CET           Success
Upgrade pwfile to 12.2                   February 26, 2026 15:16:44 CET           February 26, 2026 15:16:47 CET           Success
Set log_archive_dest for Database        February 26, 2026 15:16:47 CET           February 26, 2026 15:16:50 CET           Success
Populate PDB metadata                    February 26, 2026 15:16:51 CET           February 26, 2026 15:16:52 CET           Success
Generating and saving BOM                February 26, 2026 15:16:52 CET           February 26, 2026 15:17:33 CET           Success
TDE parameter update                     February 26, 2026 15:18:06 CET           February 26, 2026 15:18:06 CET           Success
Everything is now OK.
Let’s check the DB homes and databases:
odacli list-dbhomes
ID                                       Name                 DB Version           DB Edition Home Location                                            Status
---------------------------------------- -------------------- -------------------- ---------- -------------------------------------------------------- ----------
d3b5fa9c-ad85-46c3-b11a-cd264978b653     OraDB19000_home10    19.30.0.0.260120     EE         /u01/app/odaorahome/oracle/product/19.0.0.0/dbhome_10    CONFIGURED
57c0dd7f-dcf4-4a38-9e79-4bf8c78e81bb     OraDB19000_home9     19.29.0.0.251021     EE         /u01/app/odaorahome/oracle/product/19.0.0.0/dbhome_9     CONFIGURED

odacli list-databases
ID                                       DB Name    DB Type  DB Version           CDB     Class    Edition  Shape    Storage  Status       DB Home ID
---------------------------------------- ---------- -------- -------------------- ------- -------- -------- -------- -------- ------------ ----------------------------------------
976a80f2-4653-469f-8cd4-ddc1a21aff51     CPROD19    SI       19.30.0.0.260120     true    OLTP     EE       odb8     ASM      CONFIGURED   d3b5fa9c-ad85-46c3-b11a-cd264978b653
Let’s now remove the old DB home. Note that DB homes are not protected by ODABR, I would recommend doing a backup before removing an old DB home:
tar czf /backup/`hostname -s`_dbhome_9.tgz /u01/app/odaorahome/oracle/product/19.0.0.0/dbhome_9

odacli delete-dbhome -i 57c0dd7f-dcf4-4a38-9e79-4bf8c78e81bb
sleep 40 ; odacli describe-job -i 4589a4d7-6986-4e16-818c-78d585f44443
Job details
----------------------------------------------------------------
                     ID:  4589a4d7-6986-4e16-818c-78d585f44443
            Description:  Database Home OraDB19000_home9 Deletion with ID 57c0dd7f-dcf4-4a38-9e79-4bf8c78e81bb
                 Status:  Success
                Created:  February 26, 2026 15:24:44 CET
                Message:

Task Name                                Start Time                               End Time                                 Status
---------------------------------------- ---------------------------------------- ---------------------------------------- ----------------
Setting up SSH equivalence               February 26, 2026 15:24:44 CET           February 26, 2026 15:24:44 CET           Success
Setting up SSH equivalence               February 26, 2026 15:24:44 CET           February 26, 2026 15:24:44 CET           Success
Validate DB Home                         February 26, 2026 15:24:44 CET           February 26, 2026 15:24:44 CET           Success
57c0dd7f-dcf4-4a38-9e79-4bf8c78e81bb
for deletion
Deleting DB Home by RHP February 26, 2026 15:24:45 CET February 26, 2026 15:25:21 CET SuccessLet’s remove the previous patch from the repository:
odacli cleanup-patchrepo -comp all -v 19.29.0.0.0

odacli describe-job -i "a9e29414-8f12-4b55-a6d4-9ad82e9a4c74"
Job details
----------------------------------------------------------------
                     ID:  a9e29414-8f12-4b55-a6d4-9ad82e9a4c74
            Description:  Cleanup patchrepos
                 Status:  Success
                Created:  February 26, 2026 15:29:46 CET
                Message:

Task Name                                Start Time                               End Time                                 Status
---------------------------------------- ---------------------------------------- ---------------------------------------- ----------------
Cleanup Repository                       February 26, 2026 15:29:46 CET           February 26, 2026 15:29:47 CET           Success
Cleanup old ASR rpm                      February 26, 2026 15:29:47 CET           February 26, 2026 15:29:47 CET           Success
Old GI binaries are still using space in /u01, it’s better to remove them manually:
du -hs /u01/app/19.*
14G	/u01/app/19.29.0.0
14G	/u01/app/19.30.0.0

rm -rf /u01/app/19.29.0.0
I would recommend doing a reboot to check if everything run fine. But let’s first check the components:
odacli describe-component
System Version
--------------
19.30.0.0.0

System Node Name
----------------
dbioda01

Local System Version
--------------------
19.30.0.0.0

Component                                Installed Version    Available Version
---------------------------------------- -------------------- --------------------
OAK                                      19.30.0.0.0          up-to-date

GI                                       19.30.0.0.260120     up-to-date

DB {
     OraDB19000_home10                   19.30.0.0.260120     up-to-date
     [CPROD19]
}

DCSCONTROLLER                            19.30.0.0.0          up-to-date

DCSCLI                                   19.30.0.0.0          up-to-date

DCSAGENT                                 19.30.0.0.0          up-to-date

DCSADMIN                                 19.30.0.0.0          up-to-date

OS                                       8.10                 up-to-date

ILOM                                     5.1.5.29.r167438     up-to-date

BIOS                                     52170100             up-to-date

LOCAL CONTROLLER FIRMWARE {
     [c4]                                8000D9AB             up-to-date
}

SHARED CONTROLLER FIRMWARE {
     [c0, c1]                            VDV1RL06             up-to-date
}

LOCAL DISK FIRMWARE {
     [c2d0, c2d1]                        XC311132             up-to-date
}

HMP                                      2.4.10.1.600         up-to-date

reboot
...

ps -ef | grep pmon
grid      8292     1  0 15:37 ?        00:00:00 asm_pmon_+ASM1
grid     11539     1  0 15:37 ?        00:00:00 apx_pmon_+APX1
oracle   20494     1  0 15:38 ?        00:00:00 ora_pmon_CPROD19
root     23559 23363  0 15:39 pts/1    00:00:00 grep --color=auto pmon
Everything is fine.
Post-patching tasksDont’ forget these post-patching tasks:
- remove the ODABR snapshots
- add your additional RPMs
- put back your profile scripts for grid and oracle users
- check if monitoring still works
/opt/odabr/odabr infosnap

│▒▒▒▒▒▒▒▒▒▒▒▒▒▒▒▒▒▒▒▒▒▒▒▒▒▒▒▒▒▒▒▒▒▒▒▒▒▒▒▒▒▒▒▒▒▒▒▒▒▒▒▒▒▒▒▒│
 odabr - ODA node Backup Restore - Version: 2.0.2-06
 Copyright 2013, 2025, Oracle and/or its affiliates.
 --------------------------------------------------------
 RACPack, Cloud Innovation and Solution Engineering Team
│▒▒▒▒▒▒▒▒▒▒▒▒▒▒▒▒▒▒▒▒▒▒▒▒▒▒▒▒▒▒▒▒▒▒▒▒▒▒▒▒▒▒▒▒▒▒▒▒▒▒▒▒▒▒▒▒│


LVM snap name         status                COW Size              Data%
-------------         ----------            ----------            ------
root_snap             active                30.00 GiB             6.08%
opt_snap              active                70.00 GiB             11.41%
u01_snap              active                60.00 GiB             25.30%

/opt/odabr/odabr delsnap

INFO: 2026-02-26 15:39:47: Please check the logfile '/opt/odabr/out/log/odabr_23962.log' for more details


│▒▒▒▒▒▒▒▒▒▒▒▒▒▒▒▒▒▒▒▒▒▒▒▒▒▒▒▒▒▒▒▒▒▒▒▒▒▒▒▒▒▒▒▒▒▒▒▒▒▒▒▒▒▒▒▒│
 odabr - ODA node Backup Restore - Version: 2.0.2-06
 Copyright 2013, 2025, Oracle and/or its affiliates.
 --------------------------------------------------------
 RACPack, Cloud Innovation and Solution Engineering Team
│▒▒▒▒▒▒▒▒▒▒▒▒▒▒▒▒▒▒▒▒▒▒▒▒▒▒▒▒▒▒▒▒▒▒▒▒▒▒▒▒▒▒▒▒▒▒▒▒▒▒▒▒▒▒▒▒│

INFO: 2026-02-26 15:39:47: Removing LVM snapshots
INFO: 2026-02-26 15:39:47: ...removing LVM snapshot for 'opt'
SUCCESS: 2026-02-26 15:39:48: ...snapshot for 'opt' removed successfully
INFO: 2026-02-26 15:39:48: ...removing LVM snapshot for 'u01'
SUCCESS: 2026-02-26 15:39:48: ...snapshot for 'u01' removed successfully
INFO: 2026-02-26 15:39:48: ...removing LVM snapshot for 'root'
SUCCESS: 2026-02-26 15:39:48: ...snapshot for 'root' removed successfully
SUCCESS: 2026-02-26 15:39:48: LVM snapshots removed successfullyIf you use DB Systems on your ODA, meaning that some of your databases are running in dedicated VMs, you will need to apply the patch inside each DB System. If you’re using 26ai, you first need to register the new clones in the repository before connecting to your DB System:
odacli update-repository -f /opt/dbi/odacli-dcs-23.26.1.0.0-260211-GI-23.26.1.0.zip
sleep 30 ; odacli describe-job -i 8612ef6a-7df4-419d-8d05-176e11126f48

Job details
----------------------------------------------------------------
                     ID:  8612ef6a-7df4-419d-8d05-176e11126f48
            Description:  Repository Update
                 Status:  Success
                Created:  February 26, 2026 15:44:00 CET
                Message:  /opt/dbi/odacli-dcs-23.26.1.0.0-260211-GI-23.26.1.0.zip

Task Name                                Start Time                               End Time                                 Status
---------------------------------------- ---------------------------------------- ---------------------------------------- ----------------
Unzip bundle                             February 26, 2026 15:44:00 CET           February 26, 2026 15:44:13 CET           Success


odacli update-repository -f /opt/dbi/odacli-dcs-23.26.1.0.0-260211-DB-23.26.1.0.zip
sleep 30 ; odacli describe-job -i 9dd624f2-9048-4897-b63b-400b955c803c

Job details
----------------------------------------------------------------
                     ID:  9dd624f2-9048-4897-b63b-400b955c803c
            Description:  Repository Update
                 Status:  Success
                Created:  February 26, 2026 15:45:12 CET
                Message:  /opt/dbi/odacli-dcs-23.26.1.0.0-260211-DB-23.26.1.0.zip

Task Name                                Start Time                               End Time                                 Status
---------------------------------------- ---------------------------------------- ---------------------------------------- ----------------
Unzip bundle                             February 26, 2026 15:45:12 CET           February 26, 2026 15:45:40 CET           Success

odacli update-repository -f /opt/dbi/oda-sm-23.26.1.0.0-260211-server.zip
sleep 20 ; odacli describe-job -i 6a24023f-de2e-4481-b9c4-d8511d54be48

Job details
----------------------------------------------------------------
                     ID:  6a24023f-de2e-4481-b9c4-d8511d54be48
            Description:  Repository Update
                 Status:  Success
                Created:  February 26, 2026 15:59:07 CET
                Message:  /opt/dbi/oda-sm-23.26.1.0.0-260211-server.zip

Task Name                                Start Time                               End Time                                 Status
---------------------------------------- ---------------------------------------- ---------------------------------------- ----------------
Unzip bundle                             February 26, 2026 15:59:08 CET           February 26, 2026 15:59:30 CET           Success

odacli list-availablepatches
-------------------- ------------------------- ------------------------- ------------------------------
ODA Release Version  Supported DB Versions     Available DB Versions     Supported Platforms
-------------------- ------------------------- ------------------------- ------------------------------
19.30.0.0.0          23.26.1.0.0               23.26.1.0.0               DB System
                     21.8.0.0.221018           Clone not available       DB System
                     19.30.0.0.260120          19.30.0.0.260120          DB System, Bare Metal
Applying the patch is done the same way you’ve done it on bare metal, but here you need to specify the 23.26.1.0.0 version:
ssh dbs-04-tst

odacli update-dcsadmin -v 23.26.1.0.0

sleep 60 ; odacli describe-job -i 4b83ab57-ccb1-4f9f-8c70-572b45ada49b

Job details
----------------------------------------------------------------
                     ID:  4b83ab57-ccb1-4f9f-8c70-572b45ada49b
            Description:  DcsAdmin patching to 23.26.1.0.0
                 Status:  Success
                Created:  March 05, 2026 10:07:44 CET
                Message:

Task Name                                Start Time                               End Time                                 Status
---------------------------------------- ---------------------------------------- ---------------------------------------- ----------------
Dcs-admin upgrade                        March 05, 2026 10:07:45 CET              March 05, 2026 10:07:59 CET              Success
Ping DCS Admin                           March 05, 2026 10:07:59 CET              March 05, 2026 10:09:07 CET              Success

sleep 30 ;  odacli update-dcscomponents -v 23.26.1.0.0
{
  "jobId" : "cb674b3e-d6eb-4351-be39-0f19b8c56f9d",
  "status" : "Success",
  "message" : "Update-dcscomponents is successful on all the node(s): DCS-Agent shutdown is successful. MySQL upgrade is successful. Metadata schema update is done. Script '/opt/oracle/dcs/log/jobfiles/cb674b3e-d6eb-4351-be39-0f19b8c56f9d/apply_metadata_change.sh' ran successfully. dcsagent RPM upgrade is successful. dcscli RPM upgrade is successful. dcscontroller RPM upgrade is successful. ahf RPM upgrade is successful.  Successfully reset the Keystore password. HAMI RPM is already updated.  Removed old Libs Successfully ran setupAgentAuth.sh ",
  "reports" : null,
  "createTimestamp" : "March 05, 2026 10:10:13 AM CET",
  "description" : "Update-dcscomponents job completed and is not part of Agent job list",
  "updatedTime" : "March 05, 2026 10:18:38 AM CET",
  "jobType" : null,
  "externalRequestId" : null,
  "action" : null
}

odacli describe-admin-job -i cb674b3e-d6eb-4351-be39-0f19b8c56f9d
odacli: 'describe-admin-job' is not an odacli command.
usage: odacli	[-h/--help]
		<category> [-h/--help]
		<operation> [-h/--help]
		<command> [-h/--help]
		<command> [<args>]
Note that there is no describe-admin-job feature on DB Systems.
odacli create-prepatchreport -sc -v 23.26.1.0.0

sleep 20 ; odacli describe-prepatchreport -i 1b104d06-bc0c-45b8-ab25-b5b6a102a857

Prepatch Report
------------------------------------------------------------------------
                 Job ID:  1b104d06-bc0c-45b8-ab25-b5b6a102a857
            Description:  Patch pre-checks for [OS, ORACHKSERVER, SERVER] to 23.26.1.0.0
                 Status:  SUCCESS
                Created:  March 05, 2026 10:59:34 CET
                 Result:  All pre-checks succeeded

Node Name
---------------
dbs-04-tst

Pre-Check                      Status   Comments
------------------------------ -------- --------------------------------------
__OS__
Validate supported versions     Success   Validated minimum supported versions.
Validate patching tag           Success   Validated patching tag: 23.26.1.0.0.
Is patch location available     Success   Patch location is available.
Verify All OS patches           Success   No dependencies found for RPMs being
                                          removed, updated and installed. Check
                                          /opt/oracle/dcs/log/jobfiles/
                                          dnfdryrunout_2026-03-05_10-59-
                                          50.0718_832.log file for more details
Validate there is usable        Success   Successfully validated
space under repo volume                   /opt/oracle/dcs/repo usable space
Validate command execution      Success   Validated command execution

__ORACHK__
Running orachk                  Success   Successfully ran Orachk
Validate command execution      Success   Validated command execution

__SERVER__
Validate local patching         Success   Successfully validated server local
                                          patching
Validate all KVM ACFS           Success   All KVM ACFS resources are running
resources are running
Validate DB System VM states    Success   All DB System VMs states are expected
Enable support for Multi-DB     Success   No need to convert the DB System
Validate DB System AFD state    Success   AFD is not configured
Validate there is usable        Success   Successfully validated
space under repo volume                   /opt/oracle/dcs/repo usable space
Validate command execution      Success   Validated command execution


odacli update-servercomponents -v 23.26.1.0.0
The DB System will reboot.
odacli describe-job -i 2b4da73a-7f64-48e0-af76-a1d687a0169f

Job details
----------------------------------------------------------------
                     ID:  2b4da73a-7f64-48e0-af76-a1d687a0169f
            Description:  Server Patching to 23.26.1.0.0
                 Status:  Success
                Created:  March 05, 2026 11:04:19 CET
                Message:

Task Name                                Start Time                               End Time                                 Status
---------------------------------------- ---------------------------------------- ---------------------------------------- ----------------
Deactivate Unit[dnf-makecache.timer]     March 05, 2026 11:04:21 CET              March 05, 2026 11:04:21 CET              Success
Validating GI user metadata              March 05, 2026 11:04:21 CET              March 05, 2026 11:04:21 CET              Success
Deactivate Unit[kdump.service]           March 05, 2026 11:04:22 CET              March 05, 2026 11:04:23 CET              Success
Modify DBVM udev rules                   March 05, 2026 11:04:23 CET              March 05, 2026 11:04:34 CET              Success
Creating local repository                March 05, 2026 11:04:34 CET              March 05, 2026 11:04:37 CET              Success
OSPatchBaseRepo
Updating versionlock plugin              March 05, 2026 11:04:37 CET              March 05, 2026 11:04:41 CET              Success
Applying OS Patches                      March 05, 2026 11:04:41 CET              March 05, 2026 11:07:33 CET              Success
Creating local repository HMPPatchRepo   March 05, 2026 11:07:34 CET              March 05, 2026 11:07:34 CET              Success
Applying HMP Patches                     March 05, 2026 11:07:35 CET              March 05, 2026 11:07:38 CET              Success
Patch location validation                March 05, 2026 11:07:39 CET              March 05, 2026 11:07:39 CET              Success
Setting SELinux mode                     March 05, 2026 11:07:39 CET              March 05, 2026 11:07:39 CET              Success
Oda-hw-mgmt upgrade                      March 05, 2026 11:07:40 CET              March 05, 2026 11:08:08 CET              Success
Installing SQLcl software                March 05, 2026 11:08:08 CET              March 05, 2026 11:08:13 CET              Success
Cleanup JRE Home                         March 05, 2026 11:08:14 CET              March 05, 2026 11:08:14 CET              Success
Generating and saving BOM                March 05, 2026 11:08:17 CET              March 05, 2026 11:08:24 CET              Success
Update System full patch version         March 05, 2026 11:08:17 CET              March 05, 2026 11:08:17 CET              Success
Update System rebootless patch version   March 05, 2026 11:08:17 CET              March 05, 2026 11:08:17 CET              Success
PreRebootNode Actions                    March 05, 2026 11:08:24 CET              March 05, 2026 11:08:25 CET              Success
Reboot Node                              March 05, 2026 11:08:25 CET              March 05, 2026 11:09:59 CET              Success

odacli create-prepatchreport -gi -v 23.26.1.0.0

sleep 240 ; odacli describe-prepatchreport -i dd5d216b-d1bc-44cf-bcf8-381da0729469

Prepatch Report
------------------------------------------------------------------------
                 Job ID:  dd5d216b-d1bc-44cf-bcf8-381da0729469
            Description:  Patch pre-checks for [RHPGI, GI] to 23.26.1.0.0
                 Status:  SUCCESS
                Created:  March 05, 2026 11:13:21 CET
                 Result:  All pre-checks succeeded

Node Name
---------------
dbs-04-tst

Pre-Check                      Status   Comments
------------------------------ -------- --------------------------------------
__RHPGI__
Validate available space        Success   Validated free space under /u01
Evaluate GI patching            Success   Successfully validated GI patching
Validate there is usable        Success   Successfully validated
space under repo volume                   /opt/oracle/dcs/repo usable space
Validate command execution      Success   Validated command execution

__GI__
Validate GI metadata            Success   Successfully validated GI metadata
Validate supported GI versions  Success   Successfully validated minimum version
Validate there is usable        Success   Successfully validated
space under repo volume                   /opt/oracle/dcs/repo usable space
Is clusterware running          Success   Clusterware is running
Validate patching tag           Success   Validated patching tag: 23.26.1.0.0.
Is system provisioned           Success   Verified system is provisioned
Validate BM versions            Success   Validated BM server components
                                          versions
Validate kernel log level       Success   Successfully validated the OS log
                                          level
Validate Central Inventory      Success   oraInventory validation passed
Validate patching locks         Success   Validated patching locks
Validate clones location exist  Success   Validated clones location
Validate command execution      Success   Validated command execution


odacli update-gihome -v 23.26.1.0.0

sleep 600 ; odacli describe-job -i c93f84fc-5cb2-41bb-9f23-f7ce22b9f5de

Job details
----------------------------------------------------------------
                     ID:  c93f84fc-5cb2-41bb-9f23-f7ce22b9f5de
            Description:  Patch GI with RHP to 23.26.1.0.0
                 Status:  Success
                Created:  March 05, 2026 11:22:47 CET
                Message:

Task Name                                Start Time                               End Time                                 Status
---------------------------------------- ---------------------------------------- ---------------------------------------- ----------------
Patch GI with RHP to 23.26.1.0.0         March 05, 2026 11:22:59 CET              March 05, 2026 11:27:54 CET              Success
Starting the clusterware                 March 05, 2026 11:22:59 CET              March 05, 2026 11:22:59 CET              Success
Creating GI home directories             March 05, 2026 11:23:01 CET              March 05, 2026 11:23:01 CET              Success
Extract GI clone                         March 05, 2026 11:23:01 CET              March 05, 2026 11:23:01 CET              Success
Provisioning Software Only GI with RHP   March 05, 2026 11:23:01 CET              March 05, 2026 11:23:01 CET              Success
Registering image                        March 05, 2026 11:23:01 CET              March 05, 2026 11:23:01 CET              Success
Registering image                        March 05, 2026 11:23:01 CET              March 05, 2026 11:23:01 CET              Success
Registering working copy                 March 05, 2026 11:23:01 CET              March 05, 2026 11:23:01 CET              Success
Patch GI with RHP                        March 05, 2026 11:23:47 CET              March 05, 2026 11:26:58 CET              Success
Set CRS ping target                      March 05, 2026 11:26:58 CET              March 05, 2026 11:26:59 CET              Success
Updating .bashrc                         March 05, 2026 11:26:59 CET              March 05, 2026 11:26:59 CET              Success
Updating GI home metadata                March 05, 2026 11:26:59 CET              March 05, 2026 11:27:00 CET              Success
Updating GI home version                 March 05, 2026 11:27:00 CET              March 05, 2026 11:27:04 CET              Success
Updating All DBHome version              March 05, 2026 11:27:04 CET              March 05, 2026 11:27:08 CET              Success
Patch DB System on BM                    March 05, 2026 11:27:48 CET              March 05, 2026 11:27:54 CET              Success
Starting the clusterware                 March 05, 2026 11:27:48 CET              March 05, 2026 11:27:48 CET              Success


odacli list-dbhomes
ID                                       Name                 DB Version           DB Edition Home Location                                            Status
---------------------------------------- -------------------- -------------------- ---------- -------------------------------------------------------- ----------
9116603b-3b5e-4e92-aa63-baad8ae1d6a8     OraDB23000_home1     23.26.0.0.0          EE         /u01/app/oracle/product/23.0.0.0/dbhome_1                CONFIGURED

odacli create-prepatchreport -d -i 9116603b-3b5e-4e92-aa63-baad8ae1d6a8 -v 23.26.1.0.0

sleep 600 ;  odacli describe-prepatchreport -i bb16e390-3dcb-4ea0-b8c5-0c22f38ba271

odacli describe-prepatchreport -i bb16e390-3dcb-4ea0-b8c5-0c22f38ba271

Prepatch Report
------------------------------------------------------------------------
                 Job ID:  bb16e390-3dcb-4ea0-b8c5-0c22f38ba271
            Description:  Patch pre-checks for [DB, RHPDB, ORACHKDB] to 23.26.1.0.0: DbHome is OraDB23000_home1
                 Status:  FAILED
                Created:  March 05, 2026 11:59:29 CET
                 Result:  One or more pre-checks failed for [ORACHK]

Node Name
---------------
dbs-04-tst

Pre-Check                      Status   Comments
------------------------------ -------- --------------------------------------
__DB__
Validate DB Home ID             Success   Validated DB Home ID:
                                          9116603b-3b5e-4e92-aa63-baad8ae1d6a8
Validate patching tag           Success   Validated patching tag: 23.26.1.0.0.
Is system provisioned           Success   Verified system is provisioned
Validate minimum agent version  Success   Validated minimum agent version
Is GI upgraded                  Success   Validated GI is upgraded
Validate available space for    Success   Validated free space required under
db                                        /u01
Validate there is usable        Success   Successfully validated Oracle Base
space under oracle base                   usable space
Validate glogin.sql file        Success   Successfully verified glogin.sql
                                          won't break patching
Is DB clone available           Success   Successfully validated clone file
                                          exists
Validate command execution      Success   Validated command execution

__RHPDB__
Evaluate DBHome patching with   Success   Successfully validated updating
RHP                                       dbhome with RHP.  and local patching
                                          is possible
Validate command execution      Success   Validated command execution

__ORACHK__
Running orachk                  Failed    DCS-10702 - ORAchk validation failed:
                                          .
Validate command execution      Success   Validated command execution
Verify the Fast Recovery Area   Failed    AHF-2929: FRA space management
(FRA) has reclaimable space               problem file types are present
                                          without an RMAN backup completion
                                          within the last 7 days
The failure is similar to the one I had when patching the bare metal DB home, but I can ignore this and update the DB home with the force option:
odacli update-dbhome -i 9116603b-3b5e-4e92-aa63-baad8ae1d6a8 -v 23.26.1.0.0 -f

sleep 1200 ; odacli describe-job -i 4fc89556-2f7c-4e5b-a12f-55e32d7e748a

Job details
----------------------------------------------------------------
                     ID:  4fc89556-2f7c-4e5b-a12f-55e32d7e748a
            Description:  DB Home Patching to 23.26.1.0.0: Home ID is 9116603b-3b5e-4e92-aa63-baad8ae1d6a8
                 Status:  Success
                Created:  March 05, 2026 13:36:42 CET
                Message:

Task Name                                Start Time                               End Time                                 Status
---------------------------------------- ---------------------------------------- ---------------------------------------- ----------------
Creating wallet for DB Client            March 05, 2026 13:37:21 CET              March 05, 2026 13:37:21 CET              Success
Patch databases by RHP - [CTEST26]       March 05, 2026 13:37:21 CET              March 05, 2026 13:54:26 CET              Success
Updating database metadata               March 05, 2026 13:54:26 CET              March 05, 2026 13:54:27 CET              Success
Upgrade pwfile to 12.2                   March 05, 2026 13:54:27 CET              March 05, 2026 13:54:32 CET              Success
Set log_archive_dest for Database        March 05, 2026 13:54:32 CET              March 05, 2026 13:54:37 CET              Success
Populate PDB metadata                    March 05, 2026 13:54:38 CET              March 05, 2026 13:54:39 CET              Success
Generating and saving BOM                March 05, 2026 13:54:39 CET              March 05, 2026 13:55:08 CET              Success
TDE parameter update                     March 05, 2026 13:55:44 CET              March 05, 2026 13:55:44 CET              Success

odacli list-databases
ID                                       DB Name    DB Type  DB Version           CDB     Class    Edition  Shape    Storage  Status       DB Home ID
---------------------------------------- ---------- -------- -------------------- ------- -------- -------- -------- -------- ------------ ----------------------------------------
276bf458-db09-4c9a-9cd9-a821e5274fb0     CTEST26    SI       23.26.1.0.0          true    OLTP     EE       odb2     ASM      CONFIGURED   9c51039d-ccba-4508-b879-a81b8c18d46a

odacli delete-dbhome -i 9116603b-3b5e-4e92-aa63-baad8ae1d6a8
sleep 100 ; odacli describe-job -i 0994b96e-e174-4776-8699-f179c1d89af0

Job details
----------------------------------------------------------------
                     ID:  0994b96e-e174-4776-8699-f179c1d89af0
            Description:  Database Home OraDB23000_home1 Deletion with ID 9116603b-3b5e-4e92-aa63-baad8ae1d6a8
                 Status:  Success
                Created:  March 05, 2026 13:58:36 CET
                Message:

Task Name                                Start Time                               End Time                                 Status
---------------------------------------- ---------------------------------------- ---------------------------------------- ----------------
Setting up SSH equivalence               March 05, 2026 13:58:36 CET              March 05, 2026 13:58:36 CET              Success
Setting up SSH equivalence               March 05, 2026 13:58:36 CET              March 05, 2026 13:58:37 CET              Success
Validate DB Home                         March 05, 2026 13:58:36 CET              March 05, 2026 13:58:36 CET              Success
9116603b-3b5e-4e92-aa63-baad8ae1d6a8
for deletion
Deleting DB Home by RHP                  March 05, 2026 13:58:38 CET              March 05, 2026 13:59:15 CET              Success

odacli describe-component
System Version
--------------
23.26.1.0.0

System Node Name
----------------
dbs-04-tst

Local System Version
--------------------
23.26.1.0.0

Component                                Installed Version    Available Version
---------------------------------------- -------------------- --------------------
OAK                                      23.26.1.0.0          up-to-date

GI                                       23.26.1.0.0          up-to-date

DB {
     OraDB23000_home2                    23.26.1.0.0          up-to-date
     [CTEST26]
}

DCSCONTROLLER                            23.26.1.0.0          up-to-date

DCSCLI                                   23.26.1.0.0          up-to-date

DCSAGENT                                 23.26.1.0.0          up-to-date

DCSADMIN                                 23.26.1.0.0          up-to-date

OS                                       8.10                 up-to-date
Finally, let’s remove obsolete GI binaries:
du -hs /u01/app/23.26.*
3.9G	/u01/app/23.26.0.0
3.6G	/u01/app/23.26.1.0

rm -rf /u01/app/23.26.0.0/
Don’t forget to apply this procedure to the other DB Systems.
ConclusionApplying this patch is OK, as soon as everything is clean and under control. When patching, only use the force option when you’re sure that you know what you’re doing. As always, patching an ODA with DB Systems can take quite a big amount of time, mainly depending on the number of DB Systems.
L’article How to patch your ODA to 19.30? est apparu en premier sur dbi Blog.
Reading data from PostgreSQL into Oracle
Usually the requests we get are around getting data from Oracle into PostgreSQL, but sometimes also the opposite is true and so it happened recently. Depending on the requirements, usually real time vs. delayed/one-shot, there are several options when you want to read from Oracle into PostgreSQL. One common of way of doing this is to use the foreign data wrapper for Oracle (the post is quite old but still valid) or to use some kind of logical replication when data needs to be up to date. The question is what options do you have for the other way around? When it comes to logical replication there are several tools out there which might work for your needs but what options do you have that compare more to the Oracle foreign data wrapper when data does not need to be up to date?
Quite old, but still available and usable is ODBC and if you combine this with Oracle’s Database Heterogeneous Connectivity this gives you one option for reading from data PostgreSQL into Oracle. Initially I wanted to write that down in document for the customer, but as we like to share here, it turned out to be become a blog post available to everybody.
My target Oracle system is an Oracle Database 21c Express Edition Release 21.0.0.0.0 running on Oracle Linux 8.10:
[oracle@ora ~]$ cat /etc/os-release
NAME="Oracle Linux Server"
VERSION="8.10"
ID="ol"
ID_LIKE="fedora"
VARIANT="Server"
VARIANT_ID="server"
VERSION_ID="8.10"
PLATFORM_ID="platform:el8"
PRETTY_NAME="Oracle Linux Server 8.10"
ANSI_COLOR="0;31"
CPE_NAME="cpe:/o:oracle:linux:8:10:server"
HOME_URL="https://linux.oracle.com/"
BUG_REPORT_URL="https://github.com/oracle/oracle-linux"

ORACLE_BUGZILLA_PRODUCT="Oracle Linux 8"
ORACLE_BUGZILLA_PRODUCT_VERSION=8.10
ORACLE_SUPPORT_PRODUCT="Oracle Linux"
ORACLE_SUPPORT_PRODUCT_VERSION=8.10

[oracle@ora ~]$ sqlplus / as sysdba

SQL*Plus: Release 21.0.0.0.0 - Production on Fri Mar 6 04:14:38 2026
Version 21.3.0.0.0

Copyright (c) 1982, 2021, Oracle.  All rights reserved.


Connected to:
Oracle Database 21c Express Edition Release 21.0.0.0.0 - Production
Version 21.3.0.0.0

SQL> set lines 300
SQL> select banner from v$version;

BANNER
--------------------------------------------------------------------------------
Oracle Database 21c Express Edition Release 21.0.0.0.0 - Production

SQL>
My source system is a PostgreSQL 17.5 running on openSUSE Leap 16:
postgres@:/home/postgres/ [175] cat /etc/os-release
NAME="openSUSE Leap"
VERSION="16.0"
ID="opensuse-leap"
ID_LIKE="suse opensuse"
VERSION_ID="16.0"
PRETTY_NAME="openSUSE Leap 16.0"
ANSI_COLOR="0;32"
CPE_NAME="cpe:/o:opensuse:leap:16.0"
BUG_REPORT_URL="https://bugs.opensuse.org"
HOME_URL="https://www.opensuse.org/"
DOCUMENTATION_URL="https://en.opensuse.org/Portal:Leap"
LOGO="distributor-logo-Leap"

postgres@:/home/postgres/ [175] ip a
1: lo: <LOOPBACK,UP,LOWER_UP> mtu 65536 qdisc noqueue state UNKNOWN group default qlen 1000
    link/loopback 00:00:00:00:00:00 brd 00:00:00:00:00:00
    inet 127.0.0.1/8 scope host lo
       valid_lft forever preferred_lft forever
    inet6 ::1/128 scope host noprefixroute
       valid_lft forever preferred_lft forever
2: enp1s0: <BROADCAST,MULTICAST,UP,LOWER_UP> mtu 1500 qdisc pfifo_fast state UP group default qlen 1000
    link/ether 52:54:00:01:dd:de brd ff:ff:ff:ff:ff:ff
    altname enx52540001ddde
    inet 192.168.122.158/24 brd 192.168.122.255 scope global dynamic noprefixroute enp1s0
       valid_lft 3480sec preferred_lft 3480sec
    inet6 fe80::b119:5142:93ab:b6aa/64 scope link noprefixroute
       valid_lft forever preferred_lft forever

postgres@:/home/postgres/ [175] psql -c "select version()"
                                      version
------------------------------------------------------------------------------------
 PostgreSQL 17.5 dbi services build on x86_64-linux, compiled by gcc-15.0.1, 64-bit
(1 row)

postgres@:/home/postgres/ [175] psql -c "show port"
 port
------
 5433
(1 row)

postgres@:/home/postgres/ [175] psql -c "show listen_addresses"
 listen_addresses
------------------
 *
(1 row)

postgres@:/home/postgres/ [175] cat $PGDATA/pg_hba.conf | grep "192.168.122"
host    all             all             192.168.122.0/24        trust
So far for the baseline.
Obviously. the first step is to have a ODBC connection working from the Oracle host to the PostgreSQL host, without involving the Oracle database. For this we need unixODBC and on top of that we need the ODBC driver for PostgreSQL. Both are available as packages on Oracle Linux 8 (should be true for any distribution based on Red Hat), so that is easy to get installed:
[oracle@ora ~]$ sudo dnf install -y unixODBC postgresql-odbc
Last metadata expiration check: 0:09:06 ago on Fri 06 Mar 2026 01:38:40 AM EST.
Dependencies resolved.
=============================================================================================
 Package                        Architecture    Version             Repository          Size
=============================================================================================
Installing:
 postgresql-odbc                x86_64          10.03.0000-3.el8_6  ol8_appstream      430 k
 unixODBC                       x86_64          2.3.7-2.el8_10      ol8_appstream      453 k
Installing dependencies:
 libpq                          x86_64          13.23-1.el8_10      ol8_appstream      199 k
 libtool-ltdl                   x86_64          2.4.6-25.el8        ol8_baseos_latest   58 k

Transaction Summary
=============================================================================================
Install  4 Packages

Total download size: 1.1 M
Installed size: 3.4 M
Downloading Packages:
(1/4): libtool-ltdl-2.4.6-25.el8.x86_64.rpm                778 kB/s |  58 kB     00:00
(2/4): libpq-13.23-1.el8_10.x86_64.rpm                     2.2 MB/s | 199 kB     00:00
(3/4): postgresql-odbc-10.03.0000-3.el8_6.x86_64.rpm       4.4 MB/s | 430 kB     00:00
(4/4): unixODBC-2.3.7-2.el8_10.x86_64.rpm                  14 MB/s  | 453 kB     00:00
---------------------------------------------------------------------------------------
Total                                                      9.9 MB/s | 1.1 MB     00:00
Running transaction check
Transaction check succeeded.
Running transaction test
Transaction test succeeded.
Running transaction
  Preparing        :                                                 1/1
  Installing       : libpq-13.23-1.el8_10.x86_64                     1/4
  Installing       : libtool-ltdl-2.4.6-25.el8.x86_64                2/4
  Running scriptlet: libtool-ltdl-2.4.6-25.el8.x86_64                2/4
  Installing       : unixODBC-2.3.7-2.el8_10.x86_64                  3/4
  Running scriptlet: unixODBC-2.3.7-2.el8_10.x86_64                  3/4
  Installing       : postgresql-odbc-10.03.0000-3.el8_6.x86_64       4/4
  Running scriptlet: postgresql-odbc-10.03.0000-3.el8_6.x86_64       4/4
  Verifying        : libtool-ltdl-2.4.6-25.el8.x86_64                1/4
  Verifying        : libpq-13.23-1.el8_10.x86_64                     2/4
  Verifying        : postgresql-odbc-10.03.0000-3.el8_6.x86_64       3/4
  Verifying        : unixODBC-2.3.7-2.el8_10.x86_64                  4/4

Installed:
  libpq-13.23-1.el8_10.x86_64 libtool-ltdl-2.4.6-25.el8.x86_64 postgresql-odbc-10.03.0000-3.el8_6.x86_64 unixODBC-2.3.7-2.el8_10.x86_64

Complete!
Having that in place, lets check which configuration we need to touch:
[oracle@ora ~]$ odbcinst -j
unixODBC 2.3.7
DRIVERS............: /etc/odbcinst.ini
SYSTEM DATA SOURCES: /etc/odbc.ini
FILE DATA SOURCES..: /etc/ODBCDataSources
USER DATA SOURCES..: /home/oracle/.odbc.ini
SQLULEN Size.......: 8
SQLLEN Size........: 8
SQLSETPOSIROW Size.: 8

[oracle@ora ~]$ odbc_config --odbcini --odbcinstini
/etc/odbc.ini
/etc/odbcinst.ini
odbcinst.ini is used to configure one or more ODBC drivers, odbc.ini is used to configure the data sources. There are several examples in the driver configuration file, but we’re only interested in PostgreSQL:
[oracle@ora ~]$ grep pgodbc -A 6 /etc/odbcinst.ini
[pgodbc]
Description     = ODBC for PostgreSQL
Driver          = /usr/lib/psqlodbcw.so
Setup           = /usr/lib/libodbcpsqlS.so
Driver64        = /usr/lib64/psqlodbcw.so
Setup64         = /usr/lib64/libodbcpsqlS.so
FileUsage       = 1
For the data source get the IP address/hostname, port, user and password for your PostgreSQL database and adapt the configuration below:
[oracle@ora ~]$ cat /etc/odbc.ini
[pgdsn]
Driver = pgodbc
Description = PostgreSQL ODBC Driver
Database = postgres
Servername = 192.168.122.158
Username = postgres
Password = postgres
Port = 5433
UseDeclareFetch = 1
CommLog = /tmp/pgodbclink.log
Debug = 1
LowerCaseIdentifier = 1
If you got it all right, you should be able to establish a connection to PostgreSQL using the “isql” utility:
[oracle@ora ~]$ isql -v pgdsn
+---------------------------------------+
| Connected!                            |
|                                       |
| sql-statement                         |
| help [tablename]                      |
| quit                                  |
|                                       |
+---------------------------------------+

SQL> select datname from pg_database;
+----------------------------------------------------------------+
| datname                                                        |
+----------------------------------------------------------------+
| postgres                                                       |
| template1                                                      |
| template0                                                      |
+----------------------------------------------------------------+
SQLRowCount returns -1
3 rows fetched
SQL> quit;
[oracle@ora ~]$
This proves, that connectivity from the Oracle host to the PostgreSQL database is fine and ODBC is working properly.
Now we need to tell the Oracle Listener and the Oracle database how to use this configuration. This requires a configuration for the listener and a configuration for the heterogeneous services. For configuring the listener we need to know which configuration file the listener is using, but this is easy to find out:
[oracle@ora ~]$ lsnrctl status | grep "Listener Parameter File"
Listener Parameter File   /opt/oracle/homes/OraDBHome21cXE/network/admin/listener.ora
The content that needs to go into this file is:
SID_LIST_LISTENER =
  (SID_LIST =
    (SID_DESC =
    (SID_NAME = orcl)
    (ORACLE_HOME = /opt/oracle/product/21c/dbhomeXE/)
    )
   (SID_DESC=
    (SID_NAME = pgdsn)
    (ORACLE_HOME = /opt/oracle/product/21c/dbhomeXE/)
    (ENVS="LD_LIBRARY_PATH=/usr/local/lib:/usr/lib64:/opt/oracle/product/21c/dbhomeXE/lib/)
    (PROGRAM=dg4odbc)
   )
)
LD_LIBRARY_PATH must include the PATH to the ODBC driver, and “PROGRAM” must be “dg4odbc”.
Continue by adding the configuration for the heterogeneous services, which in my case goes here:
[oracle@ora ~]$ cat /opt/oracle/homes/OraDBHome21cXE/hs/admin/initpgdsn.ora
HS_FDS_CONNECT_INFO = pgdsn
HS_FDS_TRACE_LEVEL = DEBUG
HS_FDS_TRACE_FILE_NAME = /tmp/hs.trc
HS_FDS_SHAREABLE_NAME = /usr/lib64/libodbc.so
HS_LANGUAGE=AMERICAN_AMERICA.WE8ISO8859P15
set ODBCINI=/etc/odbc.ini
Create the connection definition in tnsnames.ora:
[oracle@ora ~]$ cat /opt/oracle/homes/OraDBHome21cXE/network/admin/tnsnames.ora
# tnsnames.ora Network Configuration File: /opt/oracle/homes/OraDBHome21cXE/network/admin/tnsnames.ora
# Generated by Oracle configuration tools.

XE =
  (DESCRIPTION =
    (ADDRESS = (PROTOCOL = TCP)(HOST = ora.it.dbi-services.com)(PORT = 1521))
    (CONNECT_DATA =
      (SERVER = DEDICATED)
      (SERVICE_NAME = XE)
    )
  )

pgdsn =
   (DESCRIPTION=
   (ADDRESS=(PROTOCOL=tcp)(HOST = ora.it.dbi-services.com)(PORT = 1521))
     (CONNECT_DATA=(SID=pgdsn))
     (HS=OK)
)
Restart the listener and make sure that the service “pgdsn” shows up:
[oracle@ora ~]$ lsnrctl stop

LSNRCTL for Linux: Version 21.0.0.0.0 - Production on 06-MAR-2026 08:22:52

Copyright (c) 1991, 2021, Oracle.  All rights reserved.

Connecting to (DESCRIPTION=(ADDRESS=(PROTOCOL=TCP)(HOST=ora.it.dbi-services.com)(PORT=1521)))
The command completed successfully
[oracle@ora ~]$ lsnrctl start

LSNRCTL for Linux: Version 21.0.0.0.0 - Production on 06-MAR-2026 08:22:53

Copyright (c) 1991, 2021, Oracle.  All rights reserved.

Starting /opt/oracle/product/21c/dbhomeXE//bin/tnslsnr: please wait...

TNSLSNR for Linux: Version 21.0.0.0.0 - Production
System parameter file is /opt/oracle/homes/OraDBHome21cXE/network/admin/listener.ora
Log messages written to /opt/oracle/diag/tnslsnr/ora/listener/alert/log.xml
Listening on: (DESCRIPTION=(ADDRESS=(PROTOCOL=tcp)(HOST=ora.it.dbi-services.com)(PORT=1521)))
Listening on: (DESCRIPTION=(ADDRESS=(PROTOCOL=ipc)(KEY=EXTPROC1521)))

Connecting to (DESCRIPTION=(ADDRESS=(PROTOCOL=TCP)(HOST=ora.it.dbi-services.com)(PORT=1521)))
STATUS of the LISTENER
------------------------
Alias                     LISTENER
Version                   TNSLSNR for Linux: Version 21.0.0.0.0 - Production
Start Date                06-MAR-2026 08:22:53
Uptime                    0 days 0 hr. 0 min. 0 sec
Trace Level               off
Security                  ON: Local OS Authentication
SNMP                      OFF
Default Service           XE
Listener Parameter File   /opt/oracle/homes/OraDBHome21cXE/network/admin/listener.ora
Listener Log File         /opt/oracle/diag/tnslsnr/ora/listener/alert/log.xml
Listening Endpoints Summary...
  (DESCRIPTION=(ADDRESS=(PROTOCOL=tcp)(HOST=ora.it.dbi-services.com)(PORT=1521)))
  (DESCRIPTION=(ADDRESS=(PROTOCOL=ipc)(KEY=EXTPROC1521)))
Services Summary...
Service "orcl" has 1 instance(s).
  Instance "orcl", status UNKNOWN, has 1 handler(s) for this service...
Service "pgdsn" has 1 instance(s).
  Instance "pgdsn", status UNKNOWN, has 1 handler(s) for this service...
The command completed successfully
Finally, create a database link in Oracle and verify that you can ask for data from PostgreSQL:
[oracle@ora ~]$ sqlplus / as sysdba

SQL*Plus: Release 21.0.0.0.0 - Production on Fri Mar 6 08:27:23 2026
Version 21.3.0.0.0

Copyright (c) 1982, 2021, Oracle.  All rights reserved.

Connected to:
Oracle Database 21c Express Edition Release 21.0.0.0.0 - Production
Version 21.3.0.0.0

SQL> create database link pglink connect to "postgres" identified by "postgres" using 'pgdsn';

Database link created.

SQL> select "datname" from "pg_database"@pglink;

datname
--------------------------------------------------------------------------------
postgres
template1
template0

SQL>
That’s it.
L’article Reading data from PostgreSQL into Oracle est apparu en premier sur dbi Blog.
Create a new GoldenGate deployment with the REST API
Is it possible to create a new GoldenGate deployment with the REST API ? This is the question I will try to answer in this blog, based on my experience with the REST API. I will dive in what is done by the oggca.sh script when adding a new deployment and see if we can replicate this with the REST API.
When I was designing the GoldenGate Python client, I realized that some endpoints are listed in the documentation but not usable in practice. This is the case of the create_connection endpoint/method, which is read-only. But is it the case for the deployment creation ?
The GoldenGate REST API provides three endpoints to manage your deployments’ life cycle:
- Create a Deployment –
POST–/services/{version}/deployments/{deployment} - Remove a Deployment –
DELETE–/services/{version}/deployments/{deployment} - Update a Deployment –
PATCH–/services/{version}/deployments/{deployment}
In the GoldenGate Python client I released, they are available through the create_deployment, remove_deployment and update_deployment methods.
The same REST API provides three endpoints to manage the services inside your deployments:
- Create a Service –
POST–/services/{version}/deployments/{deployment}/services/{service} - Remove a Service –
DELETE–/services/{version}/deployments/{deployment}/services/{service} - Update Service Properties –
PATCH–/services/{version}/deployments/{deployment}/services/{service}
In the GoldenGate Python client, these endpoints are available through the create_service, remove_service and update_service_properties methods.
oggca.sh do in the background ?
Before even attempting to create a new deployment with the REST API, I figured I would reverse engineer the configuration assistant script oggca.sh. In this section, I will use the method I described in this blog to analyze the restapi.log efficiently.
After creating a new deployment named ogg_test_02 with oggca.sh, I looked at the logs of the service manager and the deployment to see what was done in the background.
restapi_read.py /u01/app/oracle/product/ogg26sm/var/log/ restapi.ndjson
restapi_read.py /u01/app/oracle/product/ogg_test_02/var/log/ restapi_02.ndjson
Again, look at this blog if you don’t understand where this restapi_read.py script comes from. To only retrieve the non-GET requests made to the API, I use the following commands. I’m also narrowing down the search with START_EPOCH and END_EPOCH.
START_EPOCH=$(date -d "2026-02-25 18:18:01 UTC" +%s)
END_EPOCH=$(date -d "2026-02-25 18:19:02 UTC" +%s)
jq -c --argjson s "$START_EPOCH" --argjson e "$END_EPOCH" 'select(.restapi_epoch >= $s and .restapi_epoch <= $e and .request.context.verb != "GET")' restapi.ndjson | jq -r '{verb: .request.context.verb, uri: .request.context.uri, http_code: .response.context.code, request: .request.content, date: .restapi_datetime}' -c
The commands above give me the following JSON documents for the restapi.log of the service manager.
{"verb":"POST","uri":"/services/v2/deployments/ogg_test_02","http_code":"201 Created","request":{"passwordRegex":".*","environment":[{"name":"TNS_ADMIN","value":"/u01/app/oracle/network/admin"}],"oggConfHome":"/u01/app/oracle/product/ogg_test_02/etc/conf","oggVarHome":"/u01/app/oracle/product/ogg_test_02/var","oggHome":"/u01/app/oracle/product/ogg26","oggEtcHome":"/u01/app/oracle/product/ogg_test_02/etc","metrics":{"servers":[{"protocol":"uds","socket":"PMSERVER.s","type":"pmsrvr"}],"enabled":true},"oggSslHome":"/u01/app/oracle/product/ogg_test_02/etc/ssl","oggArchiveHome":"/u01/app/oracle/product/ogg_test_02/var/lib/archive","oggDataHome":"/u01/app/oracle/product/ogg_test_02/var/lib/data","enabled":true,"status":"running"},"date":"2026-02-25 18:18:09.112+0000"}
{"verb":"POST","uri":"/services/v2/deployments/ogg_test_02/services/adminsrvr","http_code":"201 Created","request":{"critical":true,"config":{"authorizationDetails":{"common":{"allow":["Digest","x-Cert","Basic","Bearer"]}},"securityDetails":{"network":{"common":{"fipsEnabled":false,"id":"OracleSSL"}}},"authorizationEnabled":false,"network":{"ipACL":[{"address":"ANY","permission":"allow"}],"serviceListeningPort":{"address":"127.0.0.1","port":7820}}},"enabled":true,"status":"running"},"date":"2026-02-25 18:18:09.126+0000"}
{"verb":"PATCH","uri":"/services/v2/deployments/ogg_test_02/services/adminsrvr","http_code":"200 OK","request":{"config":{"csrfHeaderProtectionEnabled":false,"securityDetails":{"network":{"common":{"fipsEnabled":false,"id":"OracleSSL"},"inbound":{"authMode":"clientOptional_server","role":"server","crlEnabled":false,"sessionCacheDetails":{"limit":20480,"timeoutSecs":1800},"cipherSuites":"^((?!anon|RC4|NULL|3DES).)*$","certACL":[{"name":"ANY","permission":"allow"}],"sessionCacheEnabled":false},"outbound":{"authMode":"client_server","role":"client","crlEnabled":false,"cipherSuites":"^.*$","sessionCacheEnabled":false}}},"workerThreadCount":5,"csrfTokenProtectionEnabled":true,"network":{"ipACL":[{"address":"ANY","permission":"allow"}],"serviceListeningPort":[{"address":"0.0.0.0","port":7820}]},"hstsEnabled":true,"authorizationDetails":{"movingExpirationWindowSecs":900,"common":{"allow":["Digest","x-Cert","Basic","Bearer"],"customAuthorizationEnabled":true},"useMovingExpirationWindow":false,"sessionDurationSecs":3600},"defaultSynchronousWait":30,"authorizationEnabled":true,"hstsDetails":"max-age=31536000;includeSubDomains","asynchronousOperationEnabled":true,"taskManagerEnabled":true,"legacyProtocolEnabled":false},"status":"restart"},"date":"2026-02-25 18:18:12.175+0000"}
{"verb":"POST","uri":"/services/v2/deployments/ogg_test_02/services/distsrvr","http_code":"201 Created","request":{"critical":true,"config":{"authorizationDetails":{"common":{"allow":["Digest","x-Cert","Basic","Bearer"]}},"securityDetails":{"network":{"common":{"fipsEnabled":false,"id":"OracleSSL"}}},"authorizationEnabled":true,"network":{"ipACL":[{"address":"ANY","permission":"allow"}],"serviceListeningPort":[{"address":"0.0.0.0","port":7821}]}},"enabled":true,"status":"running"},"date":"2026-02-25 18:18:12.203+0000"}
{"verb":"POST","uri":"/services/v2/deployments/ogg_test_02/services/recvsrvr","http_code":"201 Created","request":{"critical":true,"config":{"authorizationDetails":{"common":{"allow":["Digest","x-Cert","Basic","Bearer"]}},"securityDetails":{"network":{"common":{"fipsEnabled":false,"id":"OracleSSL"}}},"authorizationEnabled":true,"network":{"ipACL":[{"address":"ANY","permission":"allow"}],"serviceListeningPort":[{"address":"0.0.0.0","port":7822}]}},"enabled":true,"status":"running"},"date":"2026-02-25 18:18:12.237+0000"}
{"verb":"POST","uri":"/services/v2/deployments/ogg_test_02/services/pmsrvr","http_code":"201 Created","request":{"critical":false,"config":{"authorizationDetails":{"common":{"allow":["Digest","x-Cert","Basic","Bearer"]}},"securityDetails":{"network":{"common":{"fipsEnabled":false,"id":"OracleSSL"}}},"authorizationEnabled":true,"network":{"ipACL":[{"address":"ANY","permission":"allow"}],"serviceListeningPort":[{"address":"0.0.0.0","port":7823}]}},"enabled":true,"status":"running"},"date":"2026-02-25 18:18:12.288+0000"}
And the same commands applied to the deployment’s log give me the following:
{"verb":"POST","uri":"/services/v2/authorizations/security/ogg","http_code":"201 Created","request":{"credential":"** Masked **","info":"Oracle GoldenGate Administrator"},"date":"2026-02-25 18:18:10.147+0000"}
{"verb":"POST","uri":"/services/v2/config/files/GLOBALS","http_code":"201 Created","request":{"lines":["GGSCHEMA OGGADMIN"]},"date":"2026-02-25 18:18:13.334+0000"}
In total, six non-GET requests are passing through the API in the Service Manager, and two are passing through the administration service of the newly created deployment. Here is the detail, in the correct order.
POSTon/services/v2/deployments/ogg_test_02(create_deploymentmethod in the client) : Creation of the deployment.POSTon/services/v2/deployments/ogg_test_02/services/adminsrvr(create_servicemethod) : Creation of the Administration Service, unsecured at this point.POSTon/services/v2/authorizations/security/ogg(create_usermethod) : Creation of the Security user on the new deployment.PATCHon/services/v2/deployments/ogg_test_02/services/adminsrvr(update_service_properties) : Update on the Administration Service.POSTon/services/v2/config/files/GLOBALS(create_configuration_filemethod) : Creation of theGLOBALSparameter file, based on the input fromoggca.sh.POSTon/services/v2/deployments/ogg_test_02/services/distsrvr: Creation of the Distribution ServicePOSTon/services/v2/deployments/ogg_test_02/services/recvsrvr: Creation of the Receiver ServicePOSTon/services/v2/deployments/ogg_test_02/services/pmsrvr: Creation of the Performance Metrics Service.
If we analyze the content of the request, we see that all services are created with nearly the same configuration. The administration service is created with the following configuration:
{"critical":true,"config":{"authorizationDetails":{"common":{"allow":["Digest","x-Cert","Basic","Bearer"]}},"securityDetails":{"network":{"common":{"fipsEnabled":false,"id":"OracleSSL"}}},"authorizationEnabled":false,"network":{"ipACL":[{"address":"ANY","permission":"allow"}],"serviceListeningPort":{"address":"127.0.0.1","port":7820}}},"enabled":true,"status":"running"}And the other services with the following configuration:
{"request":{"critical":false,"config":{"authorizationDetails":{"common":{"allow":["Digest","x-Cert","Basic","Bearer"]}},"securityDetails":{"network":{"common":{"fipsEnabled":false,"id":"OracleSSL"}}},"authorizationEnabled":true,"network":{"ipACL":[{"address":"ANY","permission":"allow"}],"serviceListeningPort":[{"address":"0.0.0.0","port":7823}]}},"enabled":true,"status":"running"}}Only the authorizationEnabled and address are different, but they are corrected in the PATCH request made to the administration service. The reason is that when creating the unsecured administration service first (authorizationEnabled = False), you might not want to make it available to everyone, so you limit its access (address = 127.0.0.1).
Now that we know what the configuration assistant does, let’s try to replicate this with the REST API.
Creating a GoldenGate deployment with the REST APIIn this section, I will be using the Python client I presented in a previous blog, but you can do this with direct calls to the API, in Python or in any other language. Let’s start by listing the deployments in our current environment:
>>> from oggrestapi import OGGRestAPI
>>> ogg_client = OGGRestAPI(url="http://vmogg:7809", username="ogg", password="ogg")
Connected to OGG REST API at http://vmogg:7809
>>> ogg_client.list_deployments()
[{'name': 'ServiceManager', 'status': 'running'}, {'name': 'ogg_test_01', 'status': 'running'}, {'name': 'ogg_test_02', 'status': 'running'}]
Now, let’s try to add an ogg_test_03 deployment, following the same order given above.
ogg_client.create_deployment(
    deployment="ogg_test_03",
    data={
        "passwordRegex":".*",
        "environment":[{"name":"TNS_ADMIN","value":"/u01/app/oracle/network/admin"}],
        "oggConfHome":"/u01/app/oracle/product/ogg_test_03/etc/conf",
        "oggVarHome":"/u01/app/oracle/product/ogg_test_03/var",
        "oggHome":"/u01/app/oracle/product/ogg26",
        "oggEtcHome":"/u01/app/oracle/product/ogg_test_03/etc",
        "metrics":{"servers":[{"protocol":"uds","socket":"PMSERVER.s","type":"pmsrvr"}],"enabled":True},
        "oggSslHome":"/u01/app/oracle/product/ogg_test_03/etc/ssl",
        "oggArchiveHome":"/u01/app/oracle/product/ogg_test_03/var/lib/archive",
        "oggDataHome":"/u01/app/oracle/product/ogg_test_03/var/lib/data",
        "enabled":True,
        "status":"running"
    }
)
In the web UI, we can see the new deployment ogg_test_03 without any service at this point.
Then, create the administration service.
ogg_client.create_service(
    service='adminsrvr',
    deployment='ogg_test_03',
    data={
        "$schema": "ogg:service",
        "critical":True,
        "config":{
            "authorizationDetails":{"common":{"allow":["Digest","x-Cert","Basic","Bearer"]}},
            "securityDetails":{"network":{"common":{"fipsEnabled":False,"id":"OracleSSL"}}},
            "authorizationEnabled":False,
            "network":{"ipACL":[{"address":"ANY","permission":"allow"}],
            "serviceListeningPort":{"address":"127.0.0.1","port":7830}}
        },
        "enabled":True,
        "status":"running"
    })
We can see the new administration service in the list of services of the new deployment:

To secure the administration service, let’s create the Security user. To do this, you need to connect locally to the administration service with the port chosen above (7830). You can choose username=None and password=None, since the service is not yet secured. And for a way to do this remotely, read the blog until the end !
ogg_client_adm = OGGRestAPI(url="http://127.0.0.1:7830", username=None, password=None)

ogg_client_adm.create_user(
    user='ogg',
    role='Security',
    data={
        "credential": "your_password",
        "info": "Oracle GoldenGate Administrator"
    })
Since we are already connected, let’s add the GLOBALS file.
ogg_client_adm.create_configuration_file(
    file='GLOBALS',
    data={
        "lines": [
            "GGSCHEMA OGGADMIN"
        ]
    })
Then, we can update the administration service properties to secure the service and make it available.
ogg_client.update_service_properties(
    service='adminsrvr',
    deployment='ogg_test_03',
    data={
        "config":{
            "csrfHeaderProtectionEnabled":False,
            "securityDetails":{"network":{"common":{"fipsEnabled":False,"id":"OracleSSL"},"inbound":{"authMode":"clientOptional_server","role":"server","crlEnabled":False,"sessionCacheDetails":{"limit":20480,"timeoutSecs":1800},"cipherSuites":"^((?!anon|RC4|NULL|3DES).)*$","certACL":[{"name":"ANY","permission":"allow"}],"sessionCacheEnabled":False},"outbound":{"authMode":"client_server","role":"client","crlEnabled":False,"cipherSuites":"^.*$","sessionCacheEnabled":False}}},
            "workerThreadCount":5,
            "csrfTokenProtectionEnabled":True,
            "network":{"ipACL":[{"address":"ANY","permission":"allow"}],"serviceListeningPort":[{"address":"0.0.0.0","port":7830}]},
            "hstsEnabled":True,
            "authorizationDetails":{"movingExpirationWindowSecs":900,"common":{"allow":["Digest","x-Cert","Basic","Bearer"],"customAuthorizationEnabled":True},"useMovingExpirationWindow":False,"sessionDurationSecs":3600},
            "defaultSynchronousWait":30,
            "authorizationEnabled":True,
            "hstsDetails":"max-age=31536000;includeSubDomains",
            "asynchronousOperationEnabled":True,
            "taskManagerEnabled":True,
            "legacyProtocolEnabled":False
        },
        "status":"restart"
    })
And finally, we can add the three remaining services:
- Distribution service, on port
7831. - Receiver service, on port
7832. - Performance metrics service, on port
7833.
ogg_client.create_service(
    service='distsrvr',
    deployment='ogg_test_03',
    data={
        "$schema": "ogg:service",
        "critical":True,
        "config":{
            "authorizationDetails":{"common":{"allow":["Digest","x-Cert","Basic","Bearer"]}},
            "securityDetails":{"network":{"common":{"fipsEnabled":False,"id":"OracleSSL"}}},
            "authorizationEnabled":True,
            "network":{"ipACL":[{"address":"ANY","permission":"allow"}],
            "serviceListeningPort":{"address":"0.0.0.0","port":7831}}
        },
        "enabled":True,
        "status":"running"
    })

ogg_client.create_service(
    service='recvsrvr',
    deployment='ogg_test_03',
    data={
        "$schema": "ogg:service",
        "critical":True,
        "config":{
            "authorizationDetails":{"common":{"allow":["Digest","x-Cert","Basic","Bearer"]}},
            "securityDetails":{"network":{"common":{"fipsEnabled":False,"id":"OracleSSL"}}},
            "authorizationEnabled":True,
            "network":{"ipACL":[{"address":"ANY","permission":"allow"}],
            "serviceListeningPort":{"address":"0.0.0.0","port":7832}}
        },
        "enabled":True,
        "status":"running"
    })

ogg_client.create_service(
    service='pmsrvr',
    deployment='ogg_test_03',
    data={
        "$schema": "ogg:service",
        "critical":True,
        "config":{
            "authorizationDetails":{"common":{"allow":["Digest","x-Cert","Basic","Bearer"]}},
            "securityDetails":{"network":{"common":{"fipsEnabled":False,"id":"OracleSSL"}}},
            "authorizationEnabled":True,
            "network":{"ipACL":[{"address":"ANY","permission":"allow"}],
            "serviceListeningPort":{"address":"0.0.0.0","port":7833}}
        },
        "enabled":True,
        "status":"running"
    })
And that’s it ! You just created a functional deployment with the REST API.
Can I create a deployment from a remote server ?When running oggca.sh or the API method described above, you first create an unsecured administration service, only accessible locally. But if you want to do all of this remotely, you just have to create the unsecured administration service with .config.network.serviceListeningPort.[0].address set to 0.0.0.0 right from the start. This way, you will be able to create the Security user remotely, and add deployments to your GoldenGate setups without even connecting to the server !
L’article Create a new GoldenGate deployment with the REST API est apparu en premier sur dbi Blog.